Related
At a Glance: Policy Estimates
All Reinsurance Years
Policy Estimate functionality allows you to create estimates for existing or prospect growers for multiple crops on the same estimate. This type of estimate can be created on 2018+ RY policies for existing growers or for prospect growers that do not have any policy data in the System for the 2018+ RYs. Because of this, Policy Estimates can be created from two places within the System. Information for accessing Policy Estimates to create and maintain them as well as overviews of the places from which they're accessed are covered below. Additionally, overviews of the Policy Estimate pages themselves are given below.
Access Points for Creating Policy Estimates
Policy Estimates can be created from the Estimator tab in MPCI policies for existing growers as well as from the View Policy Estimates page for existing and prospect growers for the 2018+ RYs.
Creating a Policy Estimate for existing growers can be started from one of two places: via the View Policy Estimates page or via the Estimator tab for MPCI policies.
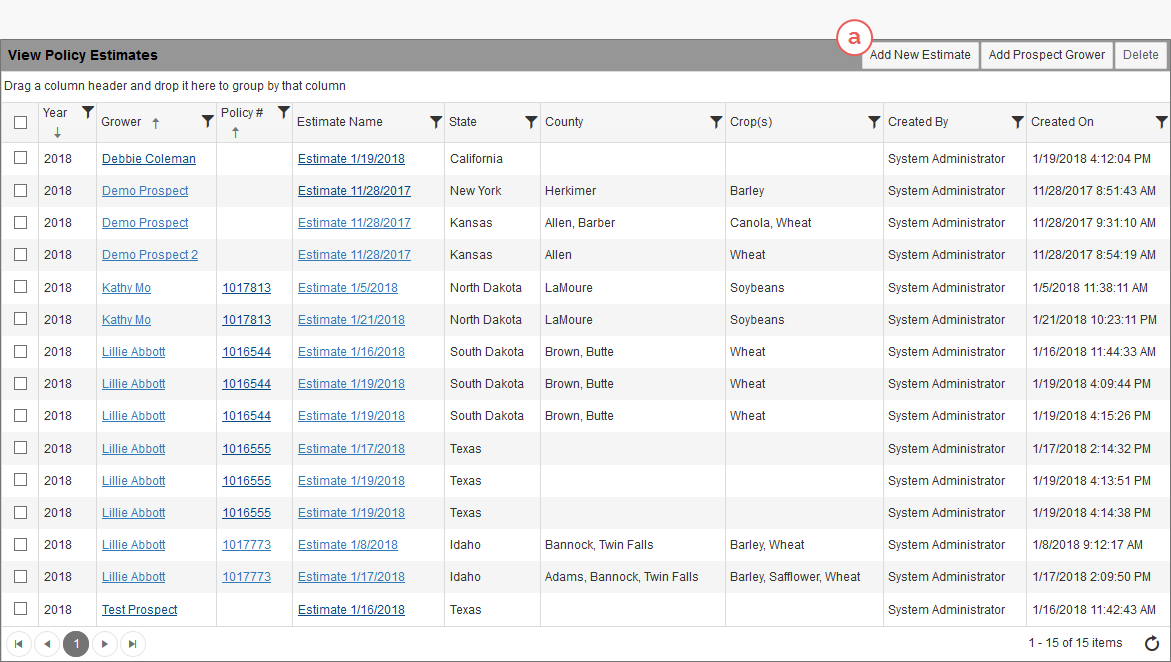
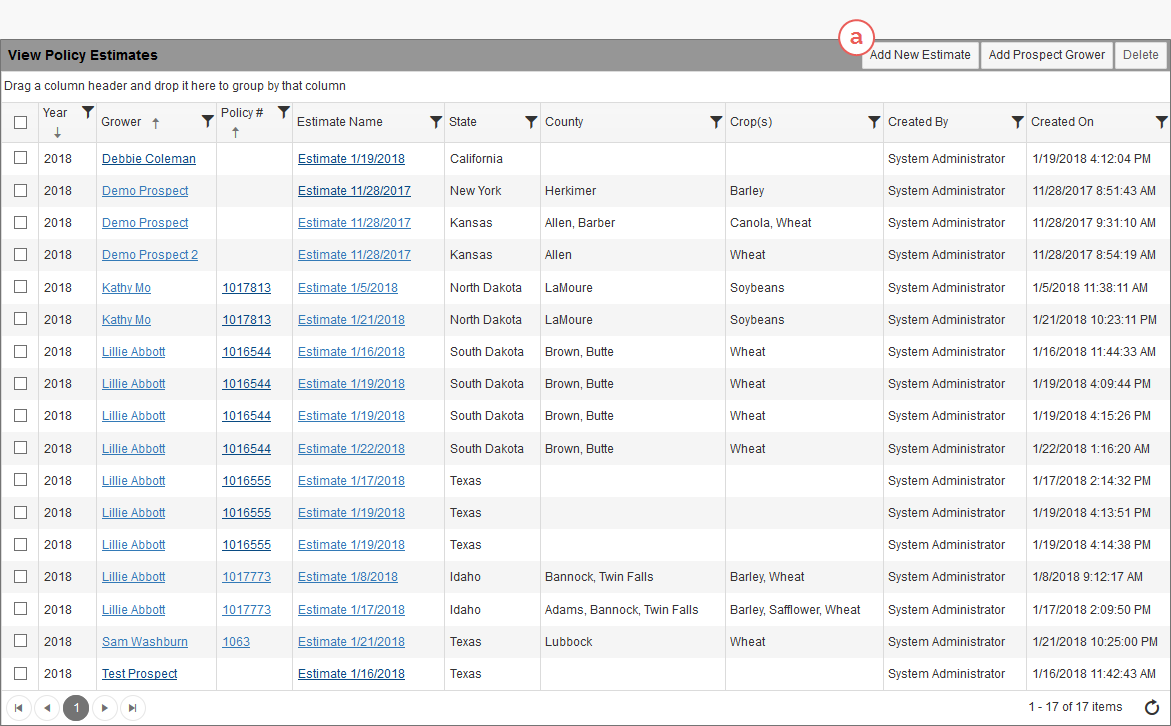
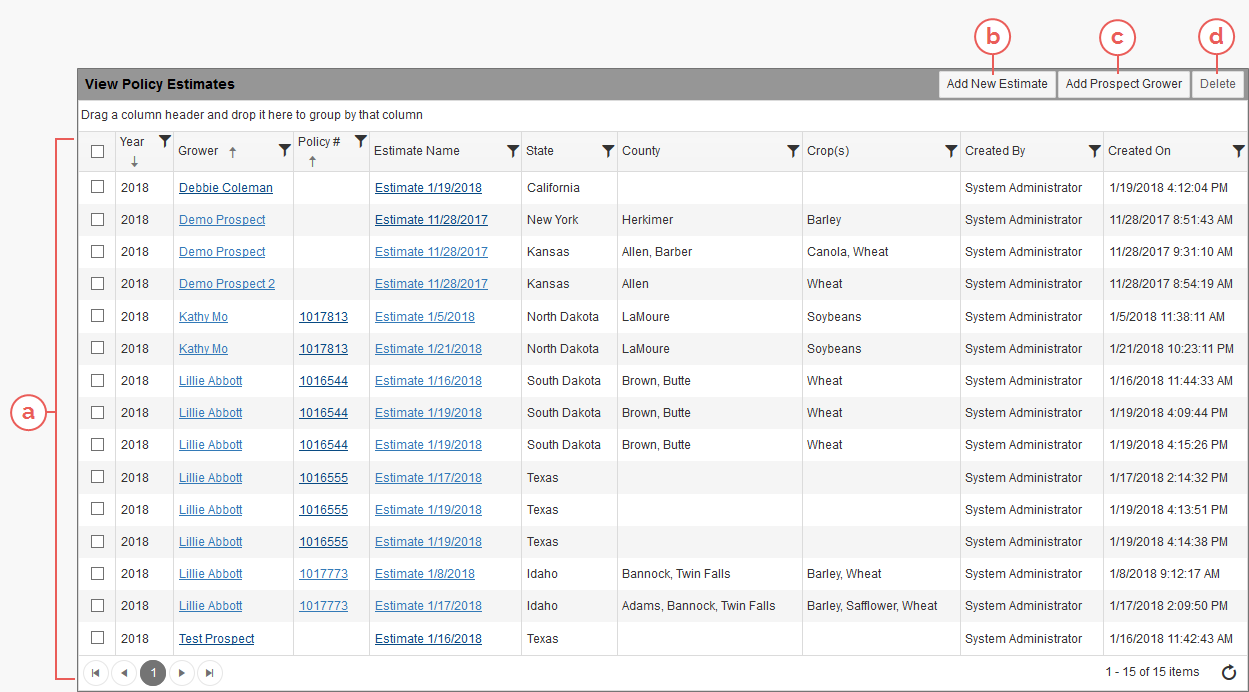
On the View Policy Estimates page (Estimator > Policy Estimates), click the Add New Estimate button (a).
Once you've run a search for a grower using the search fields on the Add New Policy Estimate page (b), click the Add button for the grower/policy you want to create a Policy Estimate for (c). The Policy Estimate Detail Lines page opens and you can begin the process of creating a Policy Estimate for an existing grower using the steps found in "Create a Policy Estimate for an Existing Grower".
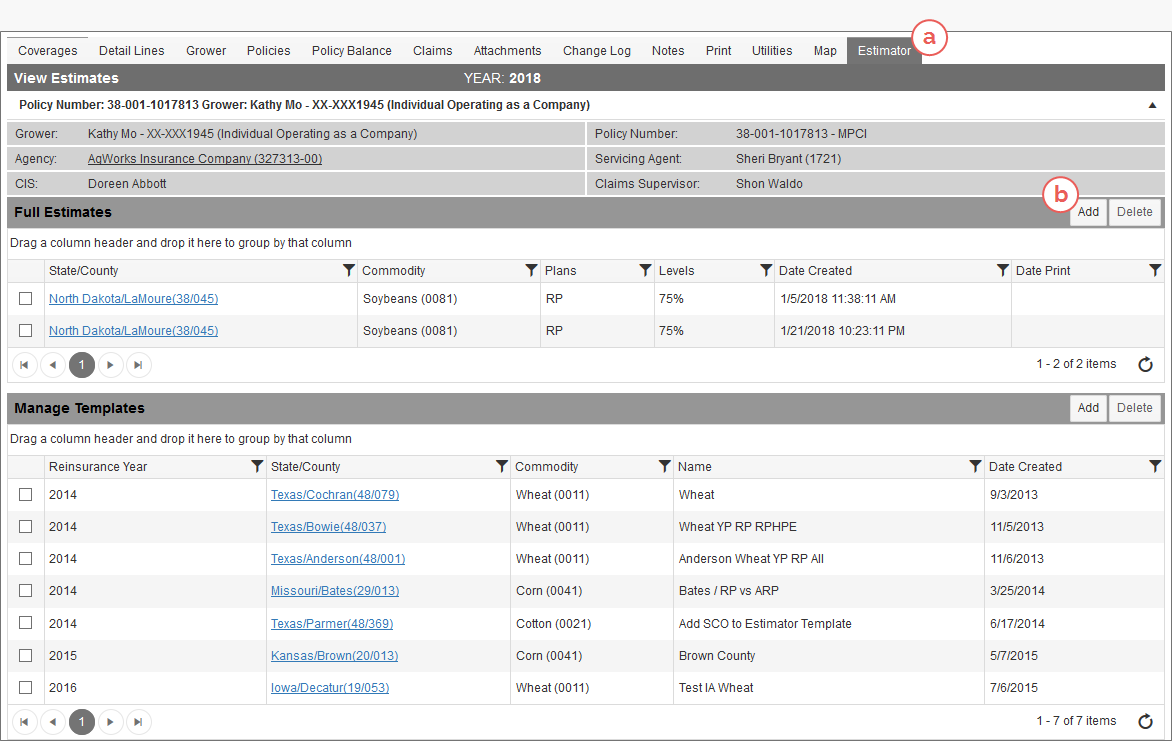
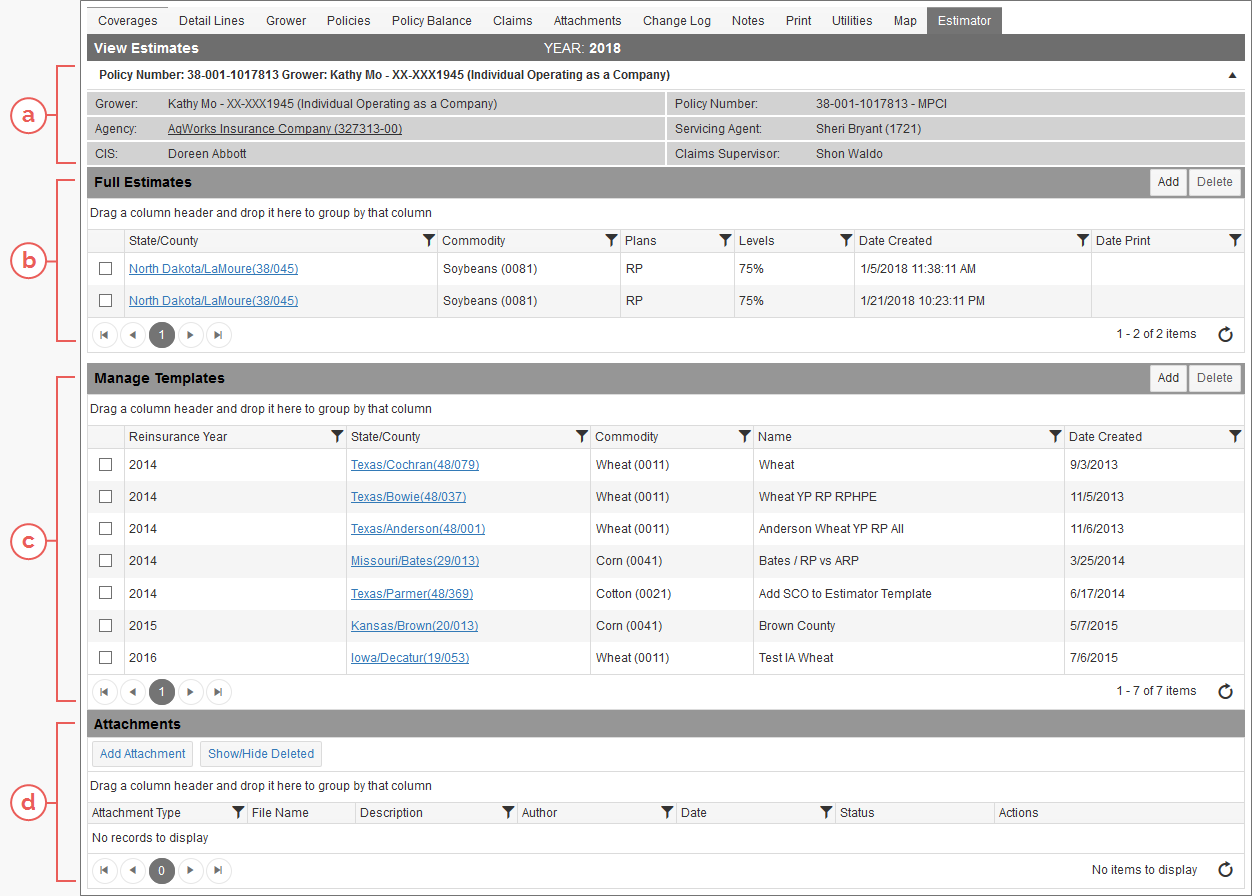
Locate and open an MPCI policy in the 2018+ RYs. Then, select the Estimator tab (a). Once on the View Estimates page of the Estimator tab, in the Full Estimates section, click the Add button (b). The Policy Estimate Detail Lines page opens and you can begin the process of creating a Policy Estimate for an existing grower using the steps found in "Create a Policy Estimate for an Existing Grower".
The process for creating a Policy Estimate for a prospect grower can only be started from the View Policy Estimates page; however, from this page there are two access points: via the Add Prospect Grower button or via the Add New Estimate button.
NOTE: Once a prospect grower is added via one of the options below, they will show up in the grower search on the Add New Policy Estimate page, and an estimate can be built for them.
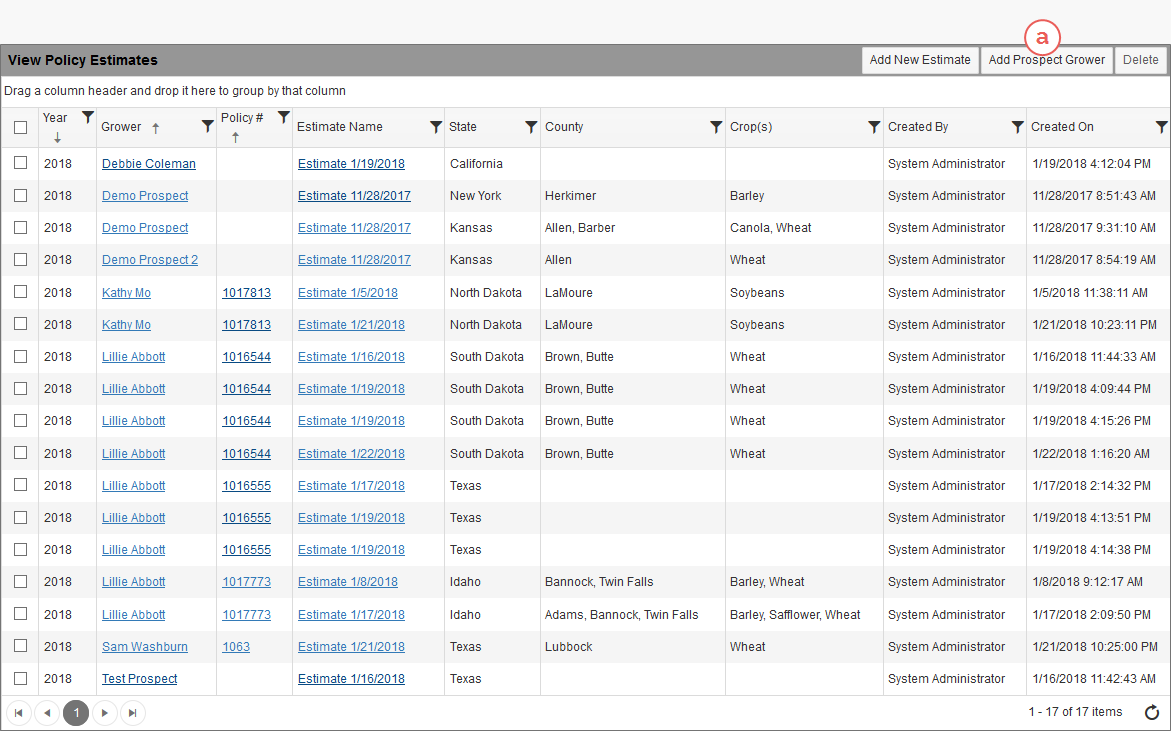
On the View Policy Estimates page (Estimator > Policy Estimates), click the Add Prospect Grower button (a). The Add Prospect Grower page opens and you can begin the process of creating a Policy Estimate for the prospect grower using the steps found in "Create a Policy Estimate for a Prospect Grower".
This method of creating a Policy Estimate for a prospect grower is recommended if the grower may already exist in the System. If a search using the fields on the Add New Policy Estimate page (which opens as a result of the action described in the paragraph below) yields no results, you can add the grower as a prospect from this page without having to go back to the View Policy Estimates page.
On the View Policy Estimates page (Estimator > Policy Estimates), click the Add New Estimate button (a).
On the Add New Policy Estimate page that opens, click the Add Prospect Grower button (b). The Add Prospect Grower page opens and you can begin the process of creating a Policy Estimate for the prospect grower using the steps found in "Create a Policy Estimate for a Prospect Grower".
Access Points for Viewing/Maintaining Policy Estimates
Policy Estimates can be viewed, edited, and deleted from the Estimator tab in MPCI policies for existing growers as well as from the View Policy Estimates page for existing and prospect growers for the 2018+ RYs. See "View a Policy Estimate" and "Delete a Policy Estimate" for additional help with viewing and deleting Policy Estimates.
Access Point Layouts
On the View Policy Estimates page (Estimator > Policy Estimates), you can add, view, edit, and delete any Policy Estimates you have created for any grower for the 2018+ RYs. From here, you can create Policy Estimates for existing growers (by policy) or for prospect growers (without having to first add them as a prospect grower from a different place in the System).
The View Policy Estimates page consists of the following:
| a. | Grid: The grid displays all existing Policy Estimates you've created. Available details for each Policy Estimate include the Year (e.g., Reinsurance Year), Grower, Policy # (if applicable), Estimate Name, State, County (if available), Crops (if available), Created By name, and the date the Policy Estimate was Created On. The values in the following columns are hyperlinked: |
| i. | Grower: Clicking a hyperlink in this column will open the Grower record tab for the associated grower. |
| ii. | Policy #: Clicking a hyperlink in this column will open the associated MPCI policy on the Coverages tab. |
| iii. | Estimate Name: Clicking a hyperlink in this column will open the Policy Estimate Detail Lines page for the associated Policy Estimate. From this page, you can view/edit the Policy Estimate. |
| b. | Add New Estimate Button: Clicking this button opens the Add New Policy Estimate page where you can search for a grower/policy to create a Policy Estimate for or begin the process of creating a Policy Estimate by adding a prospect grower. |
| c. | Add Prospect Grower Button: Clicking this button opens the Add Prospect Grower page where you can begin the process of creating a Policy Estimate for a prospect grower. |
| d. | Delete Button: After selecting the checkboxes for the Policy Estimates you want to delete in the grid, clicking this button will delete and remove them from the grid. |
The MPCI Policy Estimator tab is an already-existing tab where Full Estimates are created from for 2017 and prior RYs. For the 2018+ RYs, from this tab, you can now add, view, and delete Policy Estimates as well as add, manage, and delete templates. Attachments can also be added at this level.
The View Estimates page is comprised of 4 sections:
| a. | The policy header: This shows the Grower, Policy Number, Agency, Servicing Agent, Crop Insurance Specialist/Underwriter, and Claims Supervisor for the policy. |
| b. | Full Estimates section: Any Policy Estimates created for a policy in a given Reinsurance Year are displayed here. Policy Estimates can also be added, edited, and deleted from this section. |
| c. | Manage Templates section: When creating Policy Estimates, templates are available to expedite the quoting process. This section displays all the templates you have created. Templates are saved at the individual user level, so you can only see the templates you have created. Templates can also be added, edited, or deleted from this section. |
| d. | Attachments section: This allows you to attach any information relevant to a grower’s estimates to the grower's record. |
In each of these sections, you can manage the estimates, templates, or attachments using the hyperlinks in the grids and each section’s respective Add or Delete buttons.
Policy Estimates consist of three main pages: Policy Estimate Detail Lines, Policy Estimate Scenarios, and Policy Estimate Calculations. Each page allows you to do different things in the estimate and are accessed in the order given above.
Coverages and detail lines for a Policy Estimate are found in the grid on the Policy Estimate Detail Lines page of the estimate. This is the first page of the Policy Estimate and will open whenever a Policy Estimate is selected to view.
NOTE: If a Policy Estimate is being created for an existing grower, the first page that opens will be this page. However, if a Policy Estimate is being created for a prospect grower, the first page that opens will be the Add Prospect Grower page followed by the Policy Estimate Detail Lines page.
From this page, you can add and edit coverages on an estimate as well as add, edit, and, if applicable, delete detail lines inside coverages on the estimate. This page is also where you select which detail lines/units you want to use in building scenarios for the estimate. Additionally, this page is equipped with validations for fields in the detail lines; these are covered in greater depth in "Validations" below.
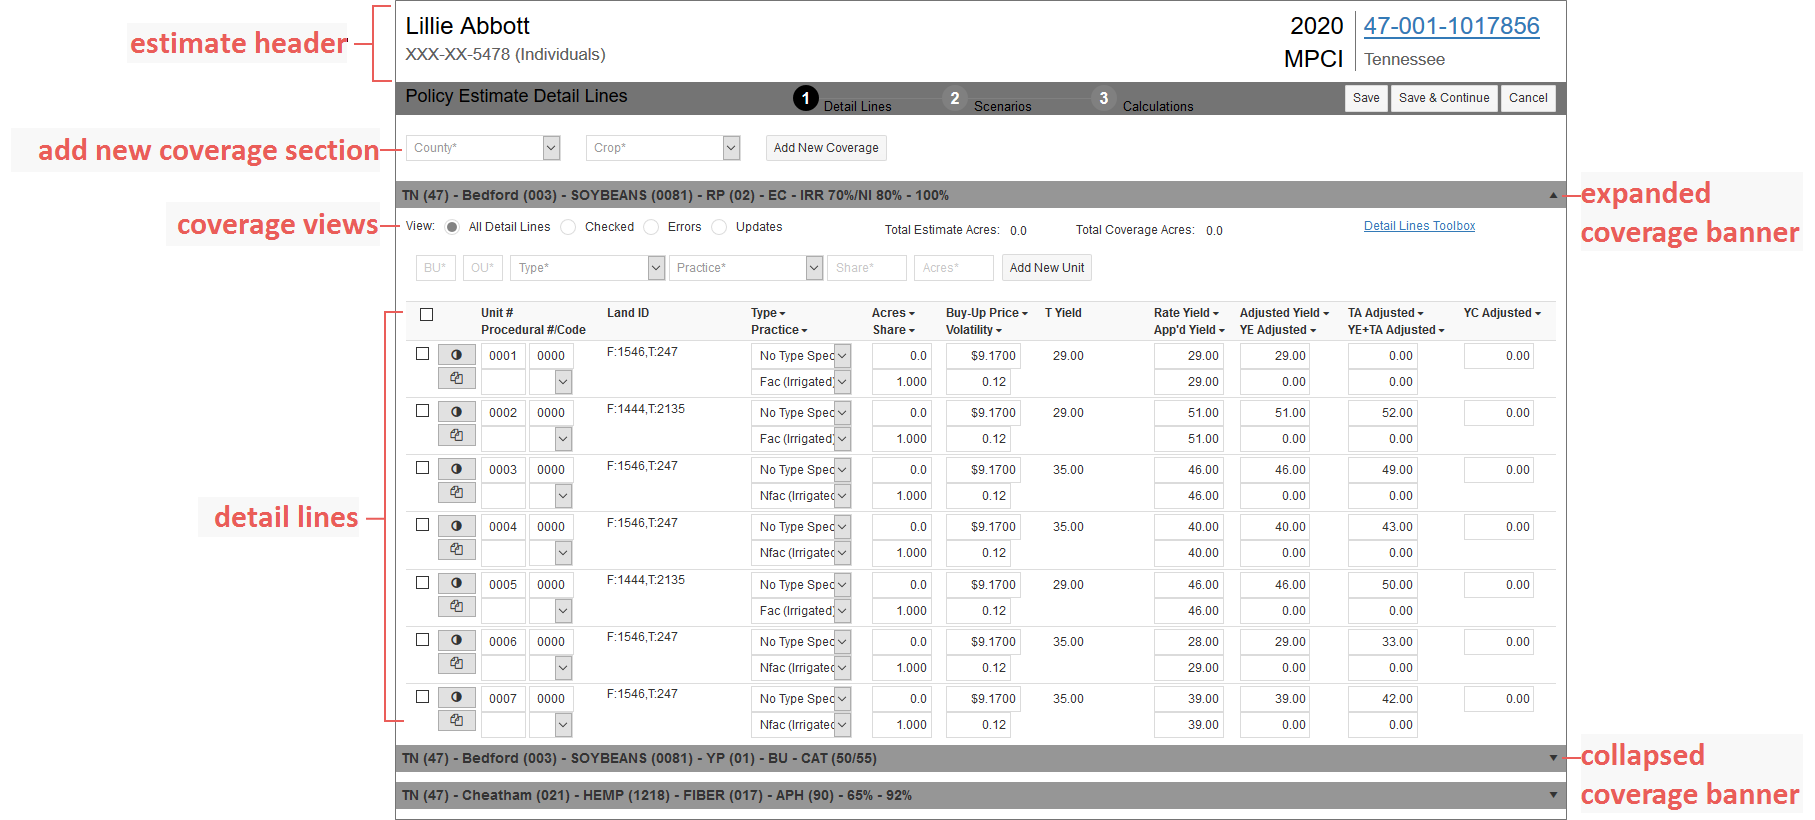
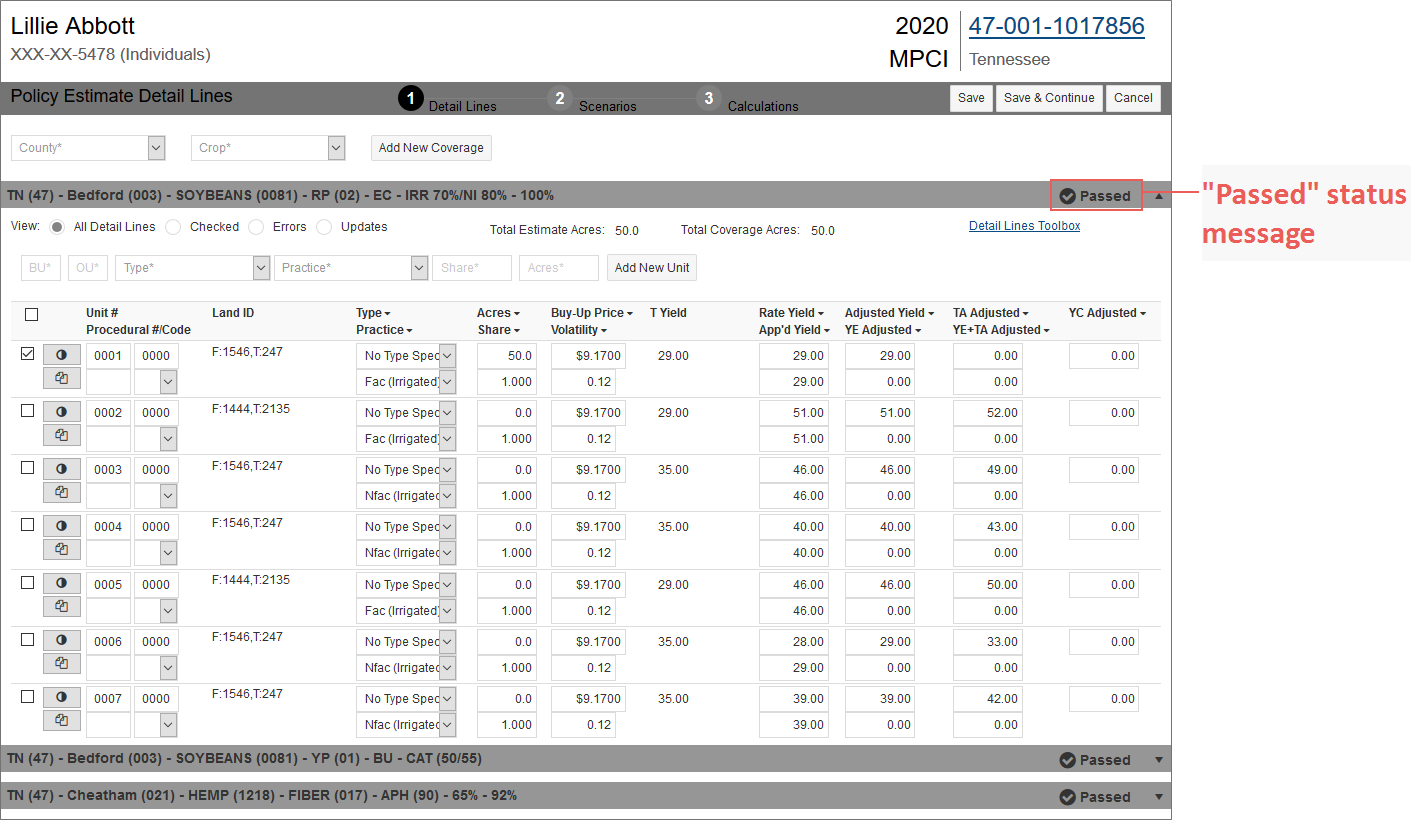
The Policy Estimate Detail Lines page contains a grid, which includes the following:
| • | Estimate Header: Displays at the top of the page; shows the grower name and their masked TIN, the Reinsurance Year, an indicator that the page/record is an estimate (if the estimate is for a prospect grower), the policy number associated with the estimate (if the estimate is for an existing grower), and the state. If the policy number displays, it displays as a link that, when clicked, will direct the user to the Policy Estimate page for the estimate. If the estimate indicator displays, it displays as a link that, when clicked, will direct the user to the Policy Estimate page for the estimate. |
| • | Add New Coverage Section: Allows you to add a new coverage to the estimate. |
| • | Coverage Banner: Each coverage on the estimate is shown on the page in a collapsible banner format. Only one coverage can be expanded at a time, and opening one coverage collapses the previously-opened coverage. |
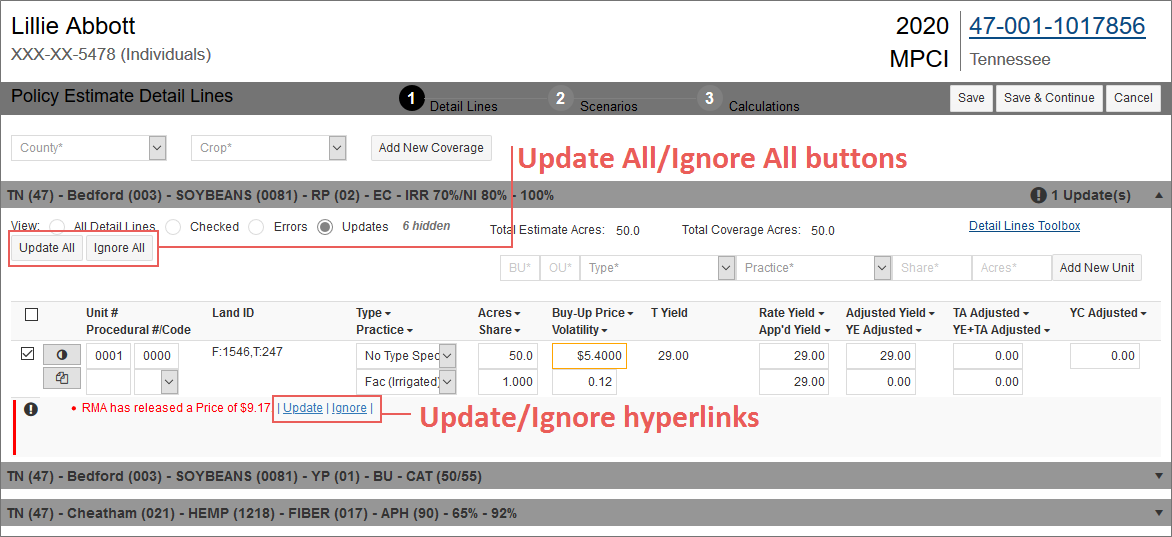
| • | Coverage Views: Four coverage views—All Detail Lines, Checked, Errors, and Updates—are available inside each coverage on the estimate. The default view is All Detail Lines. If you have selected the checkboxes to the left of specific detail lines and only want to see those lines in the expanded coverage, select the Checked view. If there are any errors on detail lines on a coverage, you can select the Errors view to see only those lines in error. If there are any updates available for fields on detail lines, you can select the Updates view to see only those lines with updates; when this view is selected, two additional buttons—Update All and Ignore All—display near the top of the coverage so you can update all lines with the updates available or ignore all updates on all lines. |
NOTE: Errors and updates for detail lines are discussed further in "Validations" below.
| • | Add New Detail Line Section: Allows you to add a new detail line to a coverage on the estimate. |
| • | Detail Lines: Each detail line inside of a coverage displays the following: |
| • | A status indicator that visually represents whether or not a line has had any changes made to it. When no changes have been made to the detail line, the "unmodified" indicator displays. All lines will display as "unmodified" when you first enter the Policy Estimate. When changes have been made to the detail line, the status indicator automatically changes from "unmodified" to "modified" so you can easily keep track of detail lines that contain new or changed values; |
| • | A Duplicate Line button ( ) to create a copy of the line; ) to create a copy of the line; |
| • | Fields to add values to or update information on the line; |
| • | Copy Down buttons ( ) to the right of each field name in the column headers that allow you to copy down the first detail line's field value to all other detail lines in the coverage; ) to the right of each field name in the column headers that allow you to copy down the first detail line's field value to all other detail lines in the coverage; |
| • | If a detail line was added from the Policy Estimate Detail Lines page (i.e., wasn't pulled in from an associated policy), a Delete Line button ( ) to the left of the line to delete the line; and ) to the left of the line to delete the line; and |
NOTE: A Delete All button is also available in coverages on Policy Estimates for prospect growers and in manually-added coverages on Policy Estimates for existing growers. This button allows you to delete all detail lines inside the coverage as well as the coverage itself.
| • | Detail line checkboxes that allow you to select which detail lines you want to use for building scenarios for the estimate. |
| • | A Detail Lines Toolbox link that, when clicked, open the Detail Lines Toolbox popup. With this toolbox, you can apply an acres value to all detail lines on the coverage at one time. This toolbox allows you to apply this year's, last year's, or the last actual acres to all detail lines on the coverage OR an estimated acres value for either all detail lines or all zero AR lines on the coverage. This toolbox can also be used to apply this year's or last year's Price and Volatility and/or this year's or last year's Yields to all detail lines on the coverage at one time. |
Also, like the Fast Edit AR and PR grids, the fields for each detail line can be tabbed through while keying.
On the Policy Estimate Detail Lines page, there are two types of validation messages you may see—errors and updates—and each is triggered and handled in different ways.
Errors
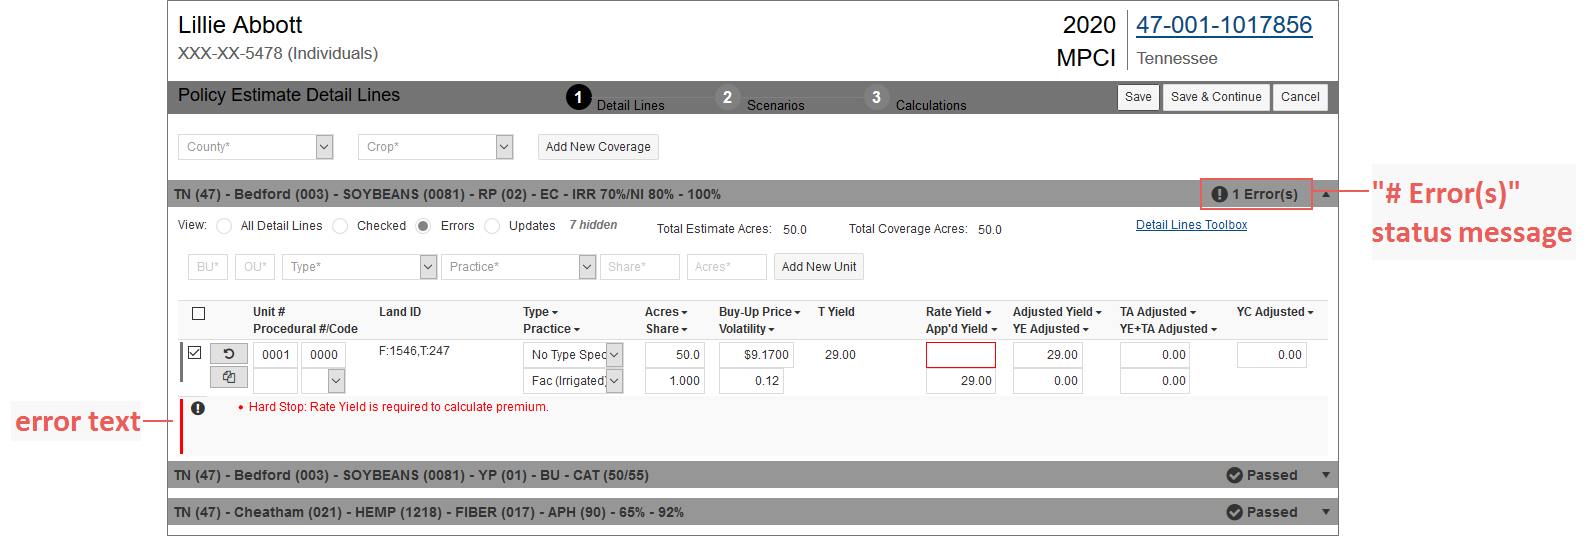
Errors are triggered in one of two ways: either by initiating a save of the Policy Estimate Detail Lines page or by tabbing through fields (e.g., if you are in the Rate Yield field and do not enter a value before tabbing to the next field, an error will trigger for that field).
When an error exists on a detail line, an error message will display below the detail line with error text that explains what fields are in error, and the coverage banner for the coverage that contains the detail line(s) with the error will update with a status message of "# Error(s)" where the # is how many errors are on the coverage.
To view only the detail lines with errors in a coverage, you can select the Errors option in the View field of the coverage. When done clearing the errors, you can select the All Detail Lines option in the View field of the coverage to view all detail lines again.
When all errors have been cleared in a coverage, clicking one of the save options on the Policy Estimate Detail Lines page will validate the coverage and display "Passed" in the coverage banner indicating that the detail lines in the coverage are free of errors and updates.
Updates
Update messages are triggered in one of two ways: either by opening an existing Policy Estimate for an existing or prospect grower where details have changed on the detail lines since they were first added to the estimate (e.g., RMA has released new values for Buy-Up Price or Volatility; the acres were updated for the detail line on the associated policy) or by updating a field on a detail line where a different value is available in RMA ADMs or the associated policy and initiating a save of the page.
When an update exists for a field(s) on a detail line, an update message will display below the detail line with update text that explains what fields have updates available, and the coverage banner for the coverage that contains the detail line(s) with the update will update with a status indicator of "# Update(s)" where the # is how many updates are available on the coverage.
To clear an update message, you can do one of two things:
| • | If you want to apply all or ignore all the updates to the applicable fields on the applicable lines of a coverage, you can click either the Update All button or the Ignore All button, respectively, near the top of the coverage. |
| • | If you want to apply or ignore individual update messages for each detail line, click either the Update or Ignore hyperlinks, respectively, in the update message that displays below the detail line. |
To view only the detail lines with updates pending in a coverage, you can select the Updates option in the View field of the coverage. When done clearing the updates, you can select the All Detail Lines option in the View field of the coverage to view all detail lines again.
When all update messages have been cleared in a coverage, if no other errors exist, clicking one of the save options on the Policy Estimate Detail Lines page will validate the coverage and display "Passed" in the coverage banner indicating that the detail lines in the coverage are free of errors and updates.
The Policy Estimate Scenarios page is the second page of Policy Estimates. On this page, you can select the scenario options for each coverage you selected detail lines in on the previous page of the estimate (i.e., the Policy Estimate Detail Lines page). Additionally, you can select which coverages you want to include in the estimate calculations if you decide you only want to view calculations for specific coverages displayed on the page.
This page is also equipped with validations for fields in the coverage sections; these are covered in greater depth in "Validations" below.
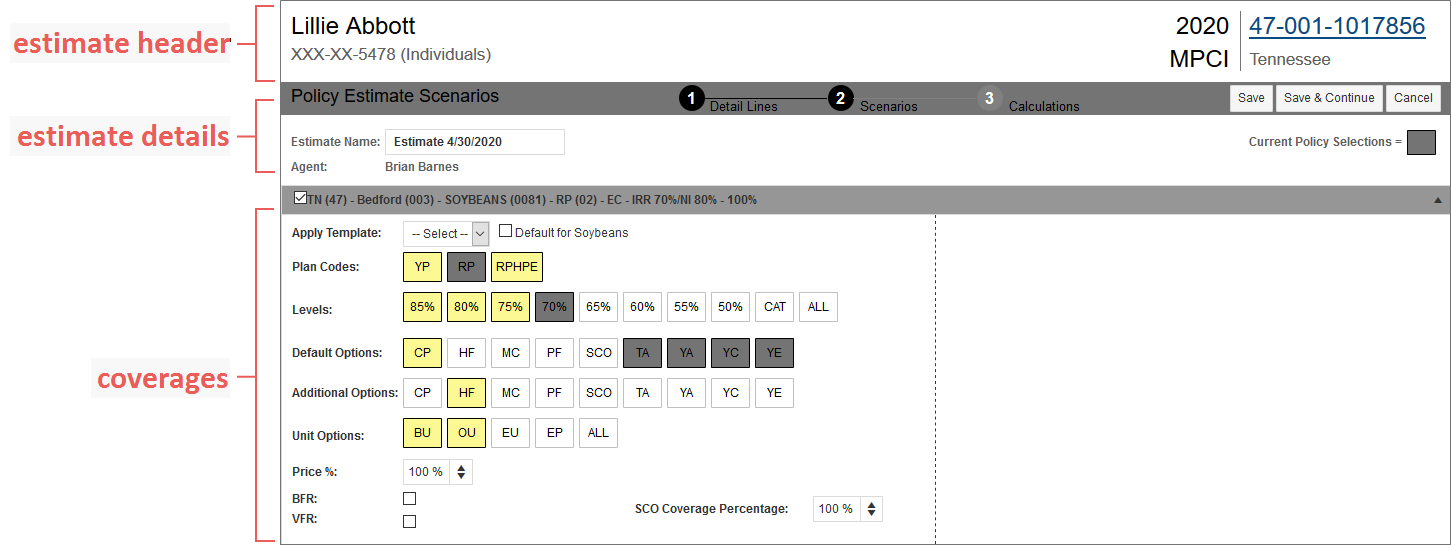
The Policy Estimate Scenarios page consists of the following:
| • | Estimate Header: Displays at the top of the page; shows the grower name and their masked TIN (if available), the Reinsurance Year, an indicator that the page/record is an estimate (if the estimate is for a prospect grower), the policy number associated with the estimate (if the estimate is for an existing grower), and the state. If the policy number displays, it displays as a link that, when clicked, will direct the user to the Policy Estimate page for the estimate. If the estimate indicator displays, it displays as a link that, when clicked, will direct the user to the Policy Estimate page for the estimate. |
| • | Estimate Details: Displays just below the page header and allows you to update the name of the estimate and the agent associated with the estimate (for prospect growers), if needed. |
| • | Coverages: Displays each coverage that had at least one detail line selected on the Policy Estimate Detail Lines page in separate collapsible sections. Each coverage section displays the following: |
| • | A template selection dropdown as well as a checkbox to set that template as the default for any other coverages on the estimate with the same crop as the one the checkbox is selected on (regardless of county); |
| • | Scenario option fields to determine which calculations will be done for each coverage when the estimate is calculated; and |
NOTE: If the Policy Estimate is for an existing grower, any coverages that are from the associated policy (i.e., weren't added manually by you on the Policy Estimate Detail Lines page) will show the currently-selected coverage options from the policy in the scenario option fields; these selections will display with a background color specific for each AIP. Any additional options selected in the scenario option fields will display with a yellow background when selected.
| • | Coverage checkboxes that allow you to select which coverages you want to include in the estimate calculations. |
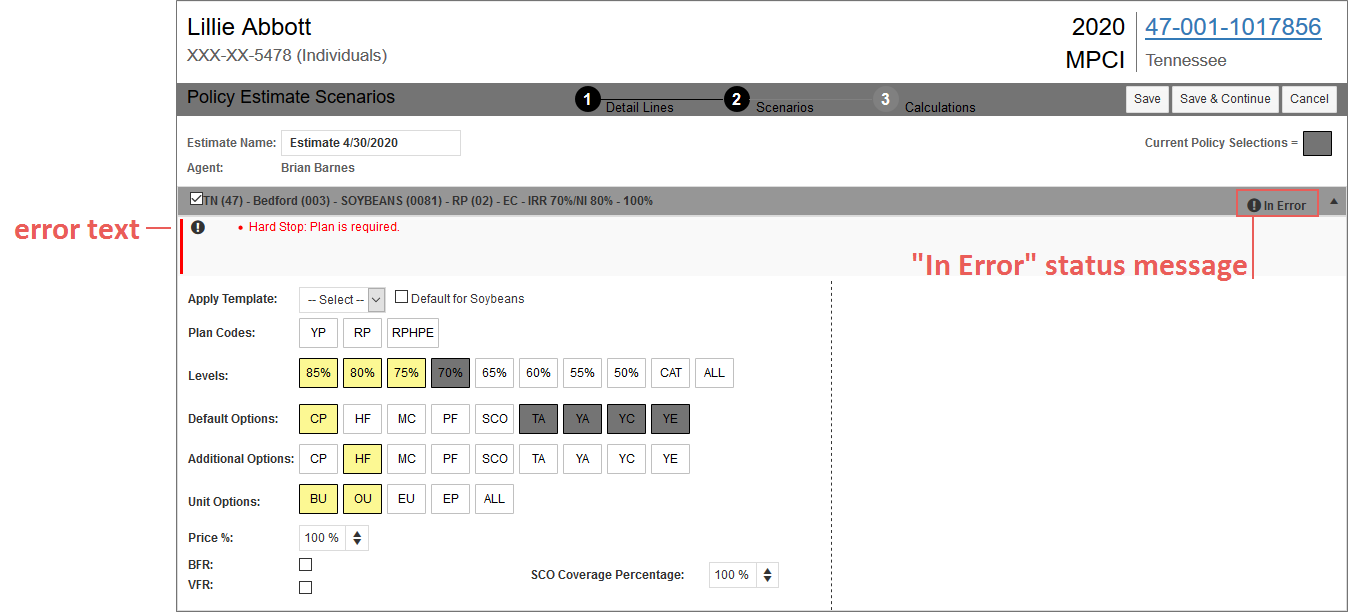
On the Policy Estimate Scenarios page, coverages are validated at save. If an error exists on a coverage, an error message will display near the top of the coverage with error text that explains what fields are in error, and the coverage banner for the coverage that contains the fields in error will update with a status message of "In Error".
When all errors have been cleared in all coverages, you can click Save on the Policy Estimate Scenarios page to re-validate the coverages. If no further errors exist, the "In Error" status message will be removed from the coverage banners.
Each coverage on the Policy Estimate Scenarios page must be error free before calculations can be run for the estimate.
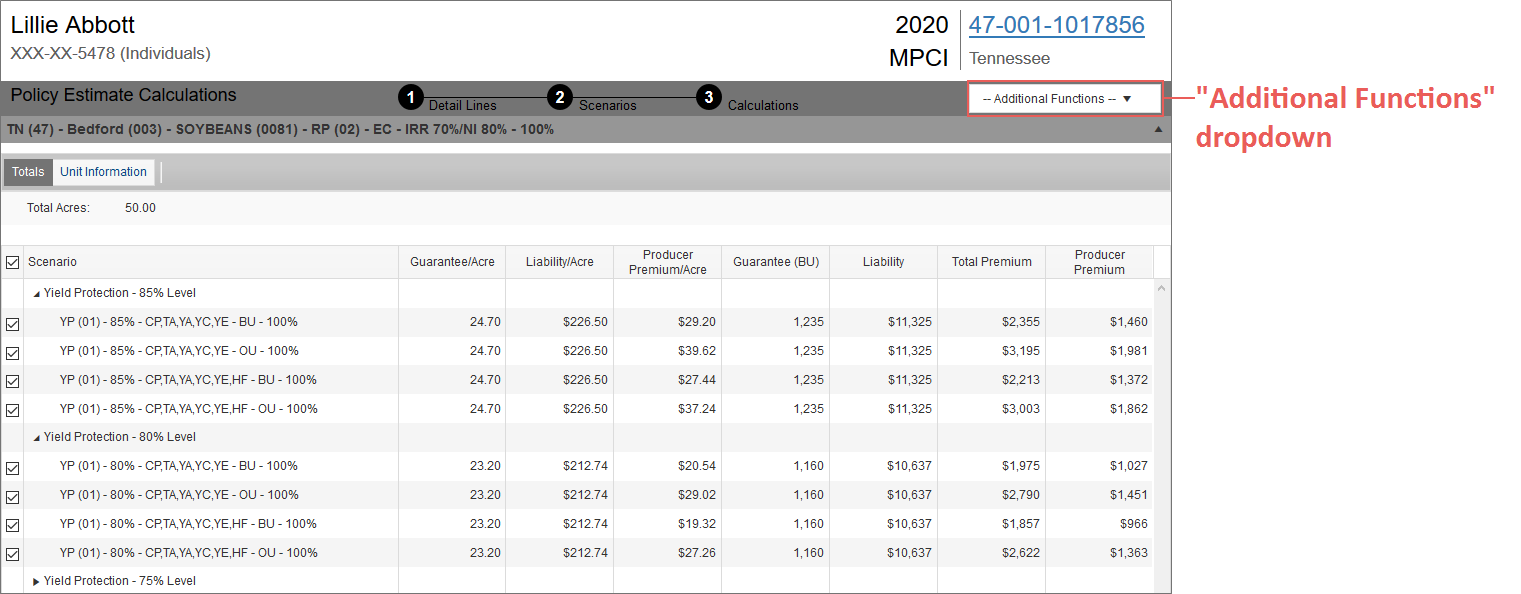
The Policy Estimate Calculations page is the third page of Policy Estimates. On this page, you can view the scenario calculations for each of the coverages you selected on the Policy Estimate Scenarios page within expandable and collapsible coverage banners. From this page, you can compare the scenario calculations for a coverage on either the Totals or Unit Information tabs of the coverage. You can also review the scenario calculations for all coverages on the page by printing or exporting the Policy Estimate Scenarios report.
The Totals and Unit Information tabs available inside coverages on the Policy Estimate Calculations page are where you can view calculated coverage scenarios, select calculated coverage scenarios to compare, and view charts of the selected calculated coverage scenarios. The functionality available on these tabs is covered in greater detail in "Compare Policy Estimate Scenarios".
The Policy Estimate Calculations page provides different options for printing and exporting the calculated estimate scenarios for a Policy Estimate via the Additional Functions dropdown.
The Additional Functions dropdown has the following options:
| • | Export Data: When this option is selected, the System begins exporting the calculated estimate scenarios data of the Policy Estimate to a non-formatted Excel workbook that downloads to your browser window. |
NOTE: This option may not be available for all users.
| • | Export Estimate: When this option is selected, the System begins exporting the calculated estimate scenarios of the Policy Estimate to a formatted Excel workbook that downloads to your browser window. |
| • | Print Forms: When this option is selected, the Print Forms popup opens. On this popup, the user select the form(s) to print with the calculated estimate scenarios of the Policy Estimate. Once forms are selected and form options are selected, the user can click Print. The System will begin to create a PDF of the forms that downloads to your browser. For more information on the Policy Estimate Scenarios report, see "Understand the Policy Estimate Scenarios Report". |
NOTE: The Policy Change form is only available for existing growers. If the grower is a prospect, the only form that displays on the Print Forms popup is the Policy Estimate.
| • | Return to Estimates: When this option is selected, the user is returned to the View Policy Estimates page. |
| • | Return to Policy: When this option is selected, the user is returned to the policy the Policy Estimate was created for. |
