Related
Create a Policy Estimate for a Prospect Grower
All Reinsurance Years
Creating a Policy Estimate for prospect growers, unlike existing growers, begins with adding prospect grower details from the View Policy Estimates page (Estimator > Policy Estimates). The procedure below is broken into the different stages of the Policy Estimate. The stages must be completed in order but can be completed at different times, if needed.
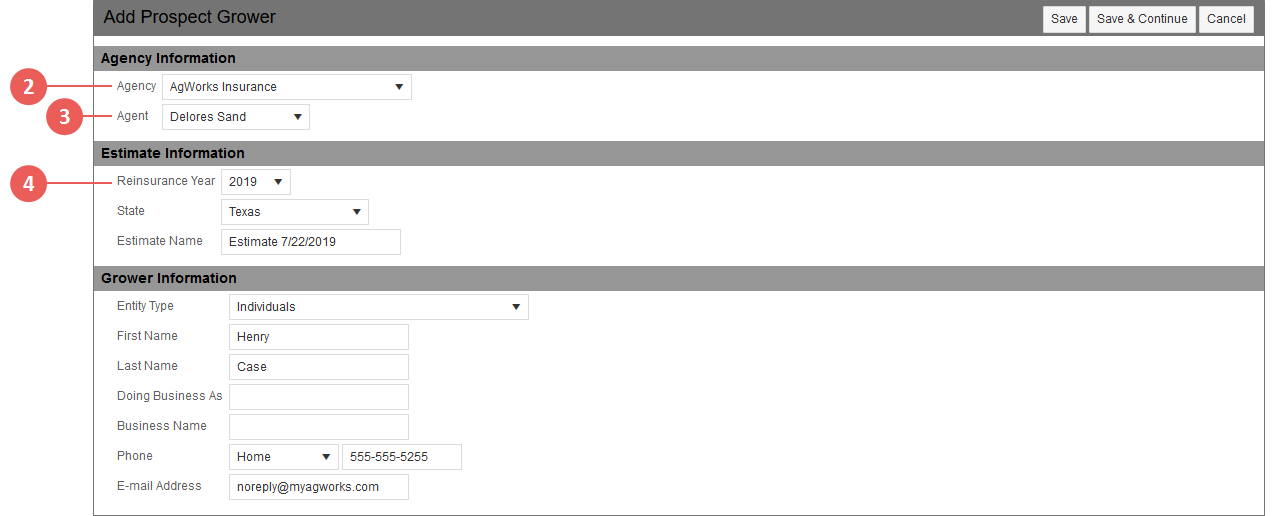
| 1. | From one of the access points shown in the "For Prospect Growers" section of "At a Glance: Policy Estimates", open the Add Prospect Grower page. |
| 2. | In the Agency Information section, from the Agency dropdown, select the agency the prospect grower is associated with. |
| 3. | From the Agent dropdown, select the agent the prospect grower is associated with. |
| 4. | In the Estimate Information section, from the Reinsurance Year dropdown, select the RY for the estimate. |
NOTE: Only the 2018+ RYs will be available to select from in this dropdown.
| 5. | From the State dropdown, select the state for the estimate. |
| 6. | The Estimate Name field is pre-filled with the word "Estimate" and the current System date (e.g., Estimate 1/22/2018). If you want to name the estimate differently, replace the pre-filled text with the text of your choice. |
| 7. | In the Grower Information section, from the Entity Type dropdown, select the entity type for the prospect grower. |
| 8. | If applicable, in the First Name field, type the first name of the prospect grower. |
| 9. | If applicable, in the Last Name field, type the last name of the prospect grower. |
| 10. | If applicable, in the Doing Business As field, type the name the prospect grower is doing business as. |
| 11. | If applicable, in the Business Name field, type the business name of the prospect grower. |
NOTE: A prospect grower must have either a First/Last Name or a Business Name.
| 12. | In the Phone field, from the dropdown, select the type of phone number available for the prospect grower. Then, in the textbox to the right of the dropdown, type the phone number. The phone number must include an area code (e.g., 555-555-5555). |
| 13. | In the E-mail Address field, type the email address of the prospect grower. |
| 14. | Once done entering prospect grower details, click Save & Continue. The prospect grower information is saved to the System and the Policy Estimate Detail Lines page opens so you can begin building the Policy Estimate for the prospect grower. |
NOTE: If you want to save the prospect grower information entered but still need to edit the information on the Add Prospect Grower page before moving on to building the Policy Estimate, you can click Save, instead of Save & Continue, to do so.
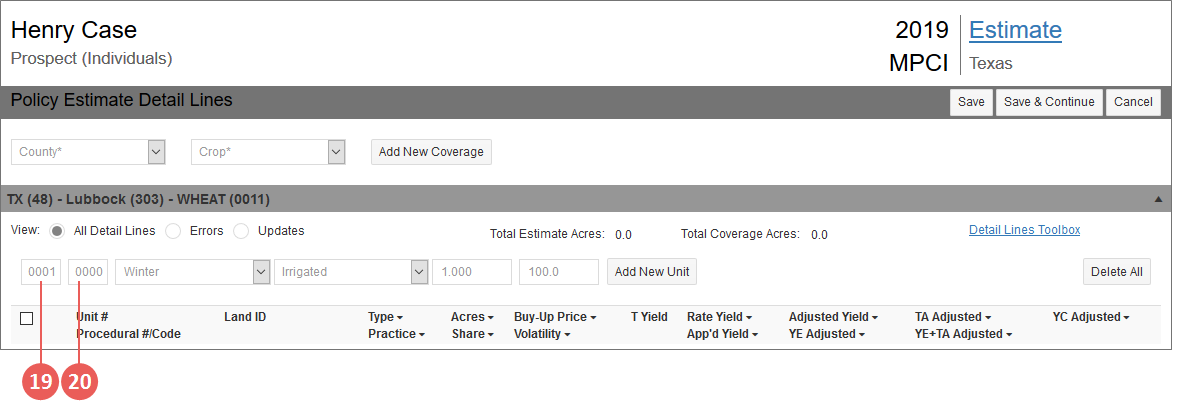
| 15. | To add a coverage to the estimate, from the County dropdown, select the county of the coverage. The counties available for selection in this dropdown are dependent on the state selected for the estimate in step 5. |
| 16. | From the Crop dropdown, select the crop of the coverage you want to add to the estimate. Only crops/commodities available in the ADM for the State/County selections made in previous steps will display in this dropdown. |
| 17. | Click Add New Coverage. The coverage is added to the page within a collapsible banner so you can begin adding detail lines to the coverage. |
| 18. | If you need to add additional coverages, repeat steps 15-17. |
| 19. | To add a detail line to a coverage, expand the coverage and, in the BU field, type the four-digit basic unit number for a detail line you want to add to the coverage. |
| 20. | In the OU field, type the four-digit optional unit number for the detail line. |
| 21. | From the Type dropdown, select the type of the detail line. This dropdown will only display types available in the ADM for the selected State/County/Crop of the coverage. |
| 22. | From the Practice dropdown, select the practice of the detail line. This dropdown will only display practices available in the ADM for the selected State/County/Crop of the coverage. |
| 23. | In the Share field, type the share the prospect grower has in the detail line. This number can be between 0.001 and 1.000, with 1.000 being a 100% share. |
| 24. | In the Acres field, type the acres for the detail line. This number can include up to 1 decimal place (e.g., 95.5). |
| 25. | Click the Add New Unit button. The detail line is added to the grid inside the coverage you added the line to with additional fields to add or edit as well as the read-only calculated T-Yield. |
If available in the ADM, the Buy-Up Price and Volatility fields will pre-fill with the values found in the ADM for the State/County/Crop/Type/Practice selected.
When changes are made to a detail line in the steps below, the status indicator for the line will change from "unmodified" to "modified".
For each detail line on the Policy Estimate Detail Lines page, a status indicator is shown to the far left. This indicator visually represents whether or not a line has had any changes made to it. As you make changes to the detail line's fields, this indicator will change.
When no changes have been made to the detail line, the "unmodified" indicator displays. All lines will display as "unmodified" when you first add them in the Policy Estimate Detail Lines page. When changes have been made to the detail line, the Status Indicator automatically changes from "unmodified" to "modified" so you can easily keep track of detail lines that contain new or changed values.
| Unmodified | Modified |
|---|---|

|

|
With "modified" lines, if you need to undo changes made, you can click the "modified" status indicator to revert changes back to their previous states, and the "unmodified" status indicator will again display.
You can manually change the status indicator for a line in order to include it in the validation process by clicking the "unmodified" status indicator to change it to "modified". Doing this will allow the System to pick up the detail line for validation.
| 26. | If a value is unavailable in the ADM for the State/County/Crop/Type/Practice selected or you want to use a different price, in Buy-Up Price field, type a buy-up price for the unit. The value in this field can have up to two decimal places (e.g., 5.05). |
NOTE: If a price from the ADM pre-fills in this field and you change it, a message will display below the detail line that a price is available from RMA. You can choose to update the price to the RMA value (by clicking Update) or ignore the message and keep the price as you've set it (by clicking Ignore). For additional help with this functionality, see "Updates" in "At a Glance: Policy Estimates".
| 27. | If a value is unavailable in the ADM for the State/County/Crop/Type/Practice selected or you want to use a different volatility factor, in the Volatility field, type a volatility factor for the unit. The value in this field must be between 0.01 and 0.99. |
NOTE: If a volatility factor from the ADM pre-fills in this field and you change it, a message will display below the detail line that a volatility factor is available from RMA. You can choose to update the volatility factor to the RMA value (by clicking Update) or ignore the message and keep the volatility factor as you've set it (by clicking Ignore). For additional help with this functionality, see "Updates" in "At a Glance: Policy Estimates".
| 28. | In the Rate Yield field, type the rate yield to be used for the unit. The value in this field can have up to two decimal places (e.g., 1.45) and is required to calculate premium in the estimate. |
| 29. | In the App'd Yield field, type the standard procedure approved yield to be used for the unit. The value in this field can have up to two decimal places (e.g., 1.45) and is required to calculate premium in the estimate. |
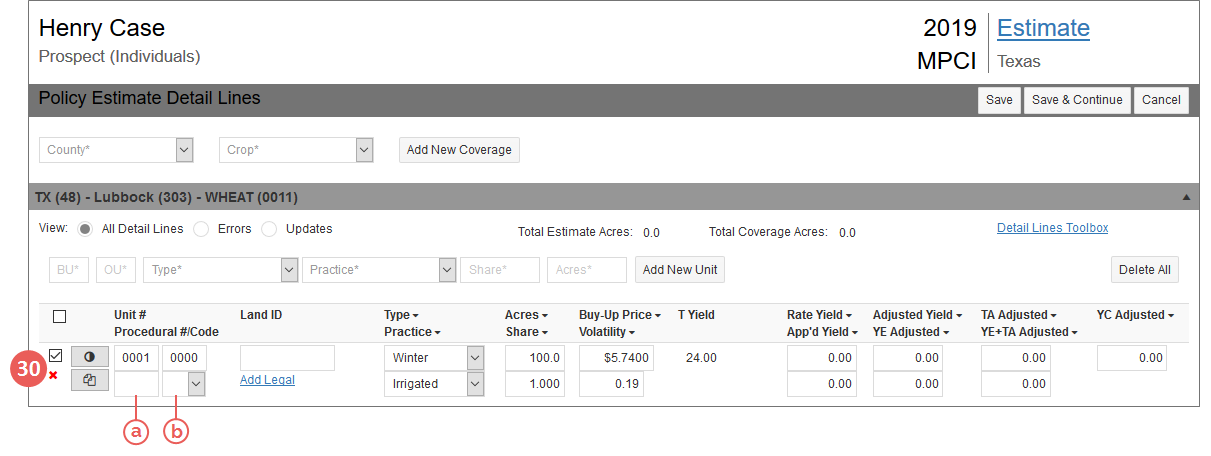
| 30. | If applicable or known, the following fields can be edited for the added detail line/unit. |
| a. | In the Procedural # field, type the procedural number for the unit. |
| b. | From the Code dropdown, select the applicable code. |
| c. | In the Land ID field, type the land ID for the unit. |
| d. | If available, from the Plant Pattern dropdown, select the plant pattern for the unit. |
| e. | If available, in the Skip Row Factor field, type the skip row factor for the unit. |
| f. | If available, from the Map Area dropdown, select the map area for the unit. |
| g. | If the detail line is for non-irrigated Grain Corn in a state/county that supports PACE (Post-Application Coverage Endorsement), an Options dropdown will display below the read-only T Yield for the line. From this dropdown, you can select "PACE" for the line if needed. |
NOTE: On Save of the Policy Estimate Detail Lines page, if the PACE selection made for a detail line on the page is different than what's on the policy, an update message will display below the detail line. You must select either "Ignore" or "Update" based on how you want the System to handle the message shown. For example, if you selected "PACE" from the Options dropdown of a detail line on the page and you received this message, "PACE was removed or excluded from the policy", you can select "Ignore" to keep the selection you made or "Update" to update the Estimate selection to match the policy.
| h. | In the Adjusted Yield field, type the calculated adjusted yield to be used for the unit. The value in this field can have up to two decimal places (e.g., 1.45). |
| i. | If available, in the YE Adjusted field, type the YE average yield to be used for the unit. The value in this field can have up to two decimal places (e.g., 1.45). |
| j. | If available, in the TA Adjusted field, type the trend adjusted yield to be used for the unit. The value in this field can have up to two decimal places (e.g., 1.45). |
| k. | If available, in the YE+TA Adjusted field, type the YE + TA yield to be used for the unit. The value in this field can have up to two decimal places (e.g., 1.45). |
| l. | If available, in the YC Adjusted field, type the YC adjusted yield to be used for the unit. The value in this field can have up to two decimal places (e.g., 1.45). |
| m. | Update/enter values for any additional fields that display as needed. |
NOTE: The BU, OU, Type, Practice, Share, and Acres fields that were entered when creating the new unit/detail line can also be edited after the unit/detail line is added to the coverage.
| 31. | If you need to add an additional detail line to the coverage, do one of the following: |
| • | If the details for the detail line you want to add are the same as the detail line you just added/edited, you can click the Duplicate Line button ( ) to the left of that detail line. The duplicated line will display below the existing line and you can make any changes needed. ) to the left of that detail line. The duplicated line will display below the existing line and you can make any changes needed. |
| • | If you want to create a new detail line, repeat steps 19-30. If any of the fields are the same for each detail line on the coverage, you can use the Copy Down button ( ) to the right of each field name (in the column headers) to copy the first detail line's value for that field down to the rest of the detail lines on the coverage. ) to the right of each field name (in the column headers) to copy the first detail line's value for that field down to the rest of the detail lines on the coverage. |
| 32. | To create detail lines in another coverage on the estimate, click on the banner for that coverage to expand it. Then, follow one of the options in the step above. |
| 33. | To delete any detail lines in a coverage, click the banner for the coverage to expand it and do one of the following: |
| • | If you need to delete all of the details in a coverage, click the Delete All button available in the coverage. A popup opens asking you to verify you want to delete all the detail lines on the coverage. Click OK. You are returned to the Policy Estimate Detail Lines page and the coverage and all its associated detail lines are removed from the page. |
| • | If you need to delete individual detail lines on a coverage, click the Delete Line button ( ) to the left of the detail line. A popup opens asking you to verify you want to delete the detail line. Click OK. You are returned to the Policy Estimate Detail Lines page and the detail line is removed from the coverage. ) to the left of the detail line. A popup opens asking you to verify you want to delete the detail line. Click OK. You are returned to the Policy Estimate Detail Lines page and the detail line is removed from the coverage. |
| 34. | Once done adding and editing coverages and detail lines on the estimate, click Save. Review the detail lines for any existing errors. If any errors exist on the detail lines of a coverage, you will need to address them before you can continue to building scenarios. |
NOTE: If an error exists on a coverage, the coverage banner will display "# Error(s)" to alert you of where errors need to be resolved. To view only the detail lines on a coverage that are in error, expand the coverage and then select the Errors view. For more information on errors, see "Errors" in "At a Glance: Policy Estimates".
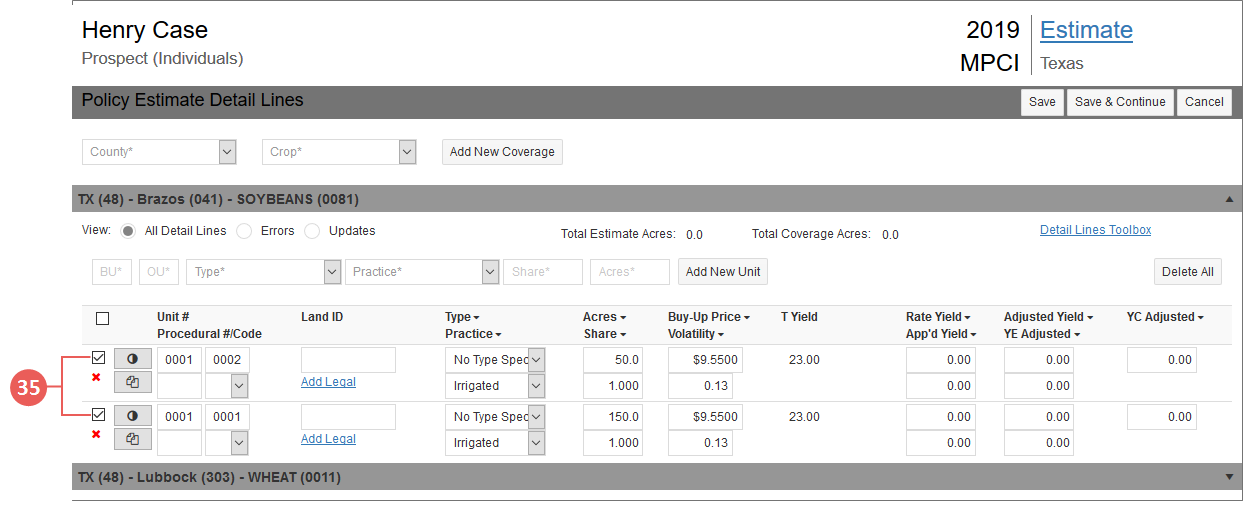
| 35. | Select the detail lines you want to include in the scenarios for the estimate by selecting the checkboxes to the left of the detail lines you want to include. You can select detail lines in any/all coverages on the estimate. |
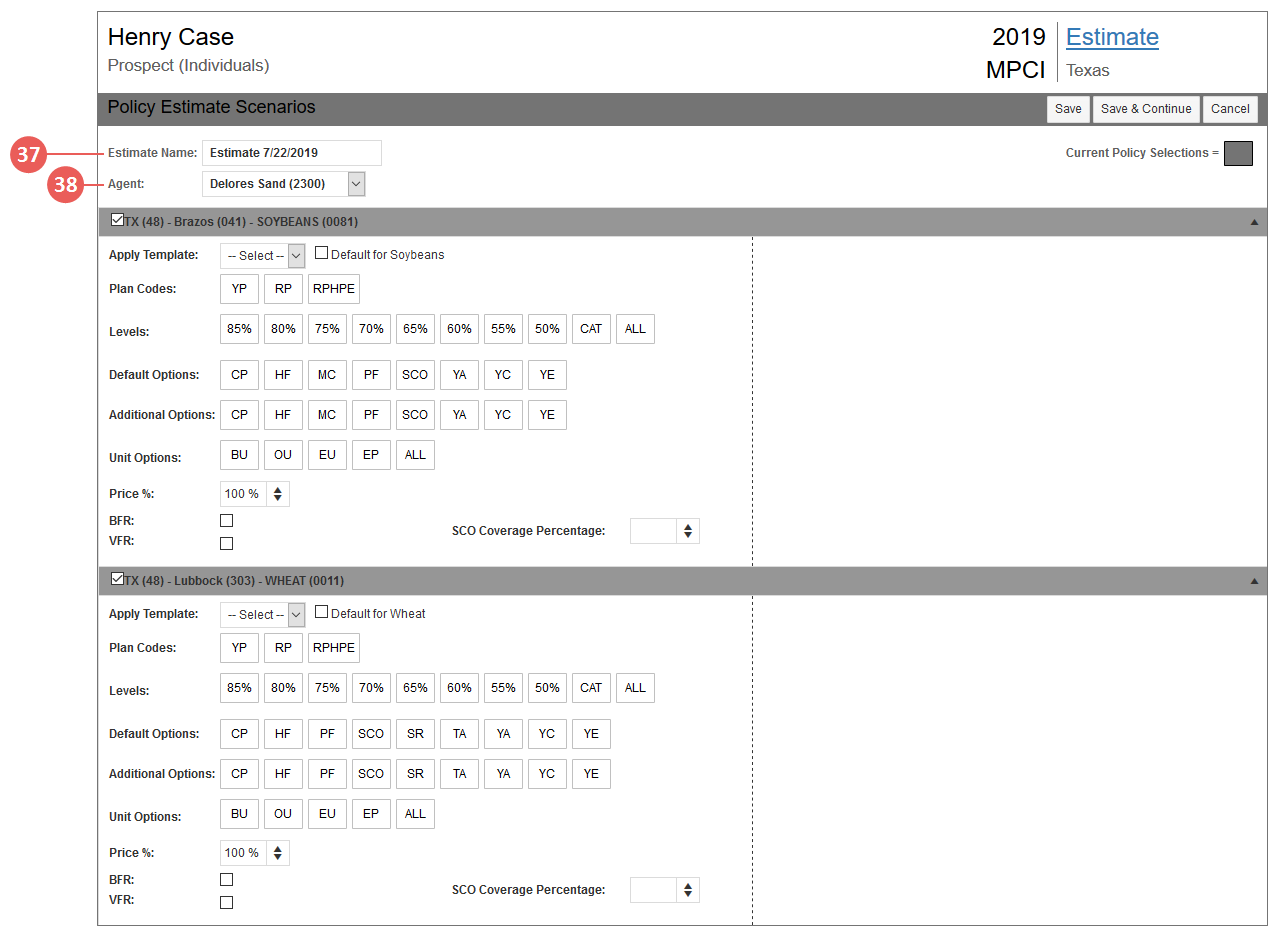
| 36. | Once done selecting detail lines to include in the scenarios for the estimate, click Save & Continue. If no errors exist on any detail lines, the Policy Estimate Scenarios page opens. |
NOTE: If you want to save the additions and edits you've made but don't want to proceed to building scenarios yet, click Save instead of Save & Continue.
| 37. | To rename the Policy Estimate from what was entered on the Add Prospect Grower page, in the Estimate Name field, type the name for the estimate. This change will reflect on the View Policy Estimates page for the estimate. |
| 38. | If enabled, to select a different agent from the one entered on the Add Prospect Grower page, from the Agent dropdown, select the agent needed. |
| 39. | Your next steps depend on whether or not you want to use a template to build the scenario for a coverage: |
| • | To use an existing template for a coverage to set the Plan Codes, Levels, Default Options, Additional Options, Unit Option, Price %, and any other applicable fields, select the template name from the Apply Template dropdown. |
NOTE: Only templates that have the same State/County/Crop as the selected coverage are available in the dropdown.
The System selects the Plan Codes, Levels, Default Options, Additional Options, Unit Option, Price %, and any other applicable fields indicated in the template.
If you have other coverages (regardless of county) on the estimate with the same crop as the coverage you applied the template to and want to use the selected template as the default for all coverages with that crop, select the Default for <Crop> checkbox to the right of the Apply Template dropdown. "<Crop>" will be whatever the crop on the coverage is. All coverages with that crop will update to show the field selections from the template.
If you need to modify the template’s default selections, continue to step 40. If the template’s selections meet your needs, skip to step 48.
| • | To enter estimate coverage options without a template, continue to step 40. |
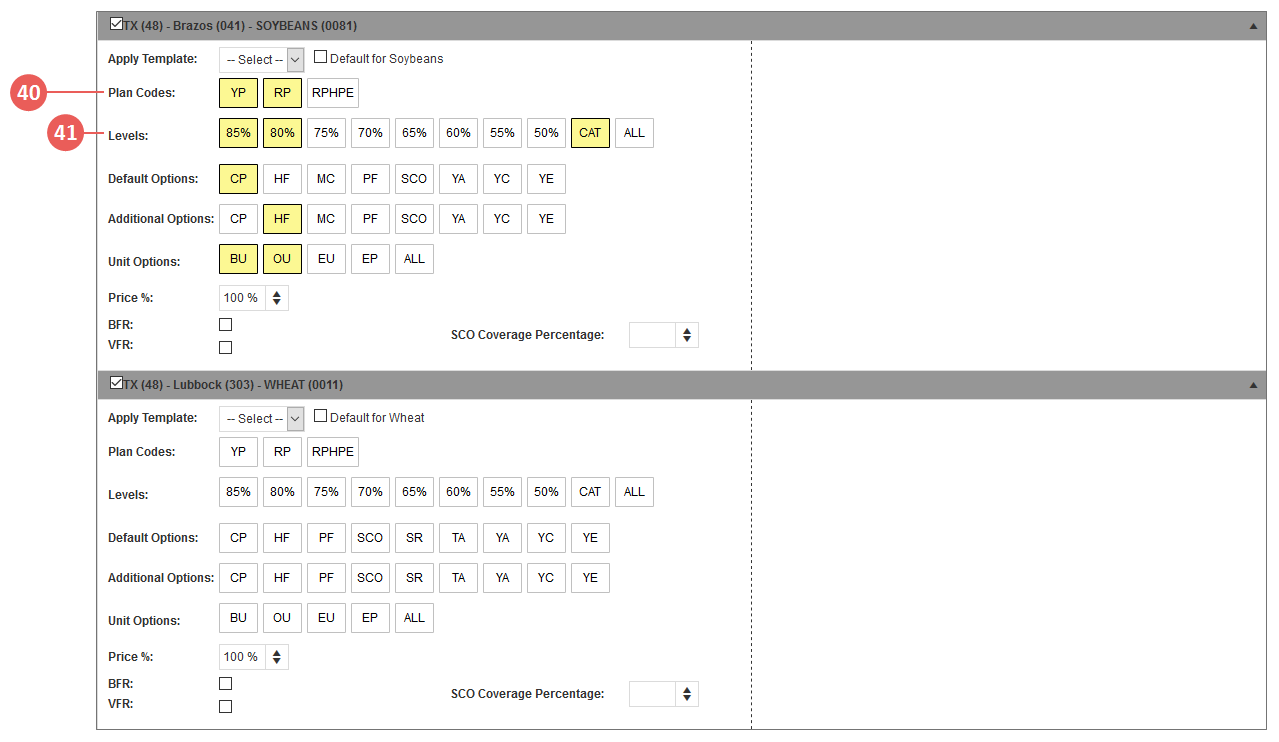
| 40. | In the Plan Codes field, click to select the plan or plans to include in the estimate. Selected plans update to display with a yellow background. |
| 41. | In the Levels field, click to select the coverage level or levels to include in the estimate. Selected levels update to display with a yellow background. |
NOTE: If you select the "ALL" option in this field, all coverage levels will be highlighted and included in the scenarios for the estimate.
NOTE: If a detail line selected on the Policy Estimate Detail Lines page had "PACE" selected from the Options dropdown, then "PACE" will be an available option in the Default Options and Additional Options (next step) fields. If this option is selected in either of these fields, two additional fields, PACE Coverage Level and PACE Post Application %, will display after the Additional Options field.
| 44. | If "PACE" was selected in either step 42 or step 43, the PACE Coverage Level field displays. In this field, click to select the coverage levels for PACE that you want. At least one selection must be made in this field when PACE is selected as an option. |
| 45. | If "PACE" was selected in either step 42 or step 43, the PACE Post Application % field displays. In this field, click to select the post application percentages for PACE that you want. At least one selection must be made in this field when PACE is selected as an option. |
| 46. | In the Unit Options field, click to select the unit structure or structures to include in the estimate. Selected unit options update to display with a yellow background. |
NOTE: If you select the "ALL" option in this field, all unit options will be highlighted and included in the scenarios for the estimate.
NOTE: If you select the "EP" option, a new field, EP Practices, displays below the Unit Options field. You can select either Irrigated, Non-Irrigated, or Both using the radio buttons for the field.
| 47. | The Price % box will automatically populate with the maximum price percentage based on the Plan/Level selected by the user. This can be adjusted by using the arrows or typing a value to include in the estimate. Only numbers are allowed in this box. |
| 48. | If creating an estimate for a grower who qualifies as a Beginning Farmer/Rancher (BFR), select the BFR checkbox. |
| 49. | If creating an estimate for a grower who qualifies as a Veteran Farmer/Rancher (VFR), select the VFR checkbox. |
| 51. | When done making selections and entering values for the coverage scenario, do one of the following: |
| • | If you have additional coverages to make scenario selections for, repeat steps 39-50 for those coverages. |
| • | If you have made scenario selections for all coverages on the estimate, click Save. The System begins validating the scenario selections. Review the coverages for any existing errors. If any errors exist on a coverage, you will need to address them before you can continue to calculating scenarios. |
NOTE: If an error exists on a coverage, the coverage banner will display "In Error" to alert you of where errors need to be resolved. For more information on errors on the Policy Estimate Scenarios page, see "Validations" in "At a Glance: Policy Estimates".
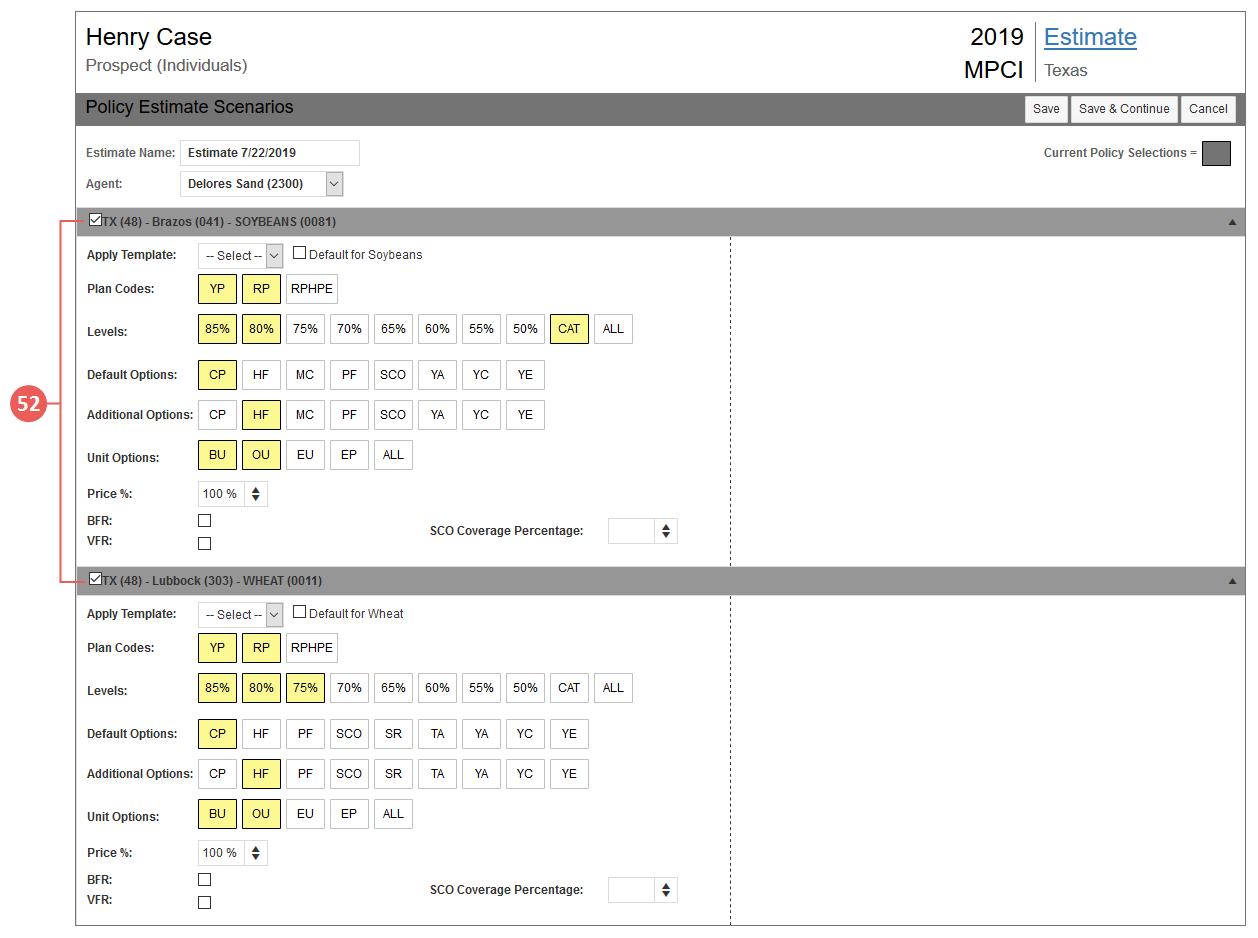
| 52. | Select the coverages you want to calculate scenarios for by selecting the checkboxes to the left of the coverages you want to include. |
| 53. | Once done selecting the coverages you want to calculate scenarios for, click Save & Continue. If no errors exist on any coverages, the Policy Estimate Calculations page opens, and the Policy Estimate's scenarios are built for the coverages selected on the Policy Estimate Scenarios page. |
NOTE: If you want to save the additions and edits you've made but don't want to proceed to calculating scenarios yet, click Save instead of Save & Continue.
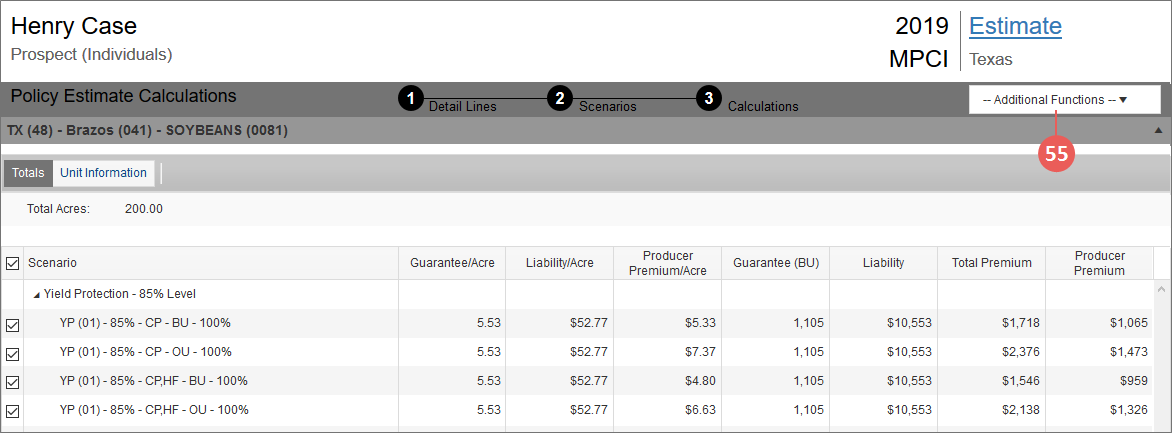
| 54. | On the Policy Estimate Calculations page, the values/estimates for the selected coverage criteria display for each coverage you selected on the Policy Estimate Scenarios page and are shown within collapsible/expandable coverage banners. Each coverage banner displays the selected coverage criteria in the Totals and Unit Information tabs just below the coverage's banner. See "Compare Policy Estimate Scenarios" for more information on comparing these estimates. |
| 55. | To print the Policy Estimate, from the Additional Functions dropdown, select "Print Forms". The Print Forms popup opens. |
| 56. | Select the Policy Estimate checkbox, and then select parameters for the form. |
| 57. | When done making selections, click Print. The Policy Estimate Scenarios report prints to a PDF and downloads to your browser window. See "Understand the Policy Estimate Scenarios Report" for more on reading the report. |
| 58. | The Additional Functions dropdown also allows you to export the policy estimate. To export the Policy Estimate to a formatted Excel workbook, select "Export Estimate" from the dropdown. Or, to export data to a non-formatted Excel workbook, select "Export Data" from the dropdown. The estimate is exported to Excel and the workbook downloads to your browser window. |
NOTE: All export options may not be available for all users.
| 59. | Once done reviewing, printing, or exporting the estimate, from the AdditionalFunctions dropdown, you can select "Return to Estimates" to navigate to the View Policy Estimates page. The coverage/detail line selections, scenarios, and calculations were saved to the estimate when you clicked Save & Continue on the Policy Estimate Scenarios page. |
