|
|
All coverages/detail lines that exist on the policy that's associated with the estimate populate on the page. |
|
2.
|
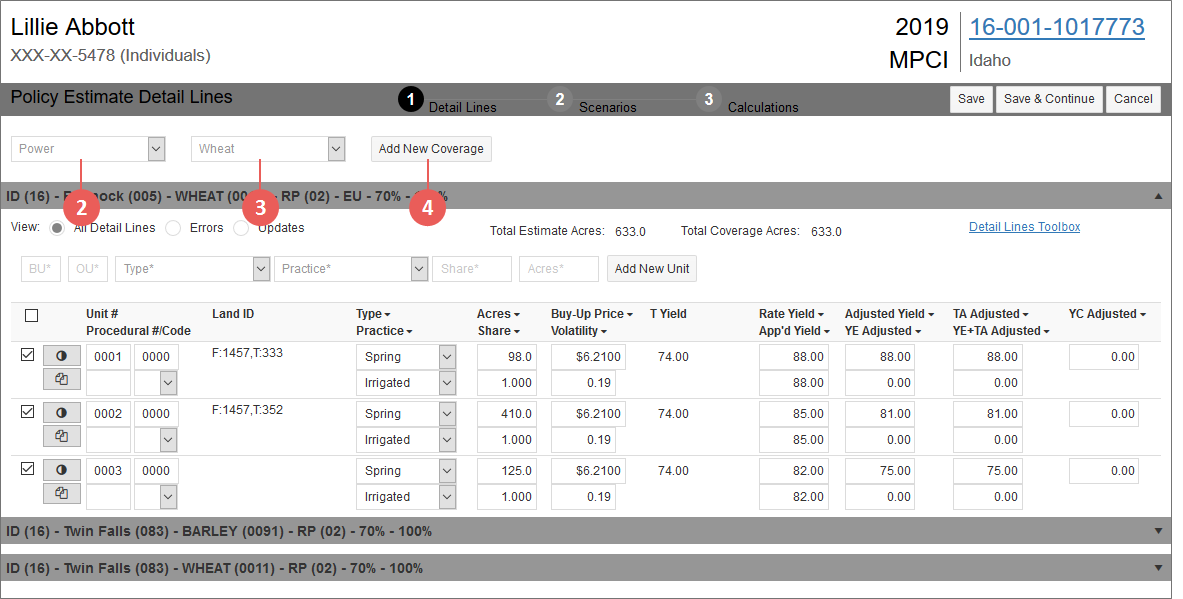
If you need to add a coverage to the estimate, from the County dropdown, select the county of the coverage. The counties available for selection in this dropdown are dependent on the state of the associated policy. |
|
3.
|
From the Crop dropdown, select the crop of the coverage you want to add to the estimate. Only crops/commodities available in the ADM for the State/County will display in this dropdown. |
|
4.
|
Click Add New Coverage. The coverage is added to the page within a collapsible banner so you can begin adding detail lines to the coverage. |
|
5.
|
If you need to add additional coverages, repeat steps 2-4. |
|
6.
|
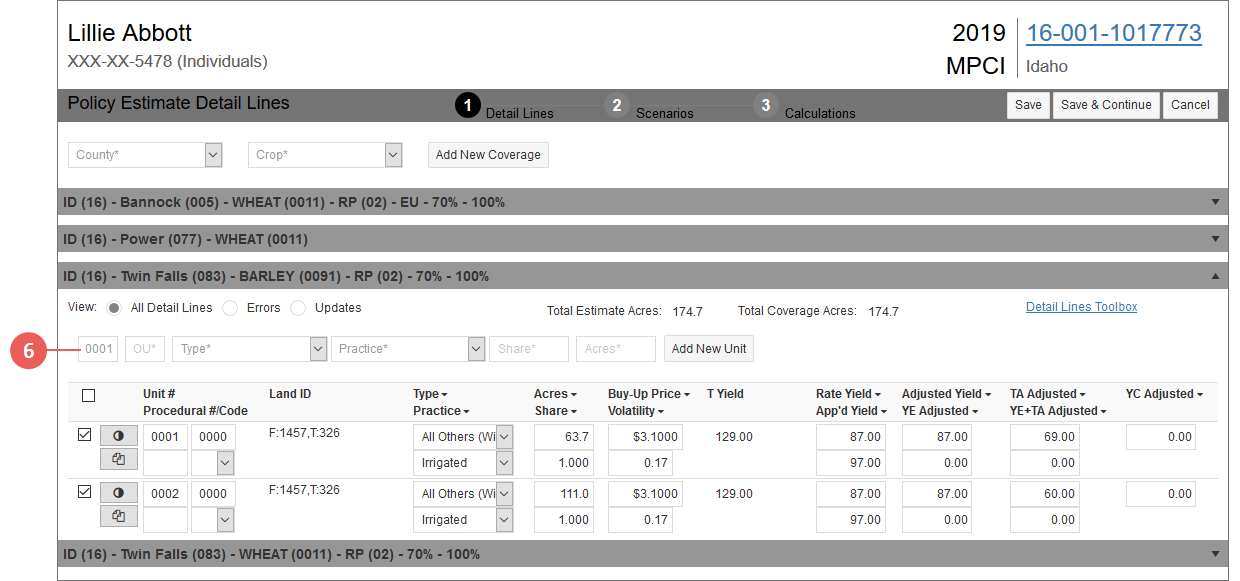
To add a detail line to a coverage, expand the coverage you want to add a detail line to, and then, in the BU field, type the four-digit basic unit number for a detail line you want to add to the coverage. |
|
7.
|
In the OU field, type the four-digit optional unit number for the detail line. |
|
8.
|
From the Type dropdown, select the type of the detail line. This dropdown will only display types available in the ADM for the selected State/County/Crop of the coverage. |
|
9.
|
From the Practice dropdown, select the practice of the detail line. This dropdown will only display practices available in the ADM for the selected State/County/Crop of the coverage. |
|
10.
|
In the Share field, type the share the grower has in the detail line. This number can be between 0.001 and 1.000, with 1.000 being a 100% share. |
|
11.
|
In the Acres field, type the acres for the detail line. This number can include up to 1 decimal place (e.g., 95.5). |
|
12.
|
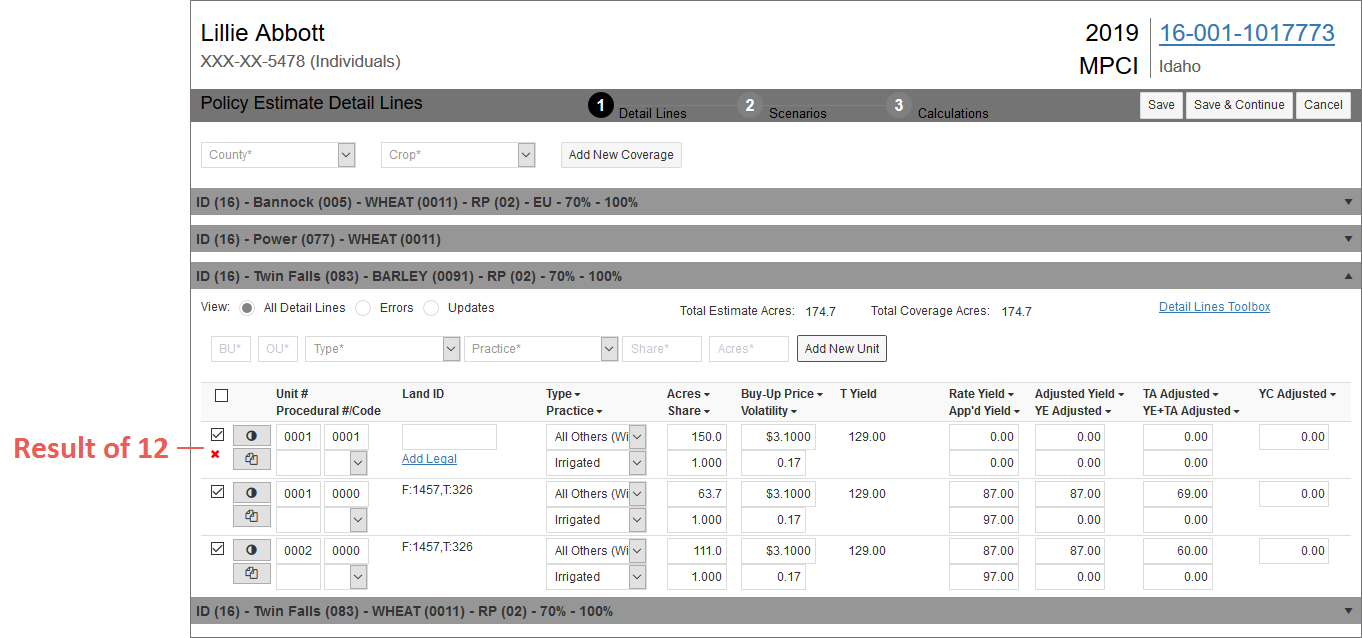
Click the Add New Unit button. The detail line is added to the grid inside the coverage you added the line to with additional fields to add or edit as well as the read-only calculated T-Yield. |
If available in the ADM, the Buy-Up Price and Volatility fields will pre-fill with the values found in the ADM for the State/County/Crop/Type/Practice selected. If unavailable in the ADM, these fields will pre-fill with values from the previous year.
When changes are made to a detail line in the steps below, the status indicator for the line will change from "unmodified" to "modified".
 UNDERSTANDING THE STATUS INDICATORS
For each detail line on the Policy Estimate Detail Lines page, a status indicator is shown to the far left. This indicator visually represents whether or not a line has had any changes made to it. As you make changes to the detail line's fields, this indicator will change.
When no changes have been made to the detail line, the "unmodified" indicator displays. All lines will display as "unmodified" when they're first added to the Policy Estimate Detail Lines page. When changes have been made to the detail line, the Status Indicator automatically changes from "unmodified" to "modified" so you can easily keep track of detail lines that contain new or changed values.
With "modified" lines, if you need to undo changes made, you can click the "modified" status indicator to revert changes back to their previous states, and the "unmodified" status indicator will again display.
You can manually change the status indicator for a line in order to include it in the validation process by clicking the "unmodified" status indicator to change it to "modified". Doing this will allow the System to pick up the detail line for validation.
|
13.
|
If you need to update the acres on the line, in the Acres field, type the updated acres value. |
TIP: If you need to apply an acres value to all detail lines on the coverage at one time, you can use the Detail Lines Toolbox link near the top-right of the coverage section. This toolbox allows you to apply this year's, last year's, or the last actual acres to all detail lines on the coverage OR an estimated acres value for either all detail lines or all zero AR lines on the coverage.
|
14.
|
If you need to update the Share on the line, in the Share field, type the updated share value. |
|
15.
|
If a value is unavailable in the ADM for the State/County/Crop/Type/Practice selected or you want to use a different price, in Buy-Up Price field, type a buy-up price for the unit. The value in this field can have up to two decimal places (e.g., 5.05). |
TIP: If you need to apply a buy-up price to all detail lines on the coverage at one time, you can use the Detail Lines Toolbox link near the top-right of the coverage section. This toolbox allows you to apply this year's or last year's price to all detail lines on the coverage.
|
16.
|
If a value is unavailable in the ADM for the State/County/Crop/Type/Practice selected or you want to use a different volatility factor, in the Volatility field, type a volatility factor for the unit. The value in this field must be between 0.01 and 0.99. |
TIP: If you need to apply a volatility to all detail lines on the coverage at one time, you can use the Detail Lines Toolbox link near the top-right of the coverage section. This toolbox allows you to apply this year's or last year's volatility to all detail lines on the coverage.
|
17.
|
If the detail line is for non-irrigated Grain Corn in a state/county that supports PACE (Post-Application Coverage Endorsement), an Options dropdown will display below the read-only T Yield for the line. From this dropdown, you can select "PACE" for the line if needed. |
NOTE: On Save of the Policy Estimate Detail Lines page, if the PACE selection made for a detail line on the page is different than what's on the policy, an update message will display below the detail line. You must select either "Ignore" or "Update" based on how you want the System to handle the message shown. For example, if you selected "PACE" from the Options dropdown of a detail line on the page and you received this message, "PACE was removed or excluded from the policy", you can select "Ignore" to keep the selection you made or "Update" to update the Estimate selection to match the policy.
|
18.
|
In the Rate Yield field, type the rate yield to be used for the unit. The value in this field can have up to two decimal places (e.g., 1.45) and is required to calculate premium in the estimate. |
TIP: If you need to apply a yield to all detail lines on the coverage at one time, you can use the Detail Lines Toolbox link near the top-right of the coverage section. This toolbox allows you to apply this year's or last year's yield to all detail lines on the coverage. Please note that this will update ALL yield fields (e.g., Rate Yield, App'd Yield, etc.) on the coverage's detail lines.
|
19.
|
In the App'd Yield field, type the standard procedure approved yield to be used for the unit. The value in this field can have up to two decimal places (e.g., 1.45) and is required to calculate premium in the estimate. |
|
20.
|
If applicable or known, the following fields can be edited for the added detail line/unit. |
|
a.
|
In the Procedural # field, type the procedural number for the unit. |
|
b.
|
From the Code dropdown, select the applicable code. |
|
c.
|
In the Land ID field, type the land ID for the unit. |
NOTE: This field will only be editable if the detail line was added directly to the estimate after the estimate was created.
|
d.
|
If available, from the Plant Pattern dropdown, select the plant pattern for the unit. |
|
e.
|
If available, in the Skip Row Factor field, type the skip row factor for the unit. |
|
f.
|
If available, from the Map Area dropdown, select the map area for the unit. |
|
g.
|
In the Adjusted Yield field, type the calculated adjusted yield to be used for the unit. The value in this field can have up to two decimal places (e.g., 1.45). |
|
h.
|
If available, in the YE Adjusted field, type the YE average yield to be used for the unit. The value in this field can have up to two decimal places (e.g., 1.45). |
|
i.
|
If available, in the TA Adjusted field, type the trend adjusted yield to be used for the unit. The value in this field can have up to two decimal places (e.g., 1.45). |
|
j.
|
If available, in the YE+TA Adjusted field, type the YE + TA yield to be used for the unit. The value in this field can have up to two decimal places (e.g., 1.45). |
|
k.
|
If available, in the YC Adjusted field, type the YC adjusted yield to be used for the unit. The value in this field can have up to two decimal places (e.g., 1.45). |
|
l.
|
Update/enter values for any additional fields that display as needed. |
NOTE: The BU, OU, Type, and Practice fields that were entered when creating the new unit/detail line can also be edited after the unit/detail line is added to the coverage. These fields are also available to edit on detail lines that were pulled in from the policy when the estimate was created.
|
21.
|
If you need to add an additional detail line to the coverage, do one of the following: |
|
•
|
If the details for the detail line you want to add are the same as another detail line on the coverage, you can click the Duplicate Line button ( ) to the left of that detail line. The duplicated line will display below the existing line and you can make any changes needed. ) to the left of that detail line. The duplicated line will display below the existing line and you can make any changes needed. |
|
•
|
If you want to create a new detail line, repeat steps 6-20. If any of the fields are the same for each detail line on the coverage, you can use the Copy Down button ( ) to the right of each field name (in the column headers) to copy the first detail line's value for that field down to the rest of the detail lines on the coverage. ) to the right of each field name (in the column headers) to copy the first detail line's value for that field down to the rest of the detail lines on the coverage. |
|
22.
|
To create detail lines in another coverage on the estimate, click on the banner for that coverage to expand it. Then, follow one of the options in the step above. |
|
23.
|
If you want to delete any of the detail lines you've added to a coverage on the estimate (detail lines that are pulled in from the associated policy cannot be deleted), click the banner for the coverage to expand it and do one of the following: |
|
•
|
If you added a coverage to the estimate after it was created and you need to delete all of the details in that coverage, click the Delete All button available in the coverage. A popup opens asking you to verify you want to delete all the detail lines on the coverage. Click OK. |
You are returned to the Policy Estimate Detail Lines page and the coverage and all its associated detail lines are removed from the page. This button will only be available for coverages that were added manually after the estimate was created. Detail lines/coverages that were pulled into the estimate from the associated policy cannot be deleted.
|
•
|
If you added a detail line to a coverage after the estimate was created and you want to delete that individual detail line, click the Delete Line button ( ) to the left of the detail line. A popup opens asking you to verify you want to delete the detail line. Click OK. ) to the left of the detail line. A popup opens asking you to verify you want to delete the detail line. Click OK. |
You are returned to the Policy Estimate Detail Lines page and the detail line is removed from the coverage. This button will only be available for detail lines that were added manually after the estimate was created. Detail lines that were pulled into the estimate from the associated policy cannot be deleted.
|
24.
|
To edit any of the fields on detail lines that were pulled into the estimate from the associated policy, follow steps 15-20 |
|
25.
|
Once done adding and editing coverages and detail lines on the estimate, click Save. Review the detail lines for any existing errors. If any errors exist on the detail lines of a coverage, you will need to address them before you can continue to building scenarios. |
NOTE: If an error exists on a coverage, the coverage banner will display "# Error(s)" to alert you of where errors need to be resolved. To view only the detail lines on a coverage that are in error, expand the coverage and then select the Errors view. For more information on errors, see "Errors" in "At a Glance: Policy Estimates".
|
26.
|
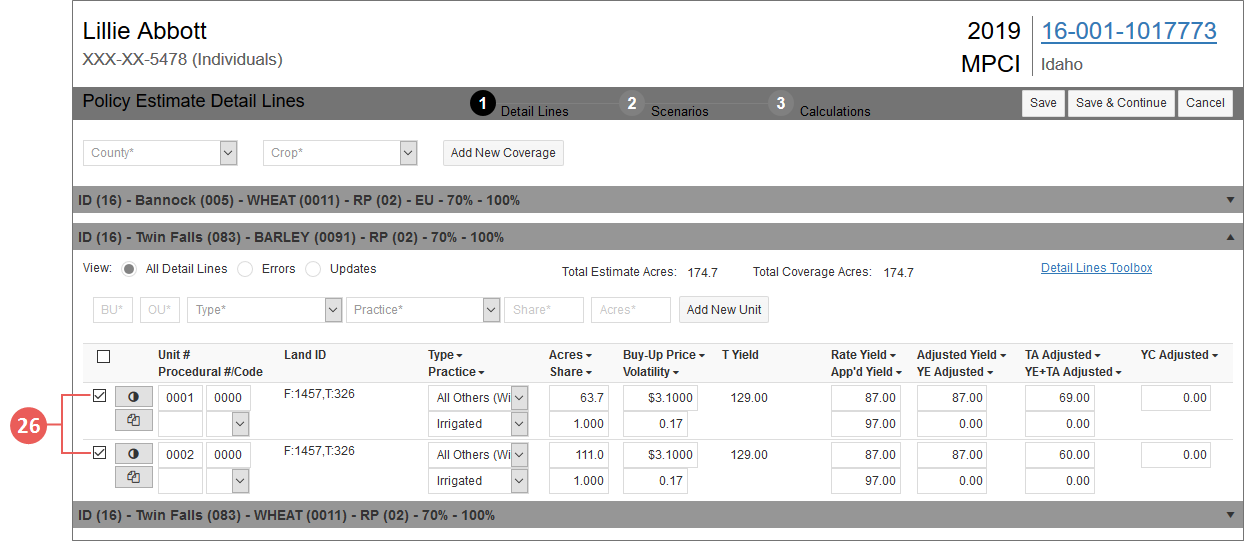
Select the detail lines you want to include in the scenarios for the estimate by selecting the checkboxes to the left of the detail lines you want to include. You can select detail lines in any/all coverages on the estimate. |
|
27.
|
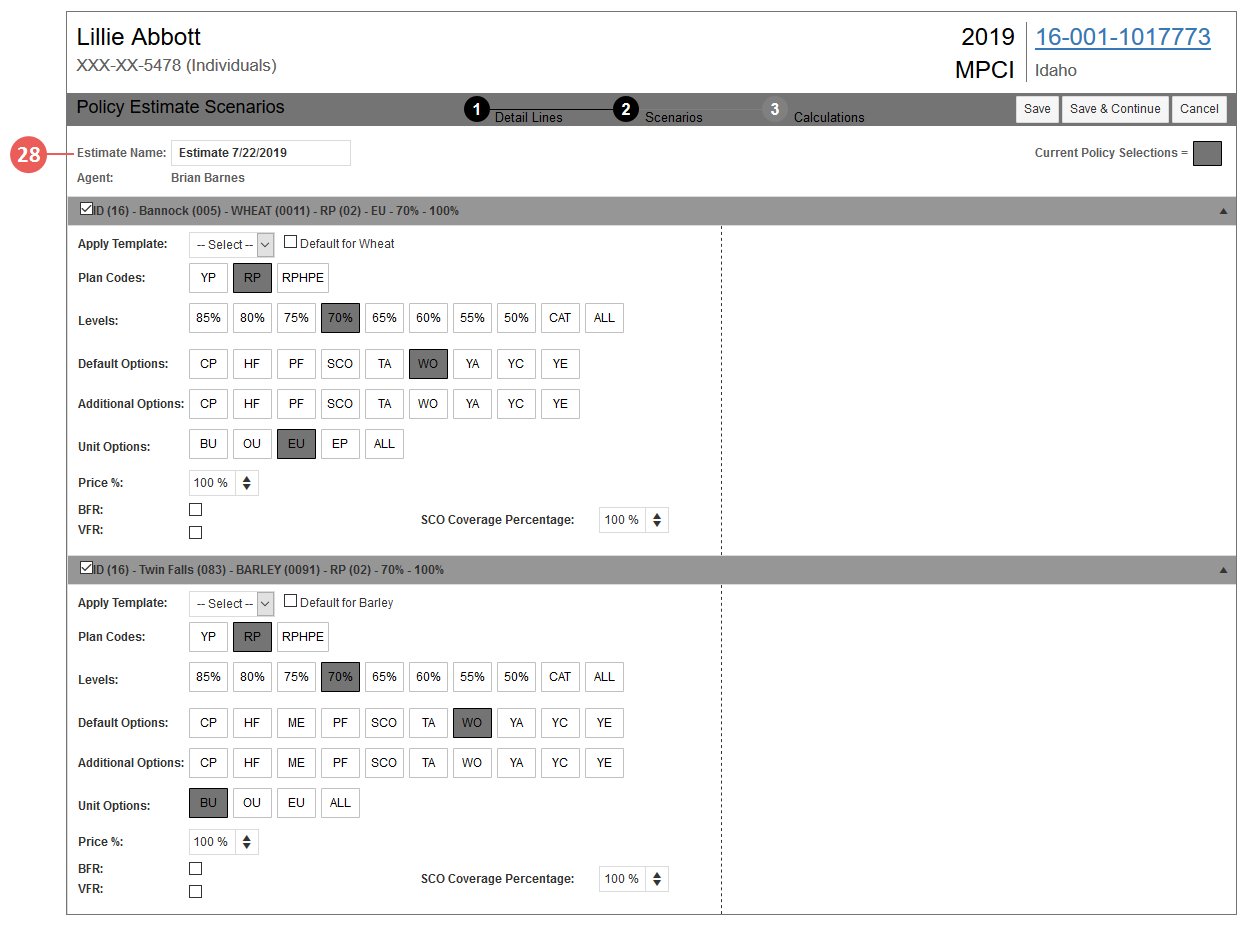
Once done selecting detail lines to include in the scenarios for the estimate, click Save & Continue. If no errors exist on any detail lines, the Policy Estimate Scenarios page opens. |
NOTE: If you want to save the additions and edits you've made but don't want to proceed to building scenarios yet, click Save instead of Save & Continue.


 ) to the left of that detail line. The duplicated line will display below the existing line and you can make any changes needed.
 ) to the right of each field name (in the column headers) to copy the first detail line's value for that field down to the rest of the detail lines on the coverage.
 ) to the left of the detail line. A popup opens asking you to verify you want to delete the detail line. Click OK.