|
1.
|
Locate and open the policy you need to add a coverage to. The policy opens on the Coverages tab. Any coverages already on the policy are shown in the MPCI Coverage Information section. |
|
2.
|
On the Coverages tab of the policy, in the MPCI Coverage Information section, click Add MPCI Coverage. The Add New Coverage page opens. |
|
3.
|
On the Add New Coverage page, in the Coverage Information section, the Policy State fields shows the state selected on the policy application. This is not editable. Continue to the next step. |
|
4.
|
In the Coverage Information section, from the County Name dropdown, select the county for the coverage you are adding to the policy. |
The System validates your selections for County Name, Crop Name, Crop Plan, Coverage Level, Unit Option Code (if applicable), and Crop Options and modifies the available fields and options within each.
|
5.
|
From the Crop Name dropdown, select the crop you want to insure on the coverage. If the crop is not available from the dropdown for the State/County selected, then a Written Agreement is necessary. For more information on adding Written Agreements to a coverage, "Written Agreements". |
|
6.
|
If the Is Primary County dropdown is displayed below the Crop Name field after selecting the crop, Primary County is available for the State/County/Crop. Select an option, "National" or "State", if the grower signed an all-county application and requested that the county shown in the County Name field be the primary county for the application. For each unique Grower Tax ID/RY, either a single coverage for the crop can be designated as Primary "National" or a single coverage for each State/Crop can be designated as Primary "State". If "State" is selected, only one Primary County election is allowed per unique Grower Tax ID/RY/State/County/Crop. |
NOTE: Added County designation is not available for Category C, D, or G crops or for Forage Production (0033) so this dropdown will not display for those crops.
|
7.
|
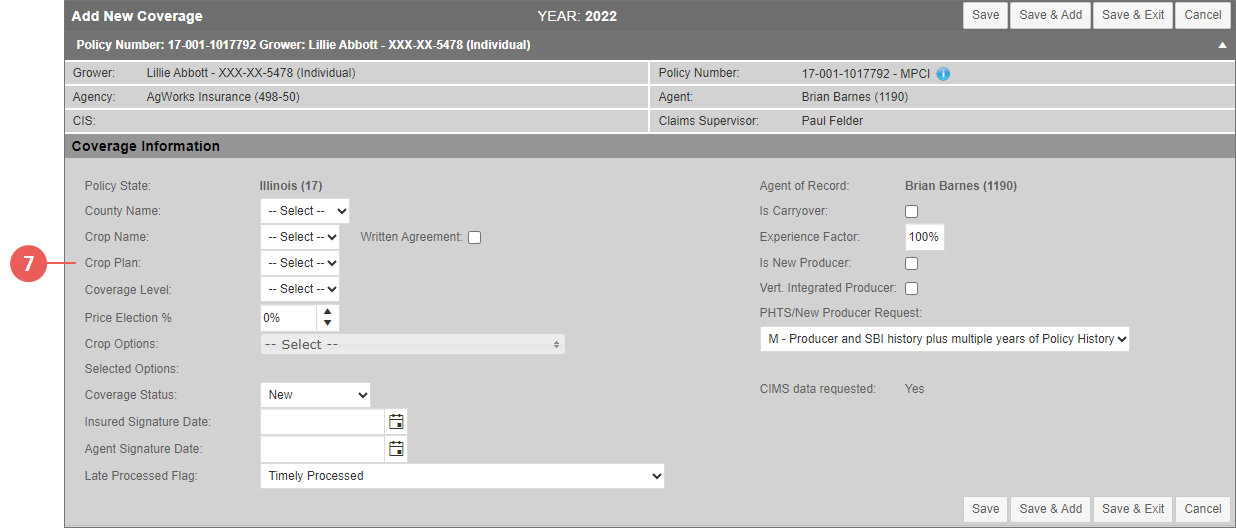
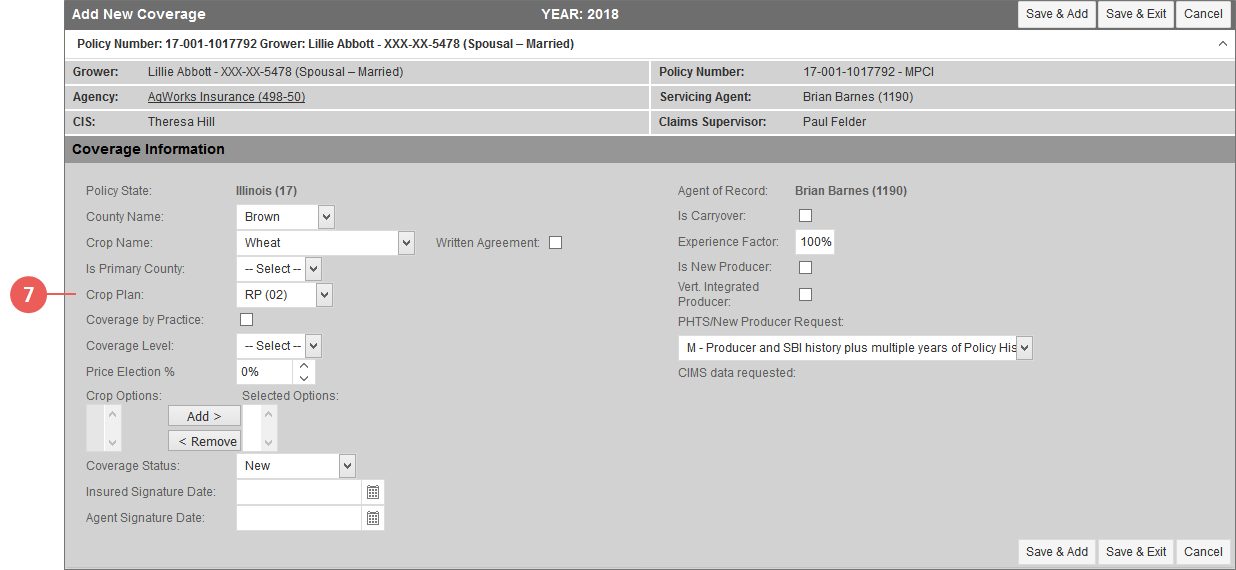
From the Crop Plan dropdown, select the crop plan for the coverage. |
NOTE: To understand how the System changes for certain Plan Types, see "Plan Types".
NOTE: To allow growers to insure Specialty Type Barley separately from other Barley, if the Crop is "Barley" and Crop Plan is "YP (01)" and at least one Specialty Type Barley is available for the RY/State/County/Crop/Plan, then the Specialty Type Barley checkbox will display after the Crop Plan field.
|
8.
|
If Coverage by Practice is available for the coverage, then the Coverage by Practice checkbox is available. Selecting this checkbox will allow you to set different Irrigated and Non-Irrigated Coverage Levels for the coverage. For more information on Coverage By Practice, see "Coverage By Irrigation Practice (LP)". |
|
9.
|
From the Coverage Level dropdown, select the level of coverage the grower is requesting. |
|
10.
|
In the Price Election % box, type the price election percentage for the coverage or use the arrows to change the default value. This defaults to 100%. |
|
11.
|
If applicable to the crop, the Additional checkbox appears to the right of the Price Election % box, this checkbox is marked by default to indicate that the established price will apply unless a higher prices is published. Clear this box if this option is not wanted on the coverage. |
Step 11: An example of the Additional checkbox that may appear for the selected Crop Name.
|
12.
|
If applicable, from the Unit Option Code dropdown, select the unit structure for the coverage. |
NOTE: When selecting "Whole Farm" or "Enterprise Unit" from this dropdown, you may receive a message stating that the type in the unit structure selected does not apply. You can ignore this message as detail lines have not been established. The System will validate the unit structure code once again at the detail line level.
|
13.
|
In the Crop Options selection box, select any crop options the grower wants to include on the coverage by selecting an option in the Crop Options box and then clicking Add>. The selected option is moved to the Selected options box. |
TIP: To select more than one option at a time, hold down CTRL and select the options in the Crop Options box. Then, click Add>. All selected options are moved over to the Selected Options box.
NOTE: The System does not allow you to select crop option combinations that are not permitted together on a coverage (e.g., you cannot elect both "PF" and "PT"). The System will validate these selections on save and alert you that the combination is not valid. You must correct the invalid combination before save is allowed.
|
14.
|
From the Coverage Status dropdown, select the status of this coverage. This is required. Your options are: |
|
•
|
Internal Transfer: When this option is selected, the Previous Policy # field displays. Enter the previous policy number held at the company. The Previous Policy # is not required. |
|
•
|
Transfer In: When this option is selected, the Previous Policy # field displays. Select the previous company from the list of those available in the dropdown and then enter the previous policy number held at the selected previous company. |
NOTE: For 2021+ RYs, if the Crop is "Forage Seeding", the Coverage Status is "New", more than on SCD exists for the coverage, the current calendar date is after the 1st SCD, and the original Insured App Sign Date is blank or later than the initial SCD, then a New App After 1st SCD field will display. When "Yes" is selected, a Select SCD dropdown will display. This option should be applied if/when necessary to allow a New App After 1st SCD and spring coverage functionality
|
15.
|
In the Insured Signature Date field, type the date the insured signed the coverage in MMDDYYYY format or click the calendar button to open the calendar and select a signature date. |
|
16.
|
In the Agent Signature Date field, type the date the agent signed the coverage in MMDDYYYY format or click the calendar button to open the calendar and select a signature date. |
|
17.
|
The Agent of Record from the policy is displayed. |
|
18.
|
If this is a carryover coverage from the same company, the Is Carryover checkbox is marked by default. |
|
19.
|
In the Experience Factor field, type the percentage of experience factor for the crop/land combination. This defaults to 100% but can be edited to no less than 50%. |
|
20.
|
If the grower is a new producer of the selected Crop Name, mark the Is New Producer checkbox. This flags the policy for a New Producer request in the P14 transmission, carries the New Producer status to the detail lines, and displays the New Producer Verification Date below the Is New Producer checkbox. In New Producer Verification Date field, type the date the New Producer status was verified using MMDDYYYY format or click the calendar button to open the calendar popup and select the date. Also, an additional field, Acres, displays under the Crop Name field. Type the number of acres on the coverage. |
|
21.
|
If the grower is a Vertically Integrated Producer, mark the Vert. Integrated Producer checkbox. |
|
22.
|
If applicable, from the PHTS/New Producer Request dropdown, select which records to request from RMA for the grower. The default selection is "M - Producer and SBI history plus multiple years of Policy History". Your options are: |
|
•
|
F - Five years of Policy History only |
|
•
|
H - Producer and SBI history plus ten years of Policy History |
|
•
|
M - Producer and SBI history plus multiple years of Policy History |
|
•
|
N - Producer and SBI history only |
|
•
|
O - Producer and SBI history plus one year of Policy History |
|
•
|
P - Producer and SBI history plus fiver years of Policy History |
|
•
|
T - Ten years of Policy History only |
|
•
|
X - Multiple years of Policy History only |
|
•
|
Y - One year of Policy History only |
|
23.
|
To request CIMS information, if available, mark the Request CIMS checkbox. |
|
24.
|
As your next step, click one of the following buttons: |
|
•
|
To save the policy and open a new Add New MPCI Policy page to add another policy, click Save & Add. |
|
•
|
To save the policy and return to the View Policies page for the grower, click Save & Exit. |
|
•
|
To discard the new policy and return to the View Policies page for the grower, click Cancel. |


