Related
Set Up Shading & Logos
All Reinsurance Years
The set up and maintenance of the shading used for a Crop/Type/Practice/Variety (C/T/P/V) or the logo/agency information printed on maps is done through the Shading & Logo panel available from Shading > Manage Shading and Logos in the Mapping window. This functionality is available to all users.
WARNING: The shading for a C/T/P/V and the printing of the logo or agency information is done at the Agency level, which means any additions or changes made to the shading used for a C/T/P/V or to the agency logo or information printed on maps are pushed down to all agency users. As such, changes should be made with caution.
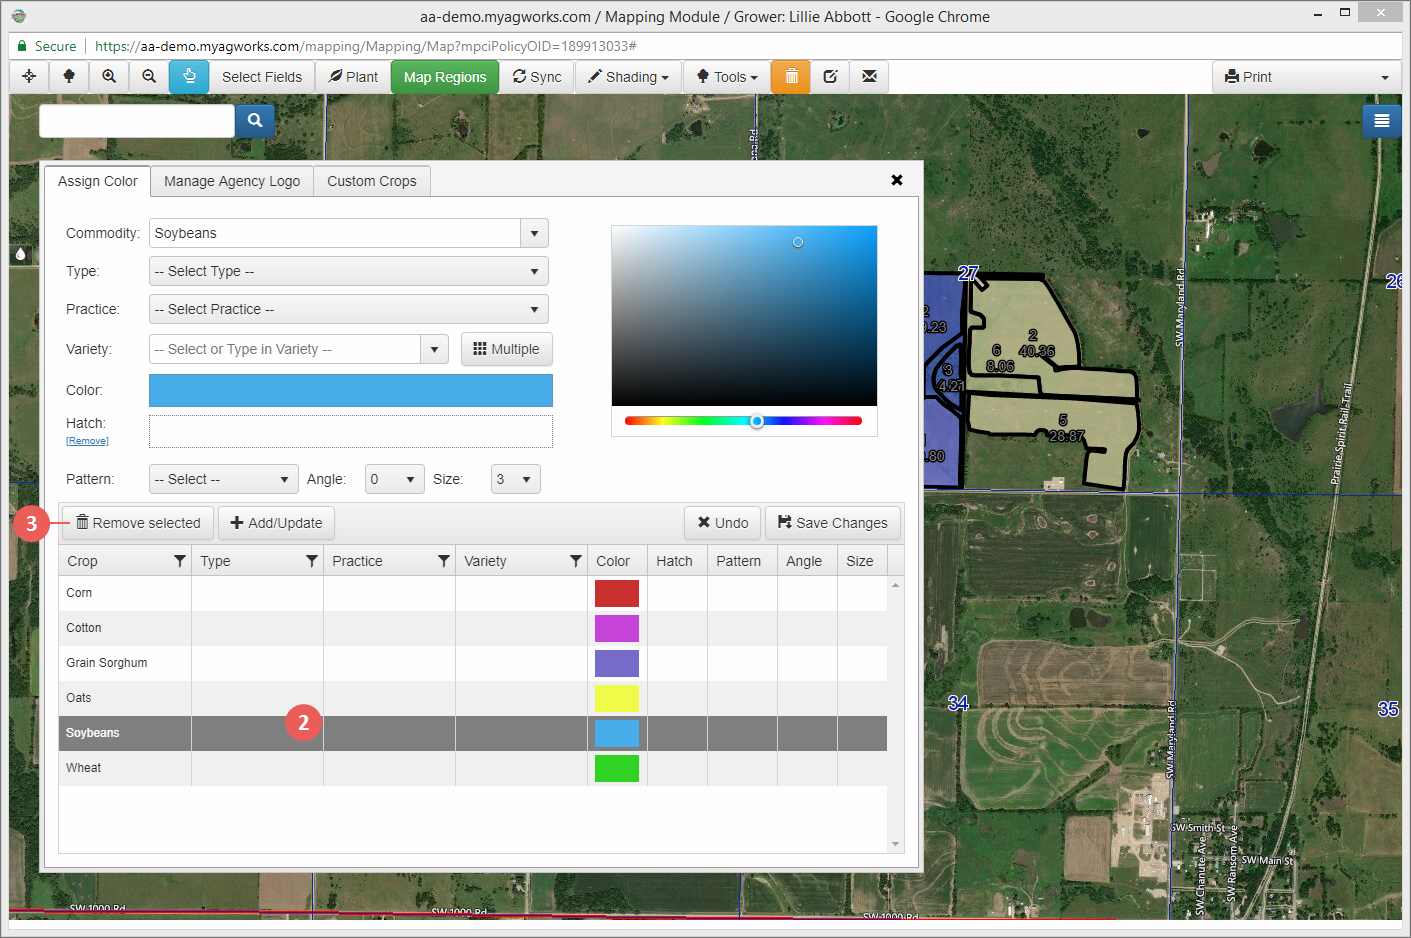
Shading can be customized through the use of color and hatching for each Commodity, Type, Practice, and Variety combination.
For each unique shading combination you want to create, perform the following steps:
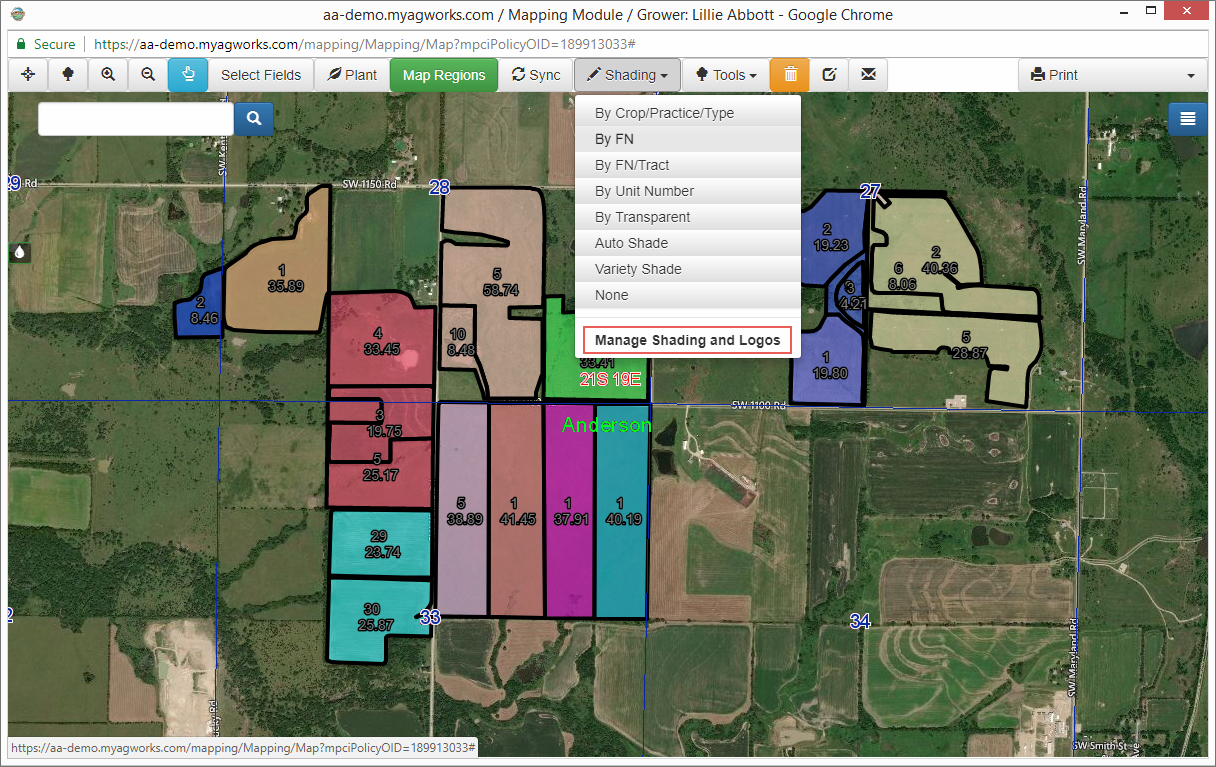
| 1. | In the Mapping window, click Shading and then select “Manage Shading and Logos”. The Shading & Logo panel opens on the Assign Color tab. |
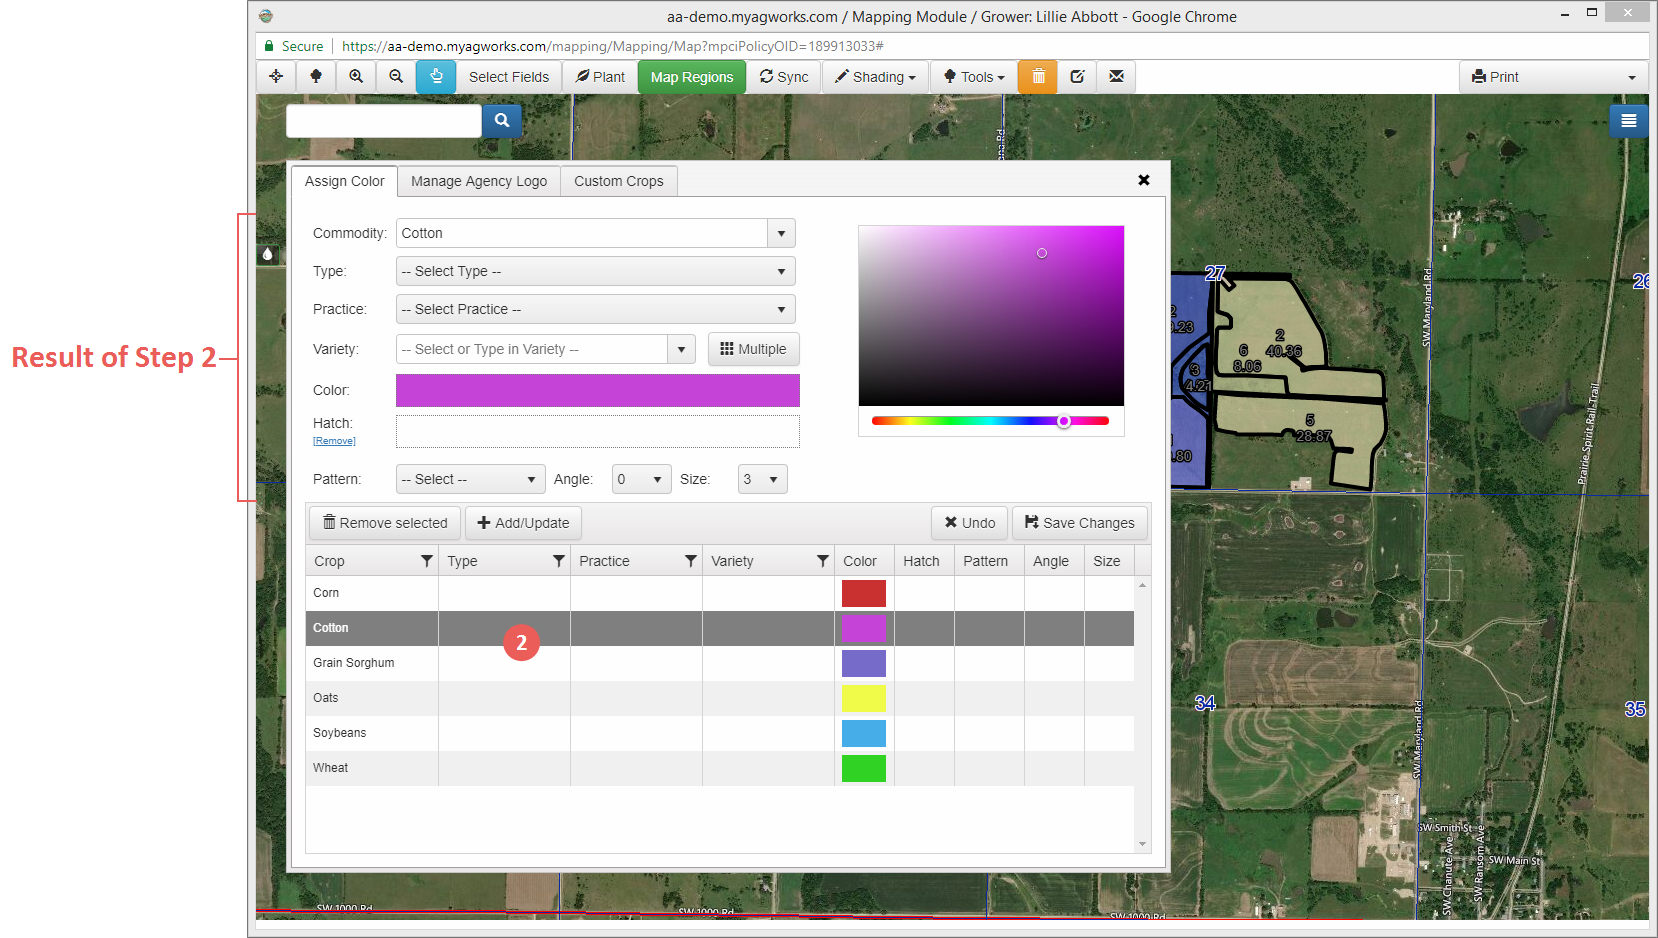
| 2. | On the Assign Color tab, from the Commodity dropdown, select the crop you are creating a color combination for. The System validates your selection against the ADM and enables the Type dropdown with options available to the selected crop. |
| 3. | From the Type dropdown, select the type for the crop. The System validates your selection against the ADM and enables the Practice dropdown with options available to the selected Crop/Type. |
| 4. | From the Practice dropdown, select the practice for the crop. The System validates your selection against the ADM and enables the Variety dropdown with options available to the selected Crop/Type/Practice. |
| 5. | If applicable, from the Variety dropdown, type or select the variety for the crop. |
NOTE: You can change weather the shading is assigned to a particular variety or multiple varieties by clicking the Multiple button. This will change the available fields. Click Single to return to the default view.
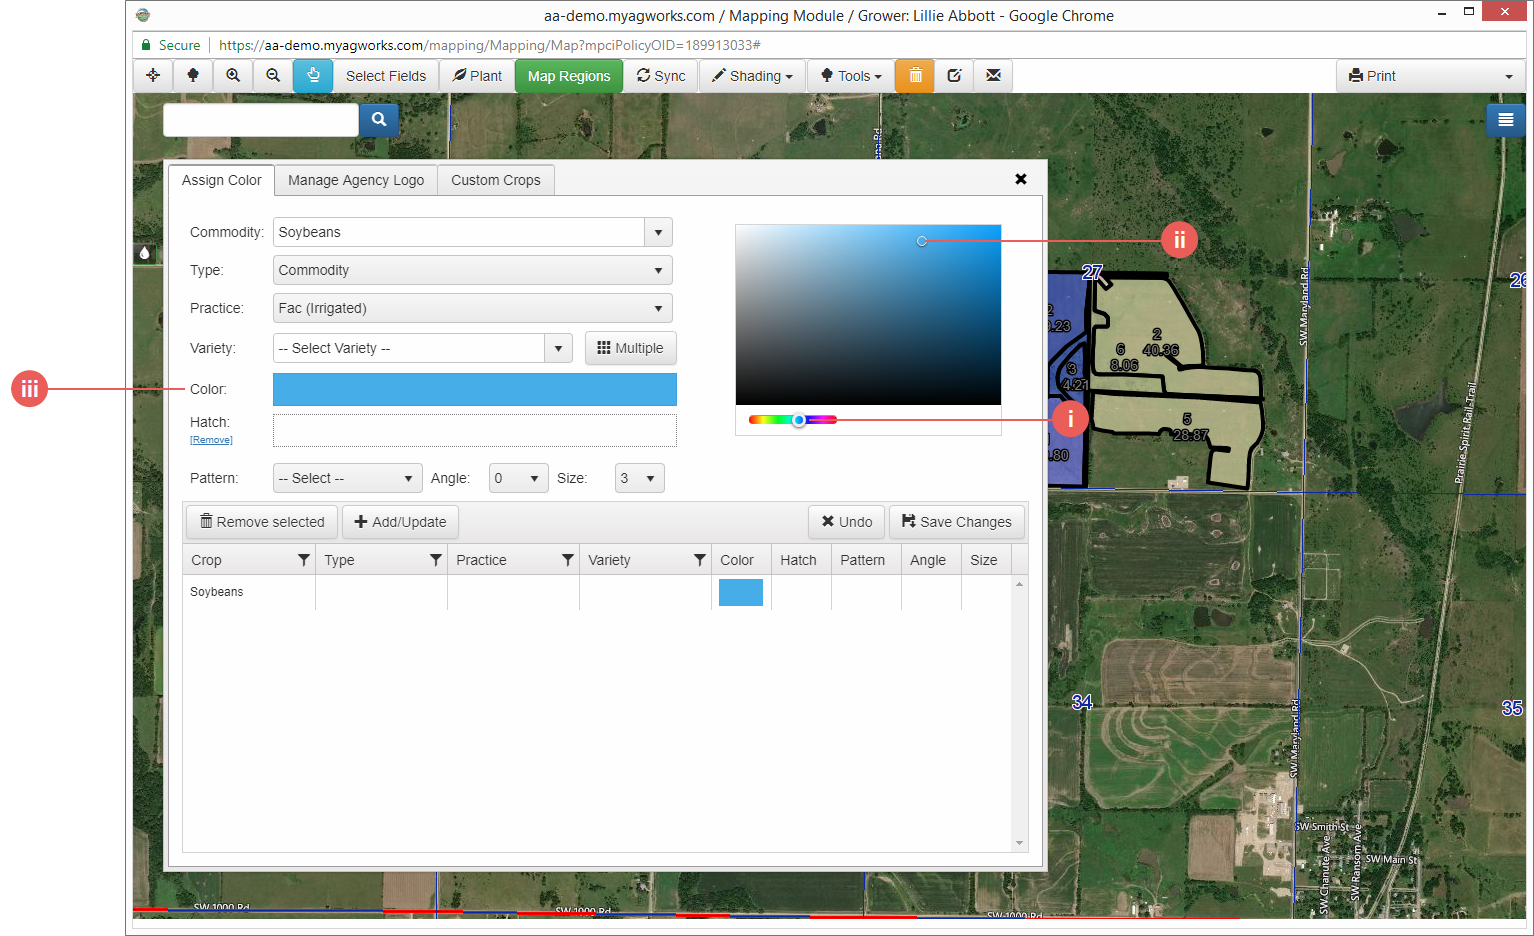
| 6. | Click in the Color field. Using the color slider, select a hue (i) and then use the color picker to select a color value within that hue to indicate the selected Crop/Type/Practice/Variety (ii). The selected color is displayed in the Color field (iii). |
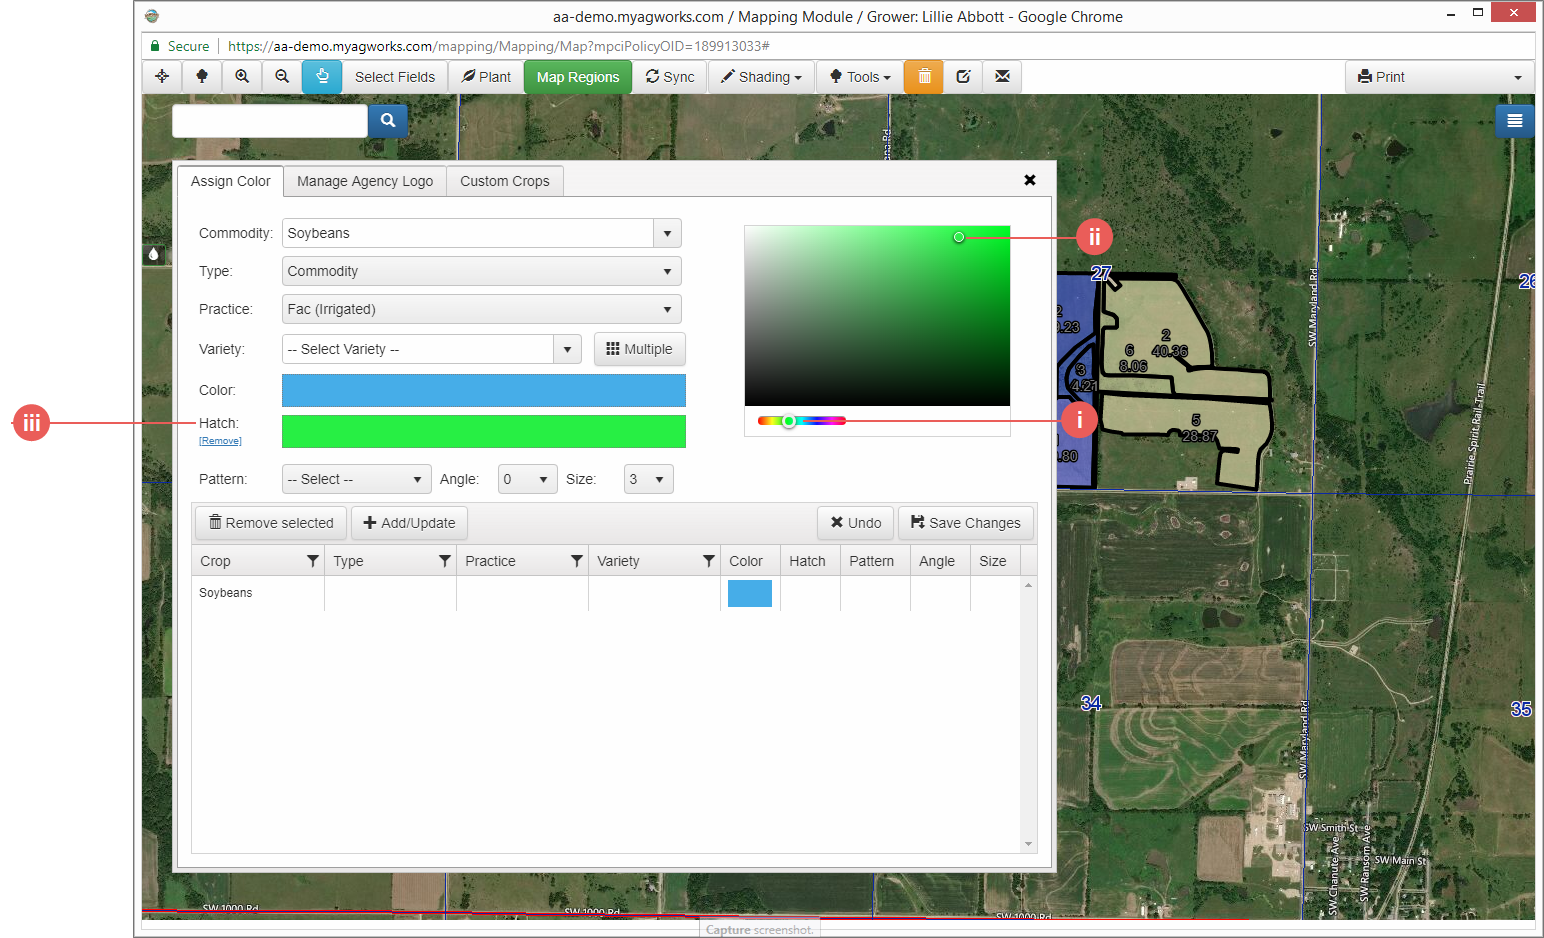
| 7. | If desired, click in the Hatch field. The color selected in this step will be used to create a diagonal line across the main color selected in step 6. This will only display on printouts, not within the user interface. Using the color slider, select a hue (i) and then use the color picker to select a color value within that hue to indicate the selected Crop/Type/Practice/Variety (ii). The selected color is displayed in the Hatch field (iii). |
| 8. | To apply a pattern to the selected Crop/Type/Practice/Variety, from the Pattern dropdown, select a pattern type. Then, use the Angle and Size dropdowns to further customize the shading. |
| 9. | Click the +Add/Update button. The Crop/Type/Practice/Variety is added to the grid with the Color and Hatch displayed. |
| 10. | When you’ve finished adding all necessary C/T/P/V color combinations, click the Save Changes button. The addition(s) are saved and you can safely navigate away from the Shading & Logo panel and the Map tab. |
When editing or deleting a C/T/P/V combination, changes are made at the agency level—so proceed with caution.
Edit an Existing C/T/P/V Combination
| 1. | In the Mapping window, click Shading and then select “Manage Shading and Logos”. The Shading & Logo panel opens on the Assign Color tab. |
| 2. | In the grid of the Assign Color tab, select the row of the C/T/P/V whose selections and/or color you need to edit. The values for the existing C/T/P/V are displayed in their corresponding fields. Make changes to the C/T/P/V as necessary. |
| 3. | Click in the Color field and then use the color picker to select a new color, if needed, to change the color used to indicate the Crop/Type/Practice/Variety. |
| 4. | Click in the Hatch field and then use the color picker to select a new color, if needed, to change the diagonal striping used on the C/T/P/V. |
| 5. | To apply a pattern to the selected Crop/Type/Practice/Variety, from the Pattern dropdown, select a pattern type. Then, use the Angle and Size dropdowns to further customize the shading. |
| 6. | Click the +Add/Update button. The Crop/Type/Practice/Variety is updated in the grid. |
| 7. | Click the Save Changes button. The change is saved and you can safely navigate away from the Shading & Logo panel and Map tab. |
Delete a C/T/P/V Color Combination
| 1. | In the Mapping window, from the Shading dropdown, select “Manage Shading and Logos”. The Shading & Logo panel opens on the Assign Color tab. |
| 2. | In the grid on the Assign Color tab, select the row of the C/T/P/V you need to delete. The row is highlighted. |
| 3. | Click Remove Selected. The highlighted row is removed from the grid. |
| 4. | Click the Save Changes button. The deletion is saved and you can safely navigate away from the Map tab without losing changes. |
When printing maps, an agency has two options for how Agency information is printed:
NOTE: At this time, the two options cannot be combined.
An agency can upload one or more logos which can be printed in the bottom-right corner of the maps. For the Wall Map and Map Book, users can select which logo they want to print. When printing forms from the policy print menu, the last uploaded logo will be the one used on those particular forms.
The System will re-size the logo, if necessary, to fit within the space allowed; the size of the printed logo depends on the chosen map.
| 1. | In the Mapping window, from the Shading dropdown, select “Manage Shading and Logos”. The Shading & Logo panel opens on the Assign Color tab. |
| 2. | Select the Manage Agency Logo tab. |
| 3. | In the Upload/Refresh Agency Logo section, click Browse. The File Upload popup opens. |
| 4. | In the File Upload popup, locate and select the logo file. The accepted file formats are .PNG, .TIF, and .GIF. Click Open. The file name is shown next to the Browse button. |
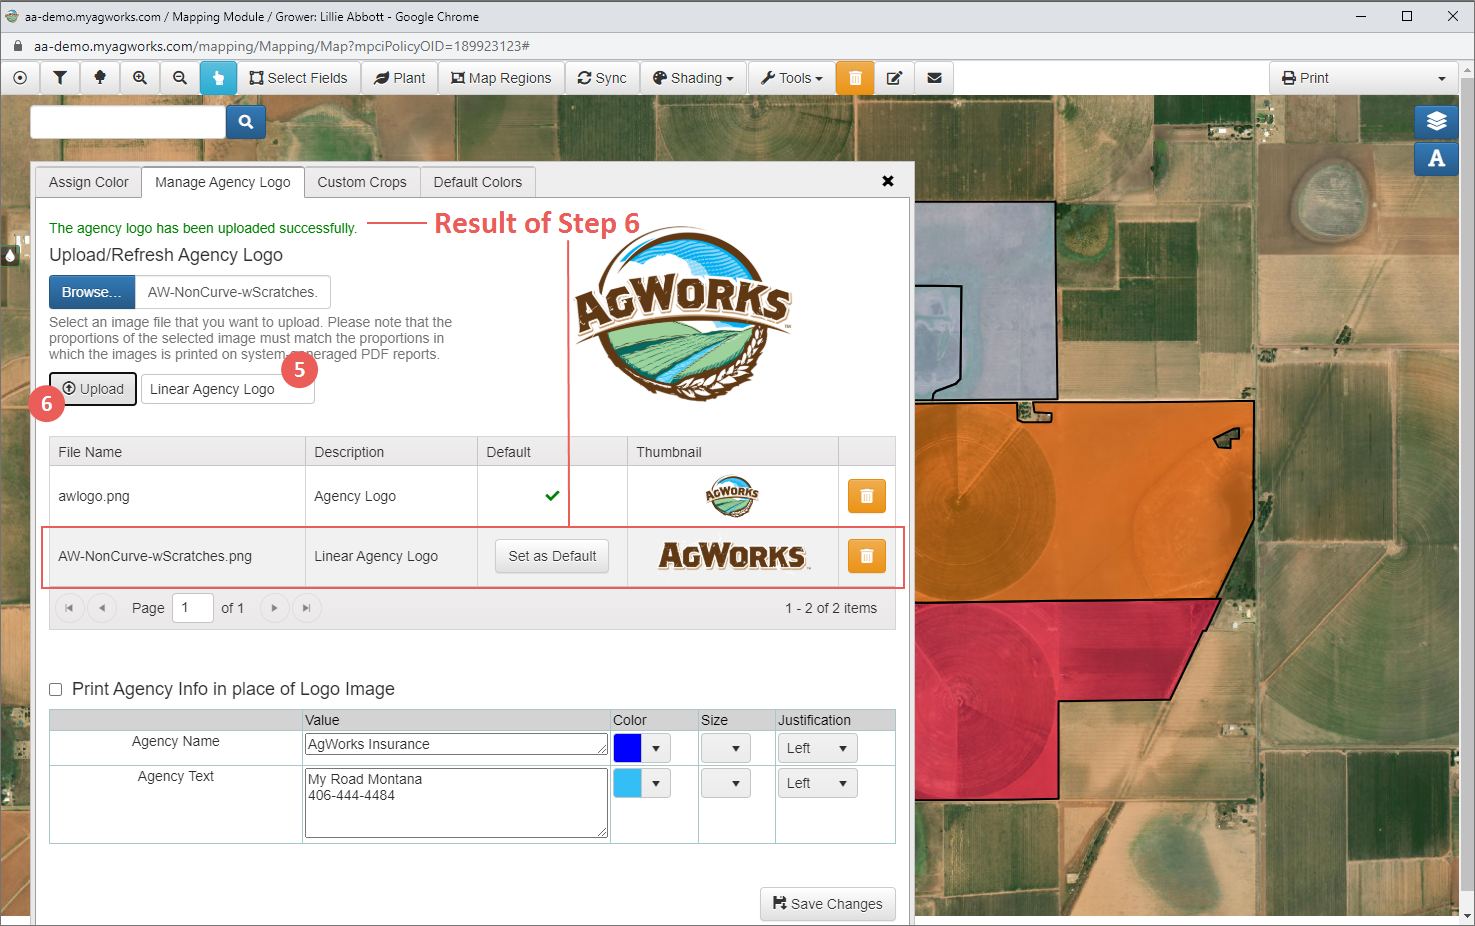
| 5. | Before uploading, add a Description of the logo file to help differentiate it among other logo files. |
| 6. | Click Upload. The selected image is displayed in the space to the right of the Upload button, and the System displays a message near the tab label: “The agency logo has been uploaded successfully.” Verify that the correct image is shown. |
| 7. | Set the default image for maps by click Set as Default for the preferred image. |
| 8. | Click Save Changes. |
NOTE: The AIP logo will print in the top-left corner of the map and cannot be removed.
When printing Map Books and Wall Maps, you will be able to select which logo you want to print, when selecting other print parameters. See "Print a Map".
In lieu of the agency logo, the agency’s name and additional text can be printed on the maps.
| 1. | In the Mapping window, from the Shading dropdown, select “Manage Shading and Logos”. The Shading & Logo panel opens on the Assign Color tab. |
| 2. | Select the Manage Agency Logo tab. |
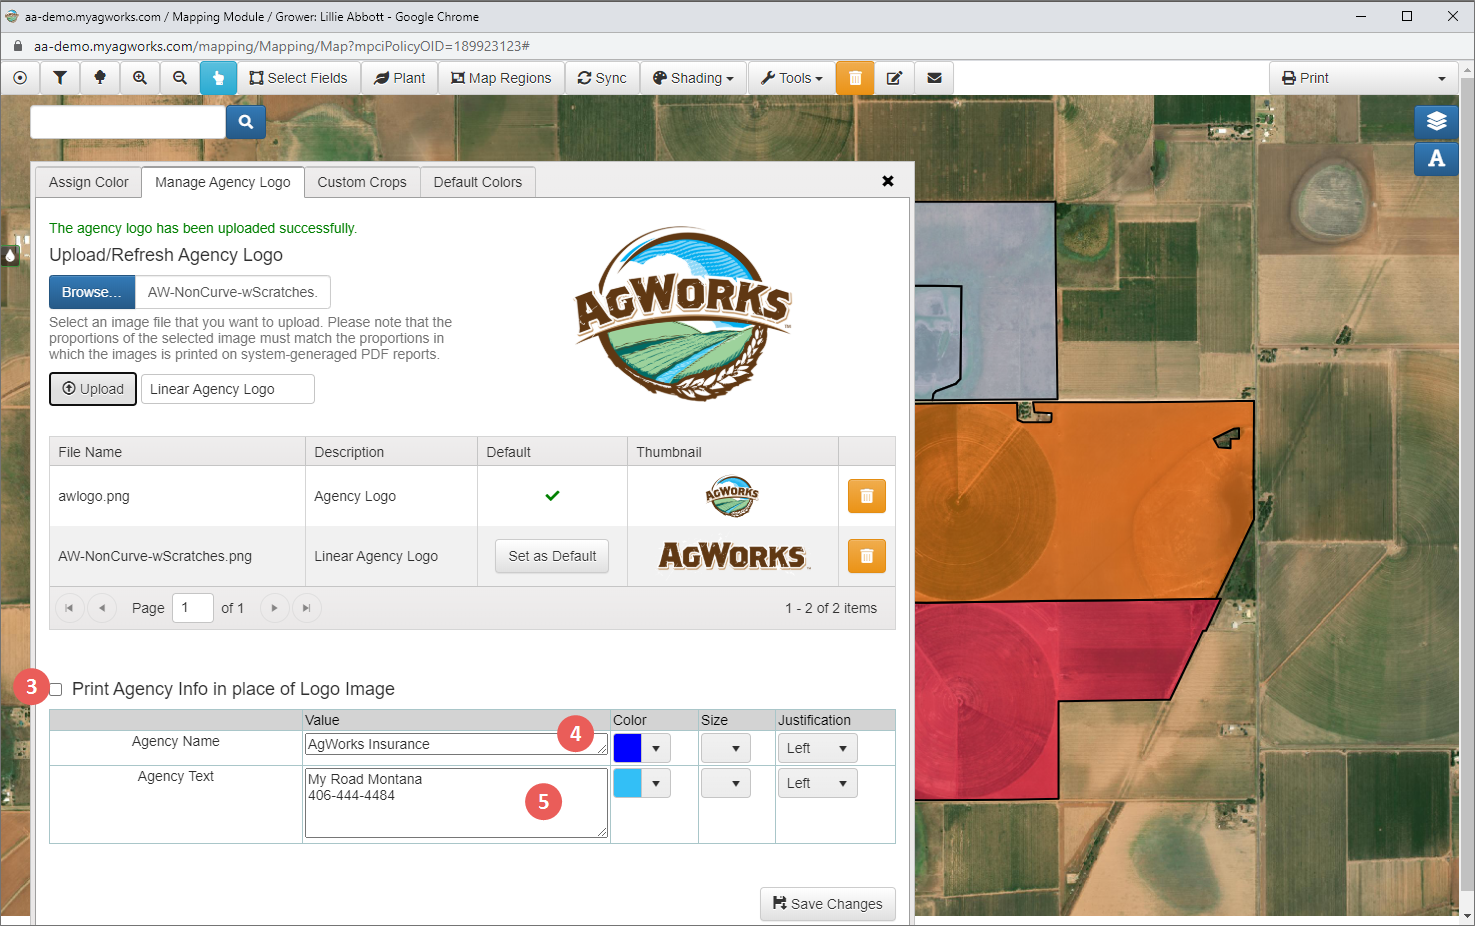
| 3. | Mark the Print Agency Info in place of Logo Image checkbox. |
| 4. | In the Agency Name row, the following fields are displayed: |
| • | The Value field defaults to the agency name associated with the policy. Replace this text as needed. There is no limit to the number or type of characters used in this text box. |
| • | The Color defaults to black. Click the dropdown to open the color picker and select a new color for the text. |
| • | The Size defaults to “12”. From the dropdown, select another size if needed. “12” is the smallest option at this time. |
| • | The Justification defaults to “Left”. From the dropdown, select “Right” or “Center” if needed. |
| 5. | In the Agency Text row, the following fields are displayed: |
| • | The Value field defaults to the agency code and name associated with the policy. Replace this text as needed. There is no limit to the number or type of characters used in this text box. |
| • | The Color defaults to black. Click the dropdown to open the color picker and select a new color for the text. |
| • | The Size defaults to “12”. From the dropdown, select another size if needed. “12” is the smallest option at this time. |
| • | The Justification defaults to “Left”. From the dropdown, select “Right” or “Center” if needed. |
| 6. | Click Save Changes. The agency information prints in the bottom-left corner. |
As with C/T/P/V shading, agency logo/information changes are done at the agency level—so be cautious. Changes made to the logo/agency information are reflected in all maps printed after the change—any Map Books or Map Based Acreage Reports saved in the Historical Grid of the Print panel will not change.
Edit the Agency Logo
| 1. | In the Mapping window, from the Shading dropdown, select “Manage Shading and Logos”. The Shading & Logo panel opens on the Assign Color tab. |
| 2. | Select the Manage Agency Logo tab. |
| 3. | In the Upload/Refresh Agency Logo section, click Browse. The File Upload popup opens. |
| 4. | In the File Upload popup, locate and select a new or revised image file. Click Open. The file name is shown next to the Browse button. |
| 5. | Create a Description for the selected image file and click Upload. The selected image is displayed in the space to the right of the Upload button. Check that the new image is the correct image. |
| 6. | Click Save Changes. The System displays a message near the tab label: “The agency logo has been uploaded successfully.” You can safely navigate away from the Shading & Logo panel and Map tab. |
Edit the Agency Information
| 1. | In the Mapping window, from the Shading dropdown, select “Manage Shading and Logos”. The Shading & Logo panel opens on the Assign Color tab. |
| 2. | Select the Manage Agency Logo tab. |
| 3. | Make sure the Print Agency Info in place of Logo Image checkbox is marked. |
| 4. | In the Agency Name row, make changes to the Value, Color, Size, and Justification fields as needed. |
| 5. | In the Agency Text row, make changes to the Value, Color, Size, and Justification fields as needed. |
| 6. | Click Save Changes. You can safely navigate away from the Shading & Logo panel and Map tab. |
You can set the default layer colors for the grower field layer
| 1. | To change the default grower field layer color, in the Mapping window, from the Shading dropdown, select "Manage Shading and Logos". The Shading & Logo panel opens on the Assign Color tab. |
| 2. | Select the Default Colors tab. |
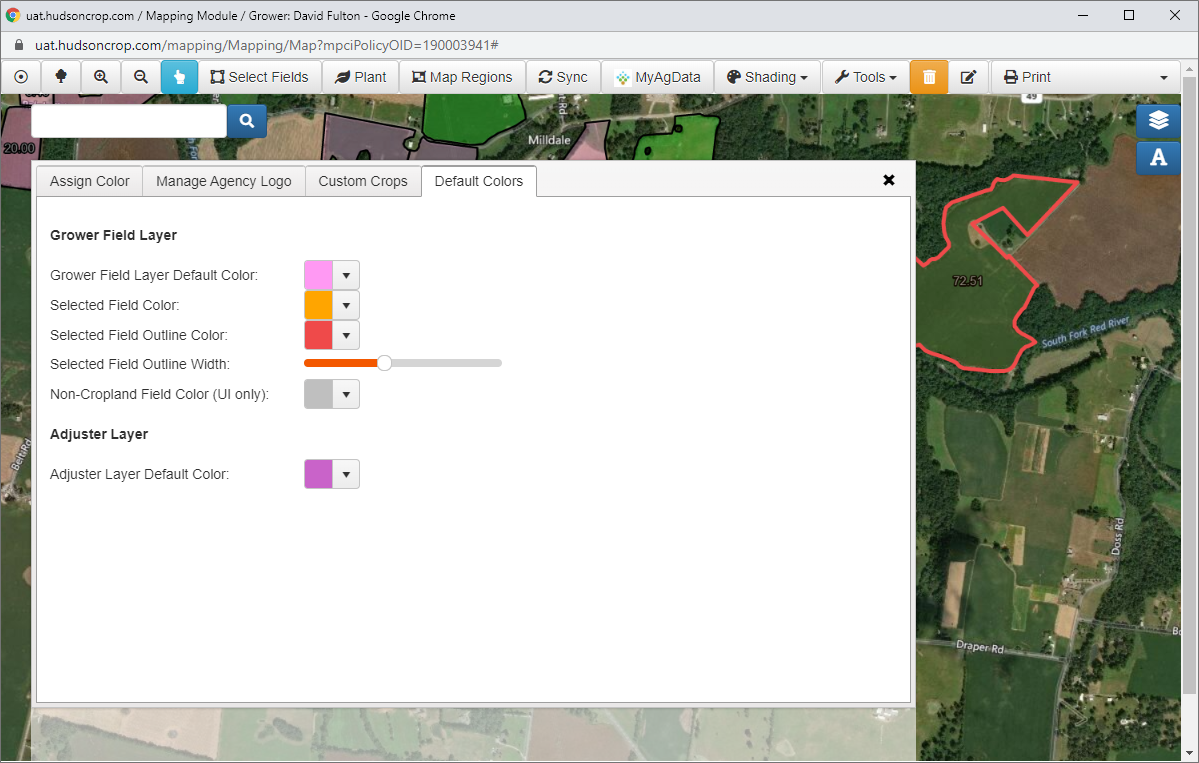
| 3. | In the Grower Field Layer section, you can change the default options for the following: |
| • | Grower Field Layer Default Color: Indicates the default color for planted fields—the color that displays for any fields that do not match color assignations on the Assign Color tab. Open the dropdown to select a color. Using the color slider, select a hue and then use the color picker to select a color value within that hue . Click Apply when you've found the right color. The selected color is displayed in the field. |
| • | Selected Field Color: Indicates which field(s) you have currently selected. Open the dropdown to select a color. Select the color to open the color picker. Using the color slider, select a hue and then use the color picker to select a color value within that hue. To change the transparency of the field's color, use the slider below the color slider to change the transparency, where further left is more transparent and further right is less transparent. Click Apply when you've found the right color. The selected color is displayed in the field. |
| • | Selected Field Outline Color: Outlines the field(s) you have currently selected. Open the dropdown to select a color. Select the color to open the color picker. Using the color slider, select a hue and then use the color picker to select a color value within that hue. To change the transparency of the outline color, use the slider below the color slider to change the transparency, where further left is more transparent and further right is less transparent. Click Apply when you've found the right color. The selected color is displayed in the field. |
| • | Selected Field Outline Width: Makes the outline's width smaller or larger for the field(s) you have currently selected. In conjunction with the Selected Field Outline Color field, use the slider to select a width for the outline where further left is smaller and further right is wider. |
| • | Non-Cropland Field Color (UI only):Indicate the fields marked as non-cropland. Select the color to open the color picker. Using the color slider, select a hue and then use the color picker to select a color value within that hue. Click Apply when you've found the right color. The selected color is displayed in the field. |
When a user has the permissions to view the adjuster layer, this second section is available for setting the default color for the adjuster layer.
To change the default color for the adjuster layer, in the Adjuster Layer section, click on the color to open the color picker. Using the color slider, select a hue and then use the color picker to select a color value within that hue to indicate the default color for the adjuster layer. Click Apply when you've found the right color. The selected color is displayed in the field.
