|
1.
|
On the View MPCI Claims page of the policy you need to add an NOL to, from the -- Actions -- dropdown, select "Add New Notice". |
|
2.
|
Click Go. The Add MPCI Notice of Loss page opens. |
|
3.
|
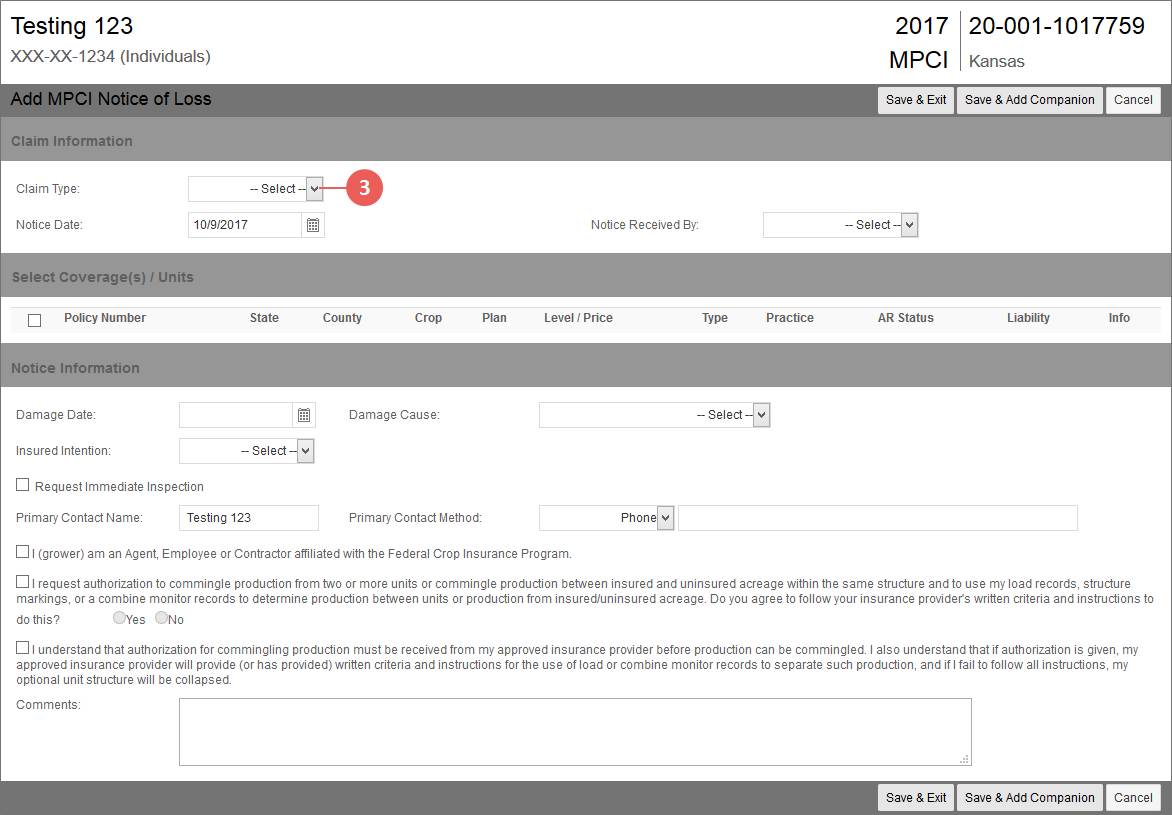
In the Claim Information section, from Claim Type, select the type of claim needed. The Select Coverage(s) / Units section of the page refreshes to show the coverages and units on all of the grower's policies that are applicable for the claim type selected; some fields in this section will only be available for certain claim types (e.g., the SC Claims checkbox is only available for coverages on Final and Replant claims, and an additional field, Replant Acres Exceed 50.0?, displays only for units on Replant claims). |
|
•
|
If you selected "Inspection", the Claim Information section also refreshes to display an additional field. Continue to step 4. |
|
•
|
If you selected any claim type other than "Inspection", skip to step 5. |
NOTE: If entering an NOL for a Production Claim, select "Final" from this dropdown.
|
4.
|
For Inspection claim types only, from Inspection Reason, select the reason for inspection. |
|
5.
|
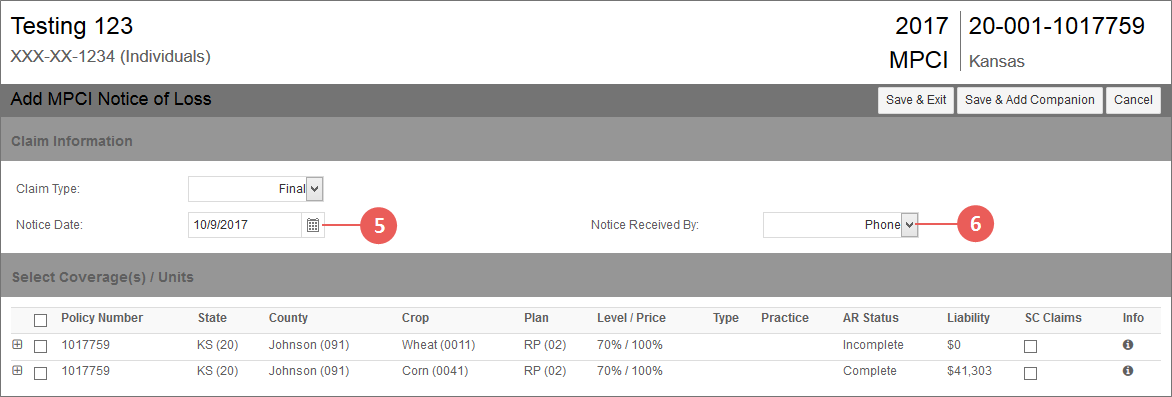
In Notice Date, type the date the insured submitted the loss notice in the MM/DD/YYYY format or use the calendar tool to select the date. This field defaults to the current System date. |
|
6.
|
From Notice Received By, select how the insured notified you of the loss. |
|
7.
|
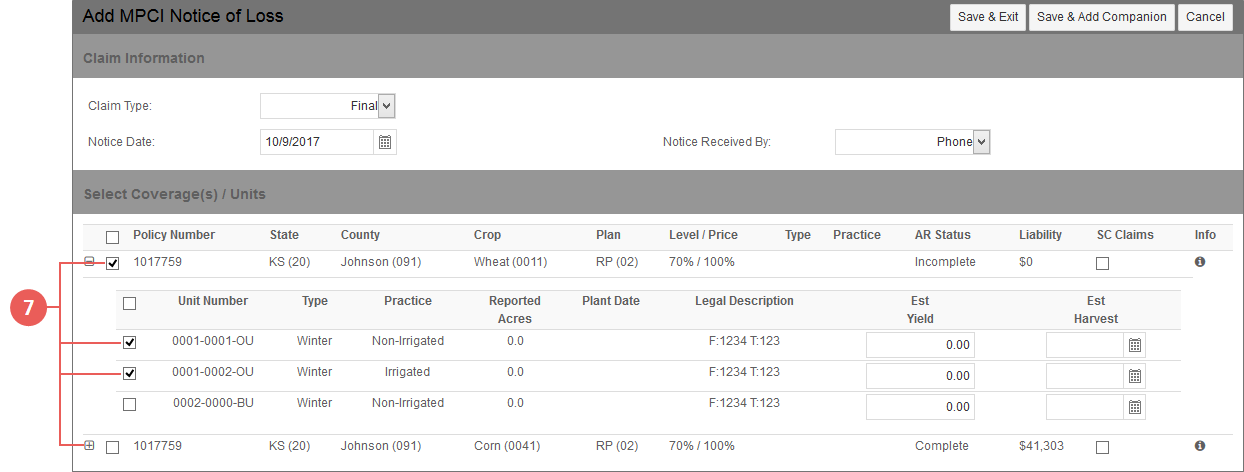
In the Select Coverage(s) / Units section, select any coverages and units that are associated with the loss. Group Plan coverages and canceled coverages are not available for selection. |
|
•
|
To select a coverage that's associated with the loss, select the checkbox for the coverage in the grid. Multiple coverages can be selected. |
NOTE: This checkbox will automatically be selected if a unit on the coverage is selected. Additionally, if a coverage is associated with any other claims of the same claim type for the current RY, an information icon displays for the coverage in the Info column of the grid. When this icon is clicked, a popup displays the claim number, type, status, and the adjuster assigned of any claims associated with the coverage.
|
•
|
To select units on a coverage, click the plus sign (+) to the left of the policy number to expand the coverage. A sub-grid displays with all units on the coverage that are applicable to the claim type you selected earlier. Select the checkboxes for any units associated with the loss. If more than one coverage is associated with the loss, repeat this process for the additional coverages. |
|
8.
|
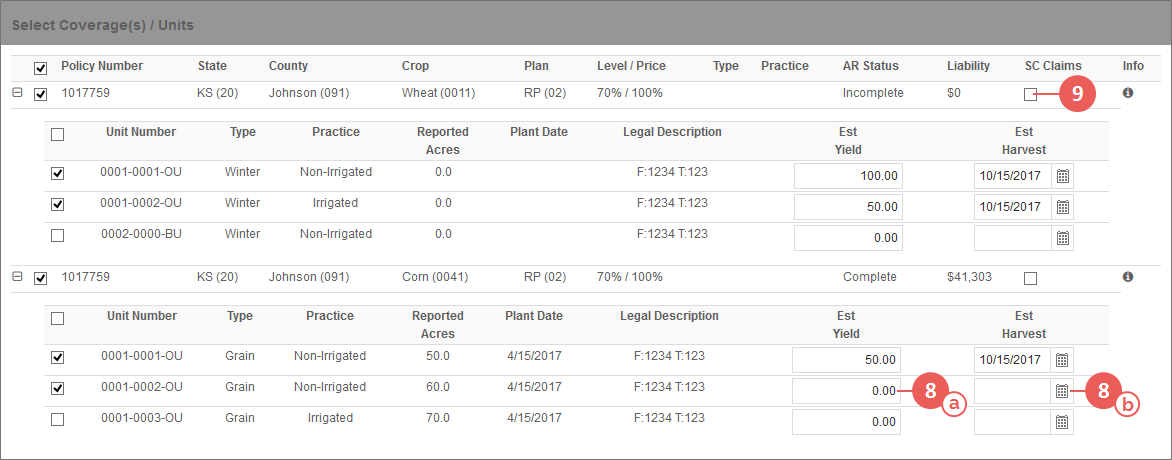
With a coverage you selected units on expanded, do the following for each unit you selected: |
|
a.
|
In the field available in the Est Yield column for a unit, type the estimated yield for the unit. |
|
b.
|
In the field available in the Est Harvest column for the unit, type the estimated harvest date or use the calendar tool to select the date. |
|
c.
|
For Replant claims only, if the replant acres for the unit exceed 50.0, in the Replant Acres Exceed 50.0? column for the unit, select the available checkbox. |
|
d.
|
Repeat steps a-c for all units you selected for each coverage. |
|
9.
|
For Final and Replant claims only, if a coverage you selected or selected units on in step 7 qualifies for SC (Simplified Claim or Self-Certified Replant), select the checkbox in the SC Claims column for the coverage. If more than one coverage is available in the Select Coverage(s) / Units section, this checkbox will be automatically selected for all coverages where SC is allowed for the crop/coverage. |
NOTE: This checkbox will only be available for crops/coverages that allow SC. Additionally, the selection of this checkbox will not automatically select coverages for inclusion in the NOL.
|
10.
|
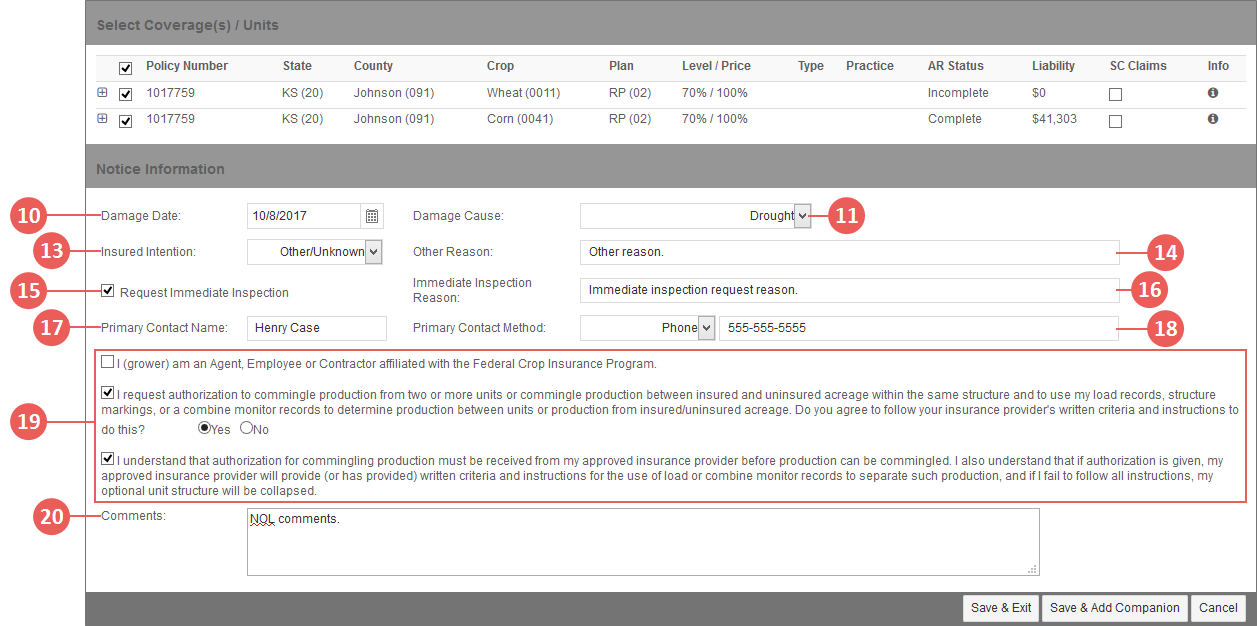
In the Notice Information section, in Damage Date, type the date the coverage(s) was damaged in the MM/DD/YYYY format or use the calendar tool to select the date. For events that cover a period of time (e.g., Excessive Moisture, Drought), enter the date of the first day of the first month in which the event started. |
NOTE: The date entered in the Damage Date field cannot be later than the date entered in the Notice Date field.
|
11.
|
From Damage Cause, select the cause of loss for the NOL. |
|
12.
|
If the coverage(s) damaged is Nursery and the claim is a Rehabilitation claim (not Final), select the Rehabilitation Claim checkbox. |
NOTE: This checkbox is only available if Nursery exists for a policy on the NOL.
|
13.
|
From Insured Intention, select the insured's intention at the time that the notice of loss was reported. If "Other/Unknown" is selected, a new field, Other Reason, will display. |
|
14.
|
If "Other/Unknown" was selected in the step above, in Other Reason, type the reason for selecting that option. |
|
15.
|
If an immediate inspection is required for the damage reported, select the Request Immediate Inspection checkbox. If the Request Immediate Inspection checkbox is selected, a new field, Immediate Inspection Reason, will display. |
|
16.
|
If the checkbox was selected in the step above, in Immediate Inspection Reason, type the immediate inspection reason. |
|
17.
|
In Primary Contact Name, type the name of the primary contact if different from the grower. This field defaults as the grower name on the policy. |
|
18.
|
From the Primary Contact Method dropdown, select the primary method of contact for the person listed in the Primary Contact Name field. Then, in the field to the right of the dropdown, type the contact information (i.e., email address or phone number) for the primary method of contact you selected. |
|
19.
|
In the statements area, select the checkbox for any of the three statements that are applicable to the NOL. If the second statement is selected, you need to also select either "Yes" or "No". If none of the statements apply, you do not need to select any. |
|
20.
|
In Comments, type any comments as needed. |
NOTE: Any comments entered in this field will be part of the permanent NOL.
|
21.
|
As your final step, click one of the following buttons: |
|
•
|
To save the NOL and return to the View MPCI Claims page, click Save & Exit. Any claims created based on the selections made on the Add MPCI Notice of Loss page will display in the Claims for Policy grid. If claims for multiple policies were created, they will be available in the Claims for Policy grid of their associated View MPCI Claims pages. |
|
•
|
To cancel the NOL entry and return to the View MPCI Claims page, click Cancel. No claims will be created. |
NOTE: Once an NOL is saved on the policy, the System will automatically mark the Request CIMS checkbox at the policy level. This flag can be seen when editing the coverages listed on the NOL.

