|
2.
|
Click the “View CLU” link of the Land ID record you want to edit the Planted Field for. The CLU grid opens for the selected Land ID. |
|
3.
|
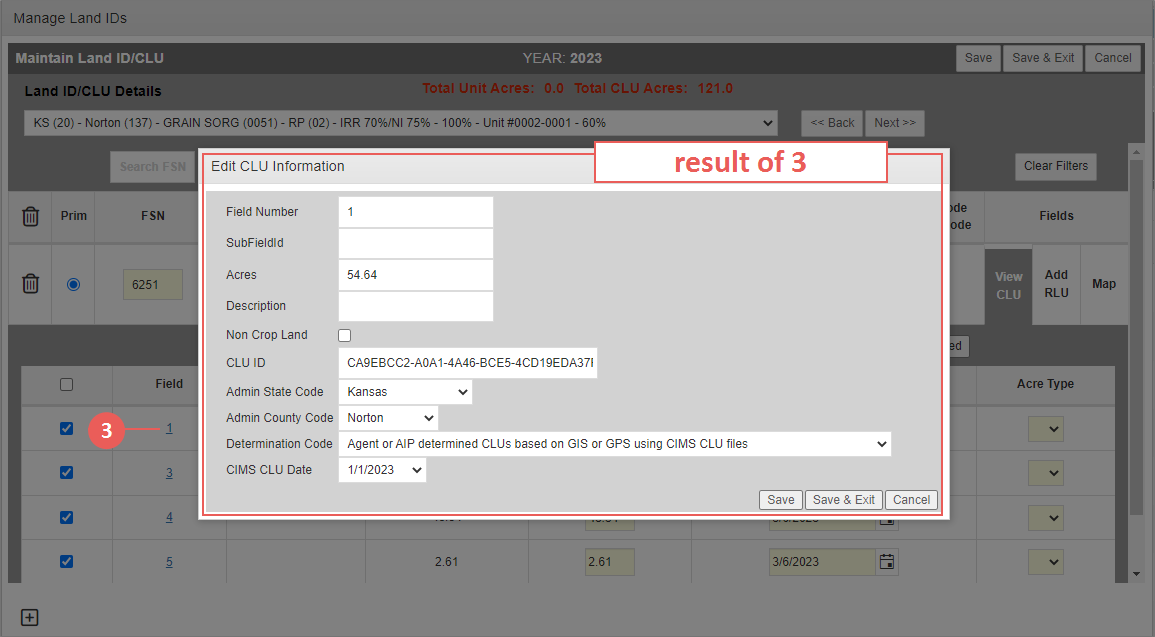
To edit a Planted Field, click on the Field hyperlink that corresponds with the Planted Field you need to edit. The Edit CLU Information popup opens for the Planted Field. |
|
4.
|
If applicable, in this popup, edit one or more of these fields: Field Number, Sub Field ID, Acres (CLU), Description, Non Crop Land Indicator, CLU ID, Admin State Code, Admin County Code, Determination Code, and CIMS CLU Date. |
|
5.
|
As your next step, click one of the following buttons: |
|
•
|
Save: Changes are saved, and you remain in the Edit CLU Information popup. |
|
•
|
Save & Exit: Changes are saved, the Edit CLU Information popup closes, and the user is returned to the Manage Land IDs popup. |
|
•
|
Cancel: Changes are not saved, and you are returned to the Manage Land IDs popup. |
|
6.
|
To change the Planted Field(s) associated with the selected Land ID record, mark or clear the checkboxes for the available Field(s). The selected rows turn yellow to indicate that there are changes to be saved. |
|
7.
|
To change the reported acres, in the Reported Acres field, type the number of acres that were actually planted for the Field. |
|
8.
|
If the CLU Web Service found Fields associated with the FSN or FSN/Tract combination, the System displays the CLU Acres in the Reported Acres field if the Field is selected to be associated with the Land ID; modify the Reported Acres if needed. |
|
9.
|
To change the Plant Date, in the Plant Date field, edit the plant date in DD/MM/YYYY format or click the calendar button to select a date. The date defaults as blank and is only editable when the corresponding Field is selected to be associated with a Land ID record. A Field number and Reported Acres value are required when adding a Plant Date. |
|
10.
|
When applicable, from the Acre Type dropdown, select the Acreage Type to apply to the Planted Field. Hover over the Acre Type column label to view a description of each code available. This field requires that a Reported Acres value is also entered. |
|
11.
|
Click Save Fields to save any changes to the CLU grid; or click Cancel Fields to cancel all changes to the CLU grid; then, select one of the following options above the Land IDs grid: |
|
•
|
Save: Changes to the Land ID and Planted Field records are saved and you remain on the Manage Land IDs popup with the CLU grid open. |
|
•
|
Save & Exit: Changes to the Land ID and Planted Field records are saved and you are returned to the point of access. The Planted Field now displays in the Planted Fields section of these System pages: Add New/Maintain Detail Lines, Add New/Maintain APH, and Fast Edit PR. |
|
•
|
Cancel: Changes to the Land ID and Planted Field records are not saved, the Manage Land IDs popup closes, and you are returned to the point of access. |
The fields are associated with the Land ID and the rows are no longer highlighted in yellow.
