In addition to Land IDs, the Manage Land IDs popup allows users to add Planted Fields to a detail line once the Land ID has been saved to the Detail Line.
|
1.
|
From one of the access points shown in "At a Glance: The Manage Land IDs Popup", open the Manage Land IDs popup for the detail line that contains the Land ID you need to associate a Planted Field with. |
|
2.
|
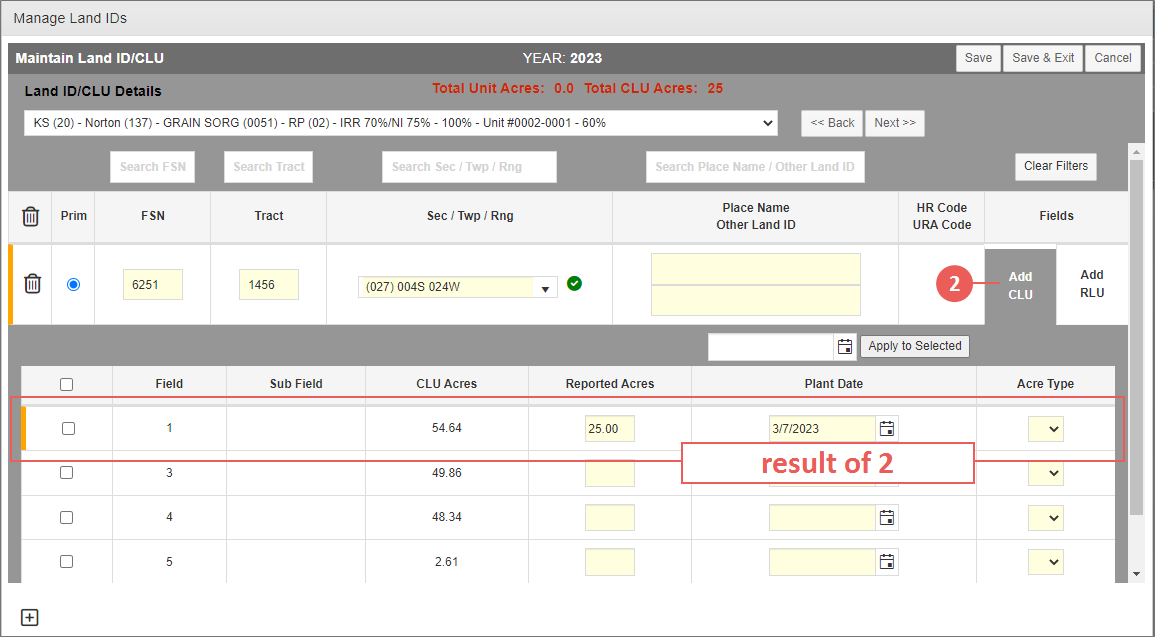
Click the [Add CLU] link in the row that corresponds with the Land ID record you want to associate the Planted Field with. If Planted Fields already exist for the Land ID record, this link displays as [View CLU] instead (as shown below). The CLU grid opens for the selected Land ID. |
|
3.
|
Your next step depends on whether fields were found by the CLU Web Service for the Land ID record: |
|
•
|
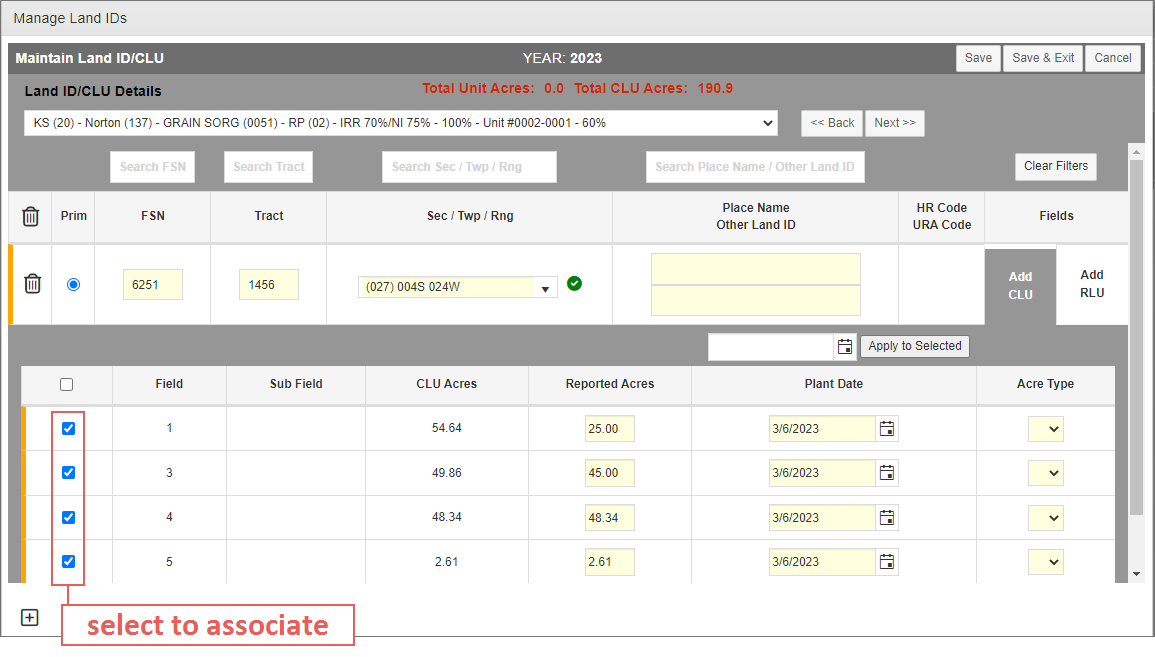
If the CLU Web Service found Fields associated with the FSN or FSN/Tract combination, the System displays those Fields and their Sub Field (if applicable) and CLU Acres as read-only values. If you do not need to manually add additional Fields, skip to step 9 to select which of the found Fields you want to associate with the Land ID. If you do need to add additional Fields, continue to step 4. |
|
•
|
If the CLU Web Service did not find any Fields associated with the FSN or FSN/Tract combination, you can manually enter a Field, Sub Field (if applicable), and CLU Acres to associate with the Land ID record. Continue to step 4. |
|
4.
|
In the Field field in the first row of the grid, type the Field number to associate with the Land ID record. A yellow vertical line appears to indicate that there are changes to be saved. |
|
5.
|
If applicable, in the Sub Field field, type a Sub Field number. Before you can save a Sub Field number, a Field number must first be provided in step 4. |
|
6.
|
In the CLU Acres field, type the total number of CLU Acres that exist for the Field. |
|
7.
|
In the Reported Acres field, type the number of acres that were actually planted for the Field. If the CLU Web Service found Fields associated with the FSN or FSN/Tract combination, the System displays the CLU Acres in the Reported Acres field if the Field is selected to be associated with the Land ID; modify the Reported Acres if needed, and then skip to step 10 to enter a Plant Date for the Planted Field. |
|
8.
|
When applicable, in the Plant Date field, enter a plant date in DD/MM/YYYY format or click the calendar button to select a date. Unless a date was already specified on the detail line, in which case the System populates the field with this date, the date defaults as blank and is only editable when the corresponding Field is selected to be associated with a Land ID record. A Field number and Reported Acres value are required when adding a Plant Date. |
TIP: To add dates in bulk to all selected fields, use the calendar button above the grid to select the bulk plant date and click Apply to Selected.
|
9.
|
Select the Field(s) you want to associate with the Land ID record by marking the checkbox(es) that correspond with the Field(s). The selected rows turn yellow to indicate that there are changes to be saved. |
|
10.
|
When applicable, from the Acre Type dropdown, select the Acreage Type to apply to the Planted Field. Hover over the Acre Type column label to view a description of each code available. This field requires that a Reported Acres value is also entered. |
|
11.
|
Click Save to save any changes to the CLU grid. The fields are associated with the Land ID and the rows are no longer highlighted in yellow. |

