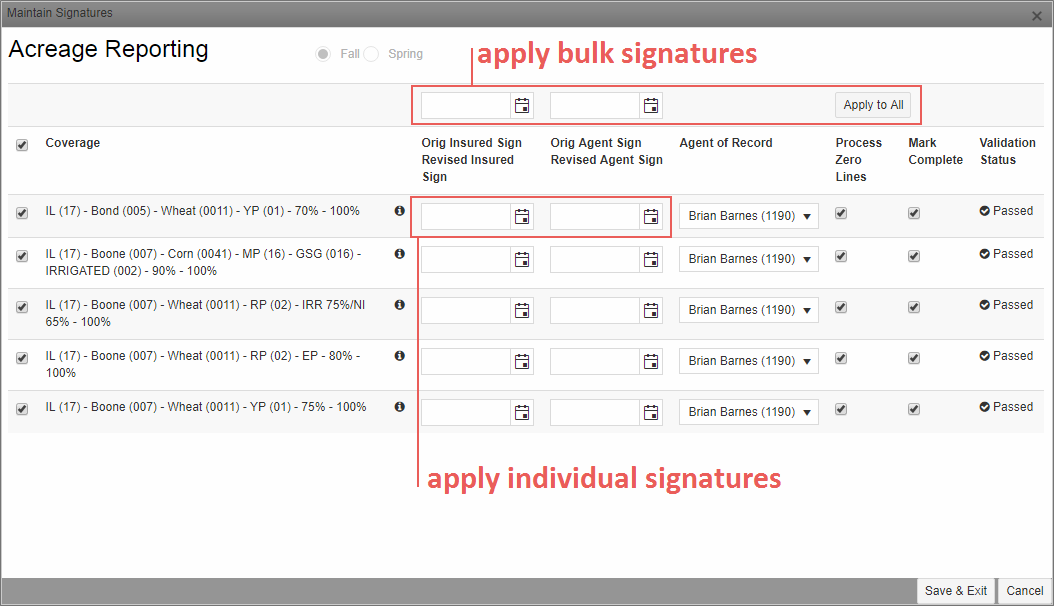
After validating the coverages on the acreage report and clicking Save & Continue, the Maintain Signature popup opens. In this popup, you can add signatures, process zero acres, and mark coverages complete.
|
1.
|
To add signature dates, select the checkbox that corresponds with each detail line you are applying a signature date for, and in the Insured Sign and Agent Sign date fields, type the dates the Insured and Agent signed the report in DDMMYYYY format or click the calendar button that corresponds with each signature to open the calendar tool and select a date for each. This date cannot be greater than the current date.If there's more than one coverage shown in the Fast Edit AR grid, then use the Insured Sign and Agent Sign date fields above the grid to apply the same signature dates to all selected coverages if needed. |
NOTE: If an original sign date exists for the coverage, it is shown as read-only above the individual date field.
TIP: To view the ARD and PRD for a coverage, click the information icon to the right of the coverage. A popup displays with the coverage's date. Click the icon again to close the popup.
|
2.
|
From the Agent of Record dropdown, select the agent of record for the coverage. If one has already been selected for the coverage, the System displays that name by default. If there is not an Agent of Record, the System defaults to the Servicing Agent, if available, in the dropdown. |
|
3.
|
To process a coverage as having zero acres, select the Process Zero Lines checkbox that corresponds with the coverage. |
|
4.
|
To mark the coverage complete, select the Mark Complete checkbox that corresponds with the coverage. The current Validation Status is shown to the right of the Mark Complete field for reference. |
|
5.
|
To attach signed documentation from within the Signature Maintenance popup, click the paperclip icon in the top-right corner. The Select file(s) to attach popup opens so you can attach one or more documents to the policy. For more details on how to add documents in this popup, see "Add an Attachment". |
|
6.
|
Repeat steps 1-4 for each coverage displayed on the Fast Edit AR page as needed. |
|
7.
|
To save the acreage report, click the Save & Exit button. The System will apply signature dates to all detail lines and zero acre lines, calculate premium on lines with greater than zero acres, process lines with 0 acres reported, and trigger the Mark Complete process for any lines that have the Mark Complete checkbox selected. Once this has been done, you are returned to the Detail Lines tab. |
After validating the coverages on the acreage report and clicking Save & Continue, the Maintain Signature popup opens. In this popup, you can add signatures, process zero acres, and mark coverages complete.
|
1.
|
To add signature dates, select the checkbox that corresponds with each detail line you are applying a signature date for, and in the Insured Sign and Agent Sign date fields, type the dates the Insured and Agent signed the report in DDMMYYYY format or click the calendar button that corresponds with each signature to open the calendar tool and select a date for each. This date cannot be greater than the current date.If there's more than one coverage shown in the Fast Edit AR grid, then use the Insured Sign and Agent Sign date fields above the grid to apply the same signature dates to all selected coverages if needed. |
NOTE: If an original sign date exists for the coverage, it is shown as read-only above the individual date field.
TIP: To view the ARD and PRD for a coverage, click the information icon to the right of the coverage. A popup displays with the coverage's date. Click the icon again to close the popup.
|
2.
|
From the Agent of Record dropdown, select the agent of record for the coverage. If one has already been selected for the coverage, the System displays that name by default. If there is not an Agent of Record, the System defaults to the Servicing Agent, if available, in the dropdown. |
|
3.
|
To process a coverage as having zero acres, select the Process Zero Lines checkbox that corresponds with the coverage. |
|
4.
|
To mark the coverage complete, select the Mark Complete checkbox that corresponds with the coverage. The current Validation Status is shown to the right of the Mark Complete field for reference. |
|
5.
|
Repeat steps 1-4 for each coverage displayed on the Fast Edit AR page as needed. |
|
6.
|
To save the acreage report, click the Save & Exit button. The System will apply signature dates to all detail lines and zero acre lines, calculate premium on lines with greater than zero acres, process lines with 0 acres reported, and trigger the Mark Complete process for any lines that have the Mark Complete checkbox selected. Once this has been done, you are returned to the Detail Lines tab. |
