|
1.
|
In the Attachments section of the page you're on, click the Add Attachment button. |
|
|
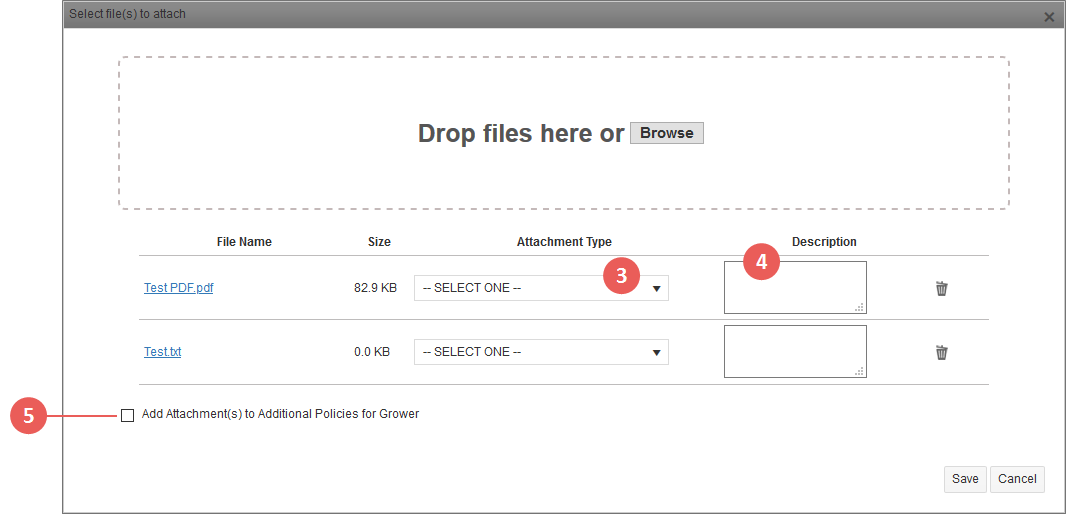
The Select file(s) to attach popup opens. |
|
2.
|
There are two methods for uploading files: |
|
•
|
You can drag and drop files into the designated location. The file name(s) appear in a grid below the file drop section. |
|
•
|
You can click the Browse button. The File Upload dialog box opens. Locate the file(s) you want to attach to the policy record and click the Open button. The File Upload dialog box closes and the file name(s) you selected display in a grid below the file drop section. |
NOTE: Once a file is selected, it appears in the File Name column of the Attachment grid. You can preview the attachment by clicking the hyperlinked name of the file. The file will download to your browser for review.
|
3.
|
From the Attachment Type dropdown, for each file you selected to upload, select the type of attachment it is. To quickly find the attachment type, use the search bar at the top of the dropdown to type the attachment type name. |
|
|
This selection will display in the Attachment Type column of the Attachments grid once the file is uploaded. |
NOTE: Some Attachment Types are classified as "permanent" attachments. Permanent Attachment Types are rolled from reinsurance year to reinsurance year. To see a list of the "Permanent" Attachment Types, see "Permanent Attachment Types".
|
4.
|
In the Description field, type a description of each uploaded file, if needed. This description will display in the Description column of the Attachments grid once the file is uploaded. |
|
5.
|
To add the attachment(s) to other policies with the same Grower TIN/Entity Type, select the Add Attachment(s) to Additional Policies for Grower checkbox. All policies matching the Grower’s OID will display in a grid below the checkbox. If the attachment is applicable to/for multiple policies, select the additional policies from the options displayed. Options will display the Policy Numbers, States, Counties, and Crops of the additional policies. |
|
6.
|
To delete a file from the grid, click the corresponding trash icon. all policies matching the Grower’s OID. If the user determines that the attachment is applicable to/for multiple policies, the user can select the additional policies from the options displayed. Options will display the Policy Numbers, States, Counties, and Crops of the additional policies. |
|
7.
|
Click the Save button. The Select file(s) to attach popup closes, and the attachment(s) are displayed in the grid of the Attachments section. In the grid, the following displays for the attachment: Attachment Type, File Name, Description, Author (user who uploaded the file), Date (of the upload), Mailed Date, Status, and Actions buttons (Actions button visibility is dependent on the user's System rights). The CIS on the policy is also notified of the attachment. |


