Related
Batch Print MPCI Policy Forms
All Reinsurance Years
MPCI and Livestock policy forms can be printed for multiple MPCI and Livestock policies from the Batch Print Forms page (Tools > Batch Printing). Users can select multiple forms to print at one time from this page, and they can select the crop(s) to include on or exclude from the forms selected. Once generated, the forms printed from this tool are then also available to view/save.
| 1. | Navigate to Tools > Batch Printing. The Batch Print Forms page opens. |
| 2. | In the Criteria section, for the Product Type dropdown, "MPCI" is selected by default. If you want to print forms for Livestock policies, select "Livestock" from this dropdown. |
| 3. | For the Reinsurance Year dropdown, the current RY in the System is selected by default (e.g., "2022"). If you want to print forms for a different RY, select the year needed from the dropdown. |
| 4. | From the Reporting Season dropdown, select the reporting season or plan type you want to view forms to print for or view all forms by selecting the "Show All Forms" option. Once an option is selected from this dropdown, additional sections display below the Criteria section, and applicable forms display for selection in the Select Forms to Print section of the page. |
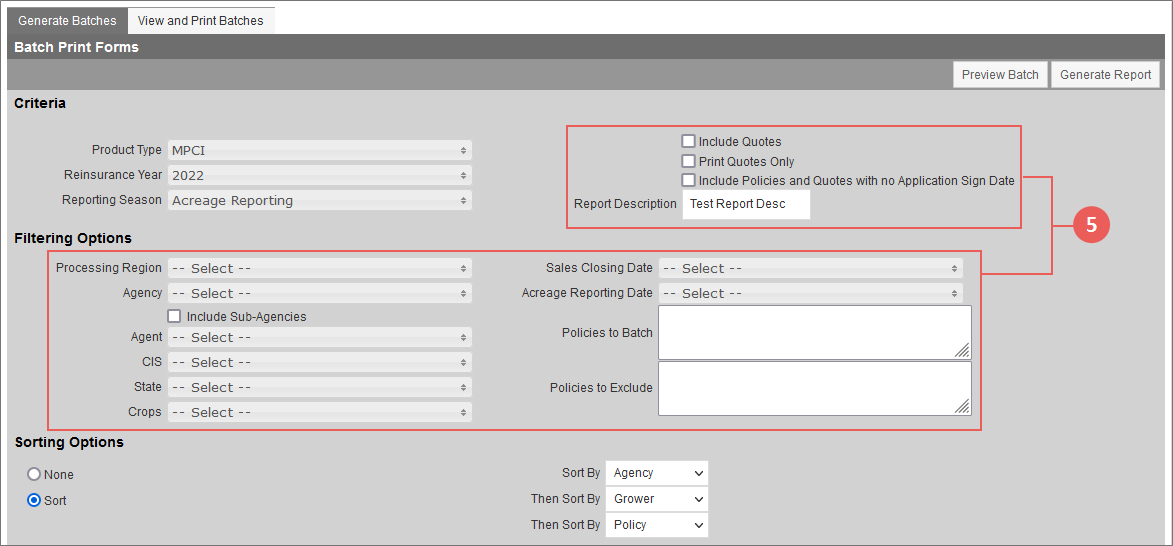
| 5. | In the Criteria and Filtering Options sections, use the following filters as needed to select the policies you want to print forms for: |
| Field | Description |
|---|---|
| CRITERIA SECTION | |
| Include Quotes | To print forms for quotes (as well as policies), select the Include Quotes checkbox. If this checkbox is selected by the user, the forms will print for policies and existing quotes that meet the print criteria. |
| Print Quotes Only | To print forms for ONLY quotes, select the Print Quotes Only checkbox. If this checkbox is selected by the user, the forms will print for existing quotes that meet the print criteria. |
| Included Policies and Quotes with no Application Sign Date | If this checkbox is selected by the user, the forms will print for existing policies and quotes with no Application Sign Date that meet the print criteria. |
| Report Description | This field allows a user to manually enter a report title, any notes, or special wording to help them differentiate the batch they generate. The wording entered in this field will display on the View and Print Batches tab under the Report Description column for easier batch identification. Up to 100 characters are allowed (this includes letters, numbers, spaces, commas, and periods). |
| FILTERING OPTIONS SECTION | |
| Processing Region | If Processing Regions have been set up by the AIP, the applicable choices are shown in the dropdown. If no Processing Regions have been set up by the AIP, "—Select—" will be the only option displayed. Users can select more than one processing region at a time. |
| Agency | Filtering of available selections is based off of Processing Region(s) selected. If one or more Processing Regions were selected, then the Agency selections are filtered to display only those that fall under the selected Processing Region(s). If no Processing Regions were selected, then all Agencies are displayed in alphabetical order. Users can select more than one agency at a time. |
| Include Sub-Agencies | If this checkbox is selected, the selected forms print for the selected agencies as well as their associated sub-agencies. |
| Agent | Filtering of selections is based off of Agency selection(s). If one or more agencies were selected, then the applicable agent names and codes for those agencies are displayed in alphabetic order by Agency. If no agencies were selected, then the list is populated with all agents in alphabetical order. |
| State |
To only print forms for policies in a certain state, select the state(s) needed from the State dropdown. Filtering of available selections is based off of Agency selection(s). If Agencies are selected, then the list is based off of those selections. If no Agencies were selected, then all States are displayed in alphabetical order. Users can select more than one state at a time. |
| Crops | To print forms for only policies with a certain crop or crops, select the crop(s) from the Crop dropdown. Filtering of available selections is based off of State selection(s). If states are selected, then the System will display crops from the ADM files for the applicable states. If no states were selected, then the System will display all crops for the Reinsurance Year from the ADMs. Users can select more than one crop at a time. |
| Sales Closing Date |
To print forms for only policies that have coverages with a specific Sales Closing Date, select the date needed from the Sales Closing Date dropdown. Filtering of available selections is based off of State selection(s). If states are selected, then the System will display Sales Closing Dates from the ADM files for the applicable states. If no states were selected, then the System will display all Sales Closing Dates for the Reinsurance Year from the ADMs. Users can select more than one SCD at a time. NOTE: If one or more Acreage Reporting Dates are selected, then the System will remove/hide the Sales Closing Date filter from the display. |
| Acreage Reporting Date |
To print forms for only policies that have coverages with a specific Acreage Reporting Date, select the date needed from the Acreage Reporting Date dropdown. Filtering of available selections is based off of State selection(s). If states are selected, then the System will display Acreage Reporting Dates from the ADM files for the applicable states. If no states were selected, then the System will display all Acreage Reporting Dates for the Reinsurance Year from the ADMs. Users can select more than one ARD at a time. NOTE: If one or more Sales Closing Dates are selected, then the System will remove/hide the Acreage Reporting Dates filter from the display. |
| Policies to Batch | To print forms for only specific policy numbers, in the Policies to Batch field, type each full policy number (i.e., 7-digit policy number) needed, separated by commas (e.g., 1011333, 1011334). There is no limit to the number of policy numbers that can be entered. |
| Policies to Exclude | To exclude specific policy numbers from the batch printing, in the Policies to Exclude field, type each full policy number (i.e., 7-digit policy number), separated by commas (e.g., 1011333, 1011334). There is no limit to the number of policy numbers that can be entered. |
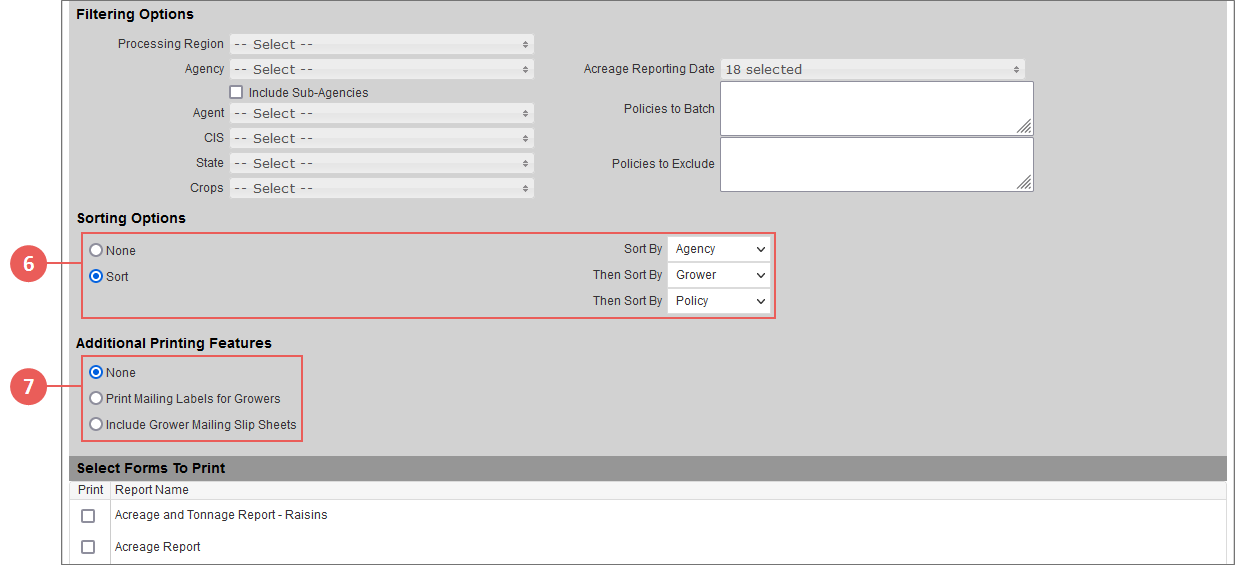
| 6. | In the Sorting Options section, set how you would like forms grouped and sorted in the batch PDF that's generated by selecting the following: |
| • | None: No sort order is applied to the forms. |
| • | Sort: The page will display 3 additional fields for the user to specify the sort order: |
| a. | From Sort By, select how you would like forms to be grouped in the batch PDF that's generated. Available options are Agency, Agency Code, Agent, Agent Code, Grower, Policy, and State. |
| b. | From the first Then Sort By dropdown, select how you would like forms to be sorted inside of the groupings established in the batch PDF as a result of the selection made in step above. Available options are Agency, Agency Code, Agent, Agent Code, Grower, Policy, and State with the exception of the 1st field sort option selected by the user. |
| c. | From the second Then Sort By dropdown, select how you would further like your forms to be sorted inside of the groupings established in step above. Available options are Agency, Agency Code, Agent, Agent Code, Grower, Policy, and State with the exception of the 1st and 2nd field sort options selected by the user. |
| 7. | In the Additional Printing Features section, select one of the following: |
| • | None: If you do not want to use any additional print features, select "None". |
| • | Print Mailing Label for Growers: If you want to print mailing labels for the growers included in the batch printing, select the "Print Mailing Label for Growers" option. Once the Generate Report button is clicked, the System will generate an extra document in the View and Print Batches Tab for the labels. The mailing label document will use the same Batch number as the generated batch but will say, "Mailing Labels for" at the beginning of the Report Description on the View and Print Batches tab. The generated labels will print in the same print order as the forms within the generated batch. |
| • | Include Grower Mailing Slip Sheets: If you want to print Grower mailing slip sheets for the grower for each form, select "Include Grower Mailing Slip Sheets". |
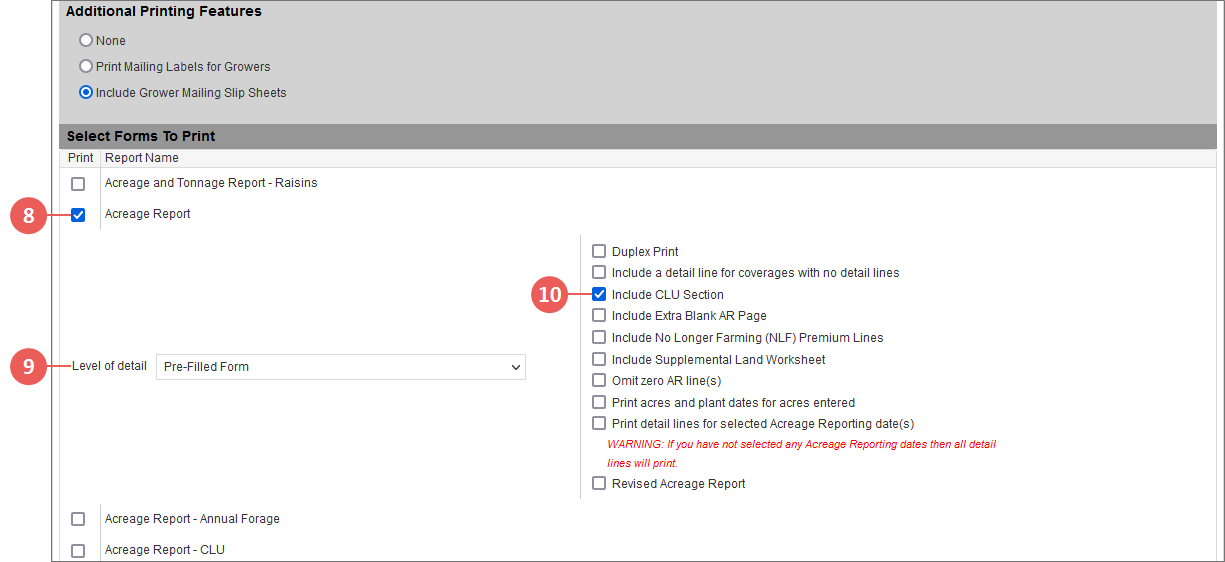
| 8. | In the Select Forms to Print section, select the forms you want to print by selecting the checkboxes to the left of those form titles. The print parameters available for the selected form display. |
| 9. | To select the level of detail you want a form selected to print with, from Level of detail, select the Report Style you need from the options available. Repeat for each form selected in step 8 as needed. |
NOTE: Not all forms allow a level of detail to be selected.
| 10. | To select print options for a form selected, select the checkboxes for any print options you need in the printing options area for the form. Repeat for each form selected in step8 as needed. |
NOTE: Not all forms have print options available.
| 11. | To preview the policies included in the batch with the selected criteria, in the top-right corner of the page, click Preview Batch. The Select Forms to Print grid updates to the Preview Batch grid and displays the Grower Name, Policy, and Agency for policies included in the batch. |
| a. | To view a policy's information, click the Policy hyperlink. A popup opens and displays the coverage information. |
| b. | To remove a policy from the batch, deselect the checkbox that corresponds with the coverage. |
| 12. | Once the Preview Batch button has been clicked, an Export button displays in the Preview Batch section. To export an Excel version of the Preview Batch results being displayed, click Export. Only the lines that have been selected (using the corresponding checkboxes) will be exported. |
| 13. | When the batch is ready to be printed, in the top-right corner of the page, click Generate Report. Once the report is generated, it is available from the View and Print Batches tab within the Batch Printing tool. |
NOTE: For the SOI, SOI/Production Report, Acreage Report, and CLU Acreage, if the batch contains more than 100 policies, it will break into separate PDFs for each new 100 policies.
| 14. | On the View and Print Batches tab, click the Report Description hyperlink to open a PDF in your browser window. |
| 15. | There are two options for downloading the batch reports on the View and Print Batches tab: |
| • | To download an individual report, click the Save button that corresponds with the individual file. The file will download to your browser window. This button is only available after the file has finished processing. |
| • | To download multiple reports at once, select the checkboxes of any reports that you want to save and click Save Selected. The files will download to your browser window. |
NOTE: The appearance and function of downloads will depend on your browser. Chrome will automatically download all selected documents; however, Internet Explorer and Firefox will prompt you to download all selected files individually. To change the default download setting and allow multiple downloads, perform the following steps. For Internet Explorer, open the IE settings dialog (![]() ) and in the Downloads section of the Settings panel that displays, toggle the Ask me what to do with each download option to "Off". For Firefox, open the menu in the browser (
) and in the Downloads section of the Settings panel that displays, toggle the Ask me what to do with each download option to "Off". For Firefox, open the menu in the browser (![]() ) and select the Options icon (
) and select the Options icon (![]() ). In the Files and Applications section, under downloads, for the Content Type, select "Portable Document Format (PDF)" and then in the Action column for the PDF type, select "Save File" from the list of options available.
). In the Files and Applications section, under downloads, for the Content Type, select "Portable Document Format (PDF)" and then in the Action column for the PDF type, select "Save File" from the list of options available.
| 16. | To delete batches from the View Batch Print Listing, mark the checkbox that corresponds with the file you want to delete and click Delete Selected. |


