|
1.
|
Go to: Estimator > Rate Sheets. The View Rate Sheets page opens. |
|
2.
|
In the top-right corner of the grid, click Add. The Add New Rate Sheet page opens. |
|
3.
|
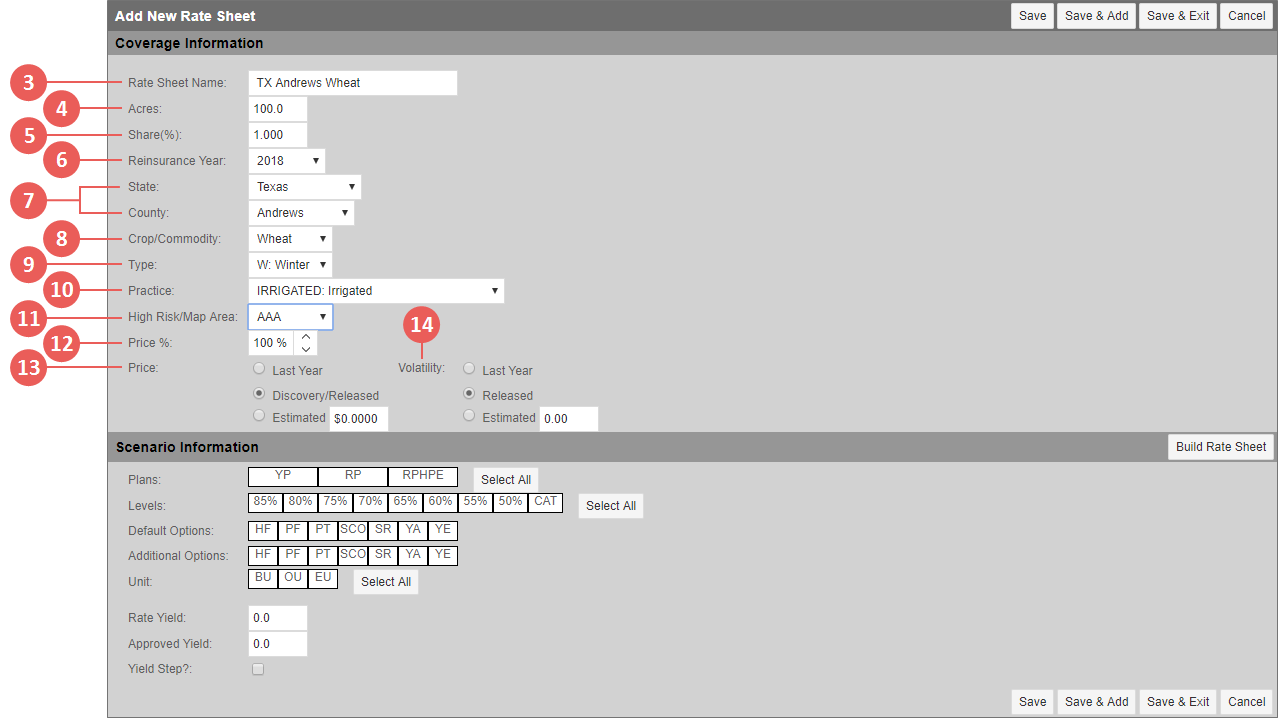
In the Coverage Information section, in the Rate Sheet Name field, type a name for the rate sheet. This field is required. |
|
4.
|
In the Acres field, enter the acres to be used for calculating the rate sheet estimates. This field is required. |
|
5.
|
In the Share (%) field, indicate the percent of share the grower has in the acreage. This field is required. |
|
6.
|
From the Reinsurance Year dropdown, select the Reinsurance Year the rate sheet applies to. Your options are the current reinsurance year or the previous reinsurance year. This field is required. |
|
7.
|
From the State and County dropdowns, select a state and county for the coverage on the rate sheet. This field is required. |
|
8.
|
From the Crop/Commodity dropdown, select the crop/commodity to include in the rate sheet. This field is required. |
The System validates the selected State/County/Crop/Commodity against the Actuarial Data Master (ADM) to populate the Plan, Level, Options, Unit, Type, Practice, and High Risk/Map Area fields that follow.
|
9.
|
From the Type dropdown, select a type for the commodity to include in the rate sheet. This field is required. |
|
10.
|
From the Practice dropdown, select a practice for the commodity to include in the rate sheet. This field is required. |
|
11.
|
If applicable, from the High Risk/Map Area dropdown, select the Sub County Codes for the coverage to include in the rate sheet. |
|
12.
|
The Price % box will automatically populate with the maximum price percentage based on the Plan/Level selected by the user. This can be adjusted by using the arrows or typing a value to include in the rate sheet estimates. Only numbers and a percent sign (%) are allowed in this box. This field is required. If an ARPI plan is selected for the rate sheet, the Protection Factor box is also displayed with the maximum Protection Factor allowed. When applicable, adjust this value by using the arrows or typing a new value. |
|
13.
|
In the Price field, select an option for determining the price for the selected crop/commodity. Your options are: |
|
•
|
Last Year: Use last year’s price for the selected crop. |
|
•
|
Discovery/Released: Use the released price for the selected crop. |
|
•
|
Estimated: Enter an estimated price (greater than $0.00) for the selected crop. This value is used in place of the published ADM price. |
|
14.
|
In the Volatility field, select an option for determining the volatility factor for the selected crop. This is only relevant for RP, RPHPE, ARP, and ARPHPE plans. Your options are: |
|
•
|
Last Year: Use last year’s volatility factor for the selected crop. |
|
•
|
Released: Use the released volatility factor for the selected crop. |
|
•
|
Estimated: Enter a volatility factor (greater than 0.00) for the selected crop. This value is used in place of the published ADM volatility factor. |
|
15.
|
In the Scenario Information section, in the Plans field, select the plan(s) to include in the rate sheet. Click Select All to choose all available plans. This field is required. |
NOTE: When ARH is an available plan, the fields for Price % and Price in the Coverage Information section are changed to Price %/Payment Factor and Price/Expected Revenue Factor. Once ARH is selected, "/Revenue" is added to the Rate Yield and Approved Yield in the Rate Sheet Information section. When ARH is the only available plan, the Price % and the Price fields are changed to Payment Factor and Expected Revenue Factor, respectively, and "/Revenue" is added to Rate Yield and Approved Yield.
|
16.
|
In the Levels field, select the coverage level(s) to include in the rate sheet. Click Select All to choose all available levels. This field is required. |
|
17.
|
In the Default Options field, the System displays all options for the selected State/County/Crop/Coverage Level. Select an option or options to include in the rate sheet. |
|
18.
|
In the Additional Options field, the System displays all options for the selected State/County/Crop/Coverage Level. Select an option or options to include in the rate sheet. The System will not allow you to select any options you selected in the Default Options field. |
|
19.
|
If either SCO or SE is selected as a Default or Addition Option, a Separate SCO Calculations or Separate SE Calculations checkbox will appear next to the Default Options field, which allows the user to choose whether or not to view the SCO/SE as separate child lines and include a Total row. When SCO is a selected option, the Area Yield and Area Revenue will also appear as applicable. |
|
20.
|
In the Unit field, select the unit structure type to include in the rate sheet. Click Select All to choose all available unit types. This field is required. |
|
21.
|
In the Rate Yield field, type the Rate Yield to use in premium calculations. This field is required. |
|
22.
|
In the Approved Yield field, type the approved yield to use in the rate sheet calculations. This is used in conjunction with the Yield Step checkbox and field (below) to identify the 7 yields on either side of this approved yield. This field is required. |
NOTE: If the TA or YE option was selected, this field displays as Avg/Adjusted Yield. Also, additional fields, TA Approved Yield, YE Approved Yield, and YE + TA Approved Yield, are displayed when applicable. For more on YE and Rate Sheets, see "Yield Exclusion (YE)".
NOTE: When an ARPI plan is selected, the Area Yield and Area Revenue fields, as applicable, are displayed instead of the Rate Yield and Approved Yield.
|
23.
|
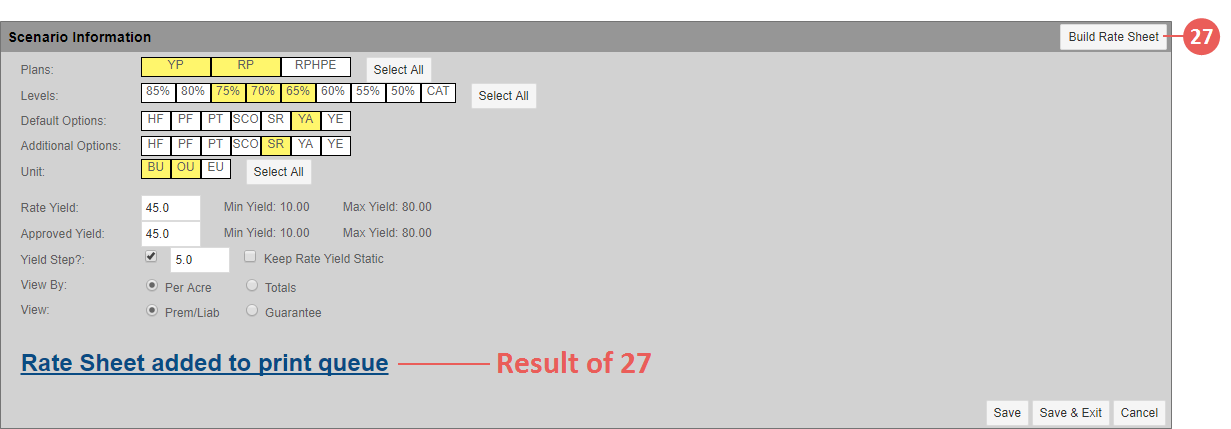
To view additional yields in the rate sheet, select the Yield Step checkbox. When this checkbox is selected, fields for Yield Step, Keep Rate Yield Static, Min Yield & Max Yield (for Rate and Approved Yields), View By, and View will appear. This feature is not available if the Trend Adjustment option is selected. |
|
24.
|
In the Yield Step field, type the interval in which you want the System to step in either direction from the Approved Yield to identify additional yield values. For instance, if “75” is the Approved Yield and the Yield Step is “5”, the System will generate values for these yields: 40, 45, 50, 55, 60, 65, 70 –75 – 80, 85, 90, 95, 100, 105, 110. |
|
|
Based on your selections in the Rate Yield, Approved Yield, and the Yield Step fields, the System calculates and displays the Min Yield and Max Yield that will be included on the rate sheet for the Rate Yield and Approved Yield. Both Rate Yield and Approved Yield display the same Yield Step. |
NOTE: If Yield Step has been selected for the rate sheet, a Keep Rate Yield Static checkbox appears to the right of the Yield Step? field. You can choose to keep the Rate Yield static by selecting the Keep Rate Yield Static checkbox next to the Yield Step? field. The Min Yield and Max Yield fields will disappear for the Rate Yield as a result.
|
25.
|
If the Yield Step? checkbox is selected, in the View By field that displays, choose to view the rate sheet estimates “Per Acre” or by “Totals”. |
|
26.
|
If the Yield Step? checkbox is selected, in the View field that displays, choose to view the totals on the rate sheet by “Prem/Liab” or “Guarantee”. |
NOTE: If an ARPI plan is selected, a selection of "Guarantee" is not permitted since it does not apply to ARPI; on save, the System will prompt you to select "Prem/Liab" instead.
|
27.
|
Click Build Rate Sheet. The rate sheet prints as a PDF to the Print Queue and the Rate Sheet added to print queue hyperlink appears. |
NOTE: To create multiple rate sheets that can be saved now but printed at a later date (e.g., after a price is announced), do not click Build Rate Sheet; instead, skip to step 29 and click Save & Add to save the rate sheet and open a new Add New Rate Sheet page. If you choose to save the rate sheet and print at a later date, you will need to click Build Rate Sheet in order to calculate the yield values and print the rate sheet.
|
28.
|
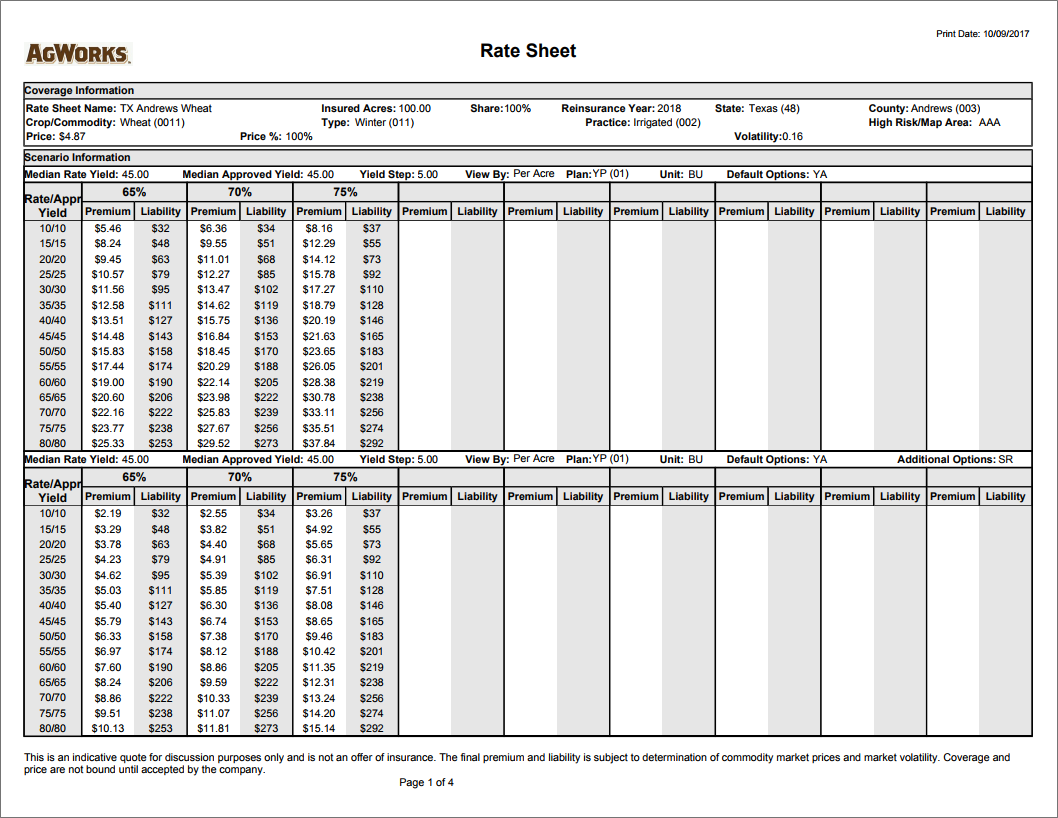
To download/view the rate sheet, click the Rate Sheet added to print queue hyperlink to open the Print Queue. Once the Rate Sheet is generated by the System, the Report Description becomes a hyperlink. Click the hyperlink to download the report in your browser window. |
NOTE: Clicking the Rate Sheet added to print queue hyperlink will take you away from the Add New Rate Sheet page; however, your selections are still saved and the Rate Sheet is available to view, edit, and delete from Estimator > Rate Sheets.
Result of 28: In this example, each Coverage Level was selected in the rate sheet criteria, and the rate sheet displays the entered Median APH Rate Yield and the 7 yields that come before and after the Median Yield based on the indicated Yield Step interval. This example displays Yields in increments of 5 and the Premium/Liability per acre for each Yield value.
|
29.
|
As your next step, choose one of the following: |
|
•
|
Save: Click to save the rate sheet and remain on the page. |
|
•
|
Save & Add: Click to save the rate sheet and open a new Add New Rate Sheet page. |
NOTE: This option is only available if you did not click the Build Rate Sheet button in step 27.
|
•
|
Save & Exit: Click to save the rate sheet and return to the View Rate Sheets page. |
|
•
|
Cancel: Click to cancel the rate sheet and return to the View Rate Sheets page without saving. |


