Related
Sync CLU Data in Mapping
All Reinsurance Years
There are two different ways users can sync CLU data, in addition to batch syncing, in the Integrated Mapping Module:
Users can Sync to AR directly from the Fast Edit Planting panel to make syncing of multiple fields easier.
| 1. | Select multiple fields for the grower and click Plant to open the Fast Edit Planting panel. |
| 2. | Below the Crop dropdown, a Show all fields checkbox displays. When selected, all fields for the grower display in the Fast Planting panel—this option also displays additional input fields for capturing sync data. Select this checkbox. |
NOTE: When not selected, only the grower's fields selected prior to clicking Plant display. Select this checkbox to view additional fields
| 3. | In the Sync to AR fields, key Acreage ReportSignature Datesfor the Insured and Agent, select the Agent, and Mark Complete. |
| 4. | Next to each field under a planting record, status indicators display to identify any errors/omissions. (A green checkmark means it has passed validations; a red X means it has not. A green tree means land has been assigned and verified; a no sign indicates it has not). |
| Select planting records you are syncing to the Acreage Report. All fields that fall under the selected Planting record are selected (if complete). |
| 5. | Select Synchronize. The System will update fields in the System with the information supplied in the Fast Edit Planting panel. The System will inform you if the sync was successful or if there were errors. |
| 1. | Click Sync. The Sync panel opens and displays available sync options. |
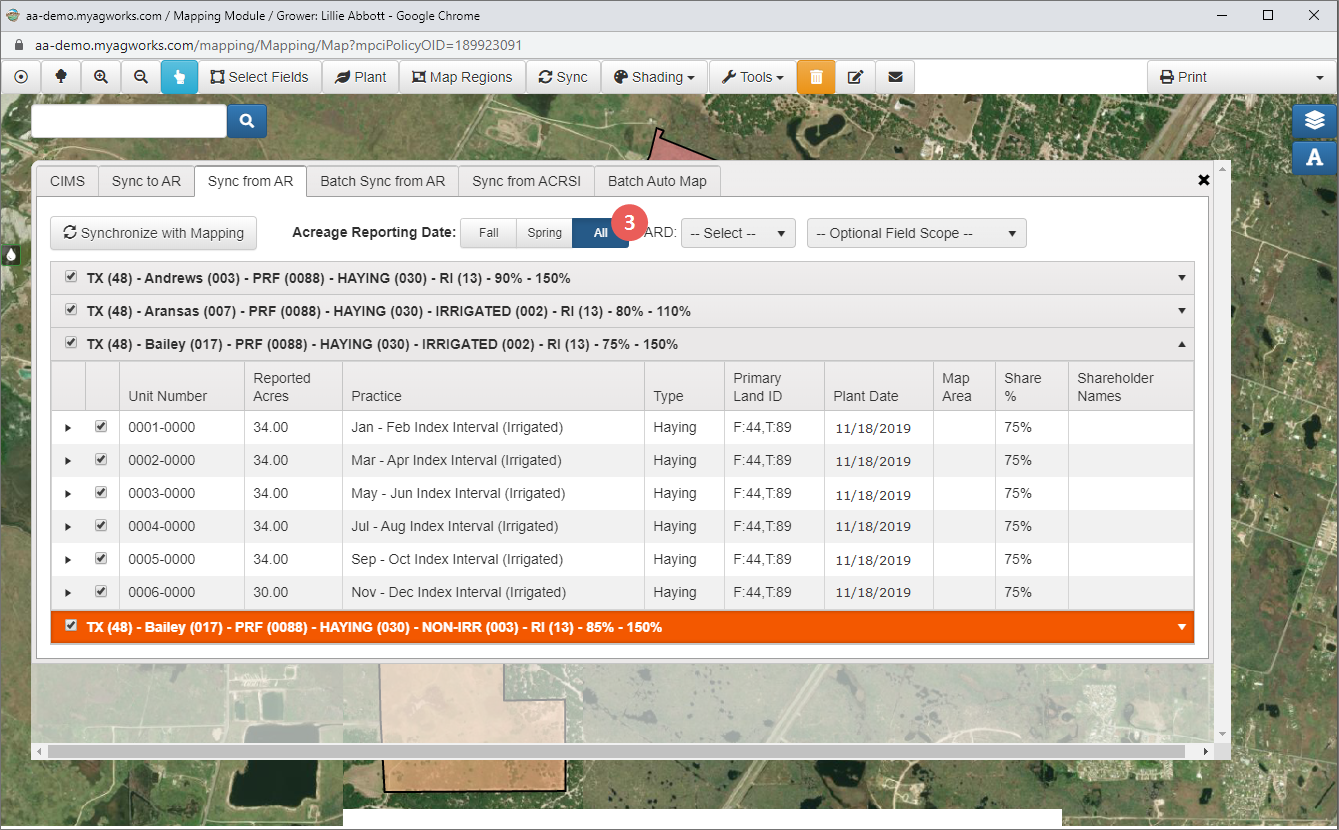
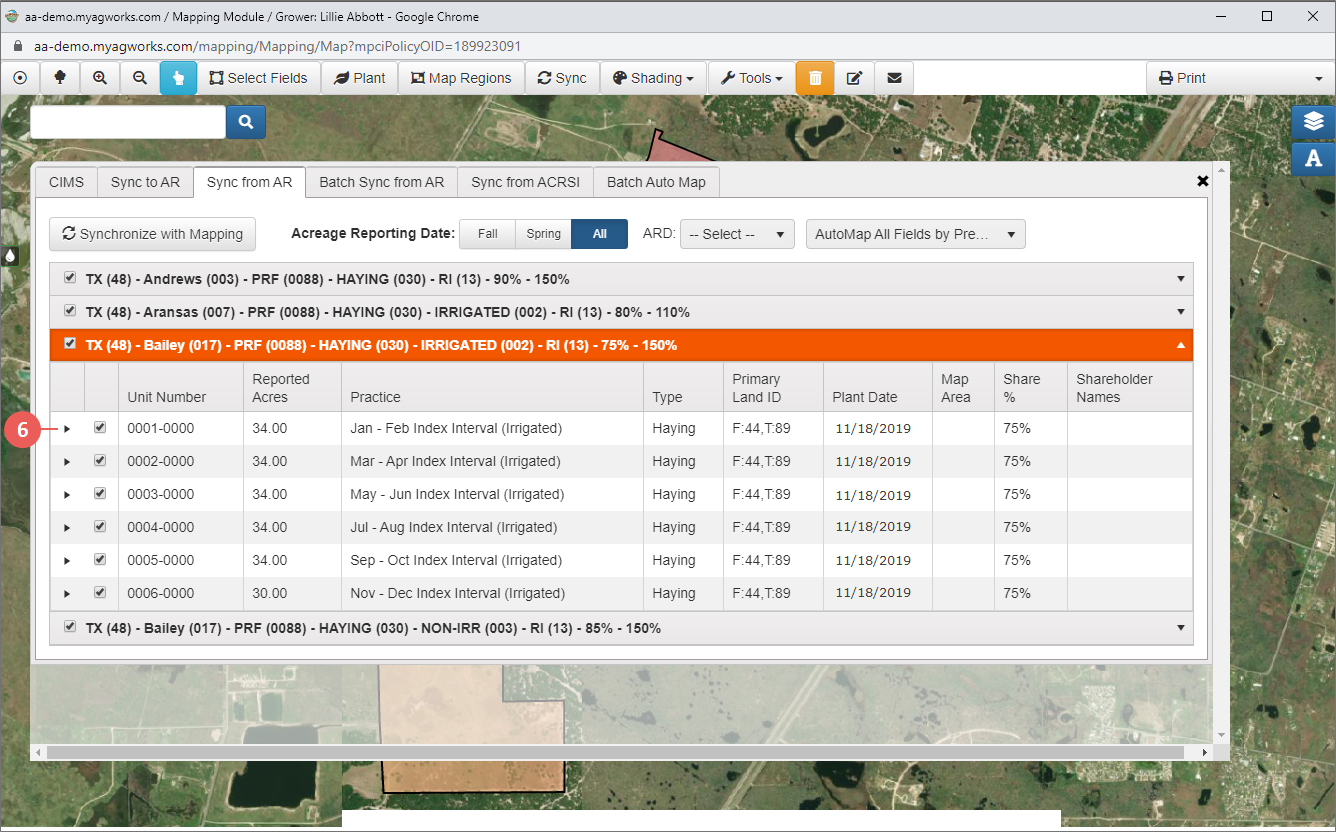
| 2. | Select the Sync from AR tab. The tab opens and populates with any units that have reported acres greater than 0. For those units, you can click to expand and view the available planted CLU information attached to the unit in Mapping. |
| 3. | To filter the available coverages shown by Acreage Report Date, you can select to view only "Fall", "Spring", or "All" coverages. |
| 4. | Then, within the selected ARD, you can choose a specific date from the ARD dropdown. |
| 5. | To change how fields are synced, from the Optional Field Scope dropdown, select one of the following: |
| • | To sync fields based on Farm/Tract instead of planted CLUs, select "Include all Fields for Farm/Tract". |
| • | To sync fields based onland IDs, select " AutoMap by Premium Land IDs". When selected, instead of the System syncing by planted CLUs, it will search through Land IDs on the policy and add fields based on the Farm/Tract information on the land ID. |
| 6. | For each unit/coverage you want to update planting information for using the MPCI Acreage Report, mark the corresponding checkbox(es). |
| 7. | Once all coverages to sync have been selected, click Synchronize with Mapping to update the current map for the selected units. |
| • | If no fields exist in the System for a selected coverage or unit, no updates will occur to the map. |
| • | If a field doesn't exist for the planted CLU, a new field will be added to the map. |
| • | If the field already existed, the planting information will be updated for the field. |
NOTE: Synchronized data is included in the transaction log for the Sync from AR process.
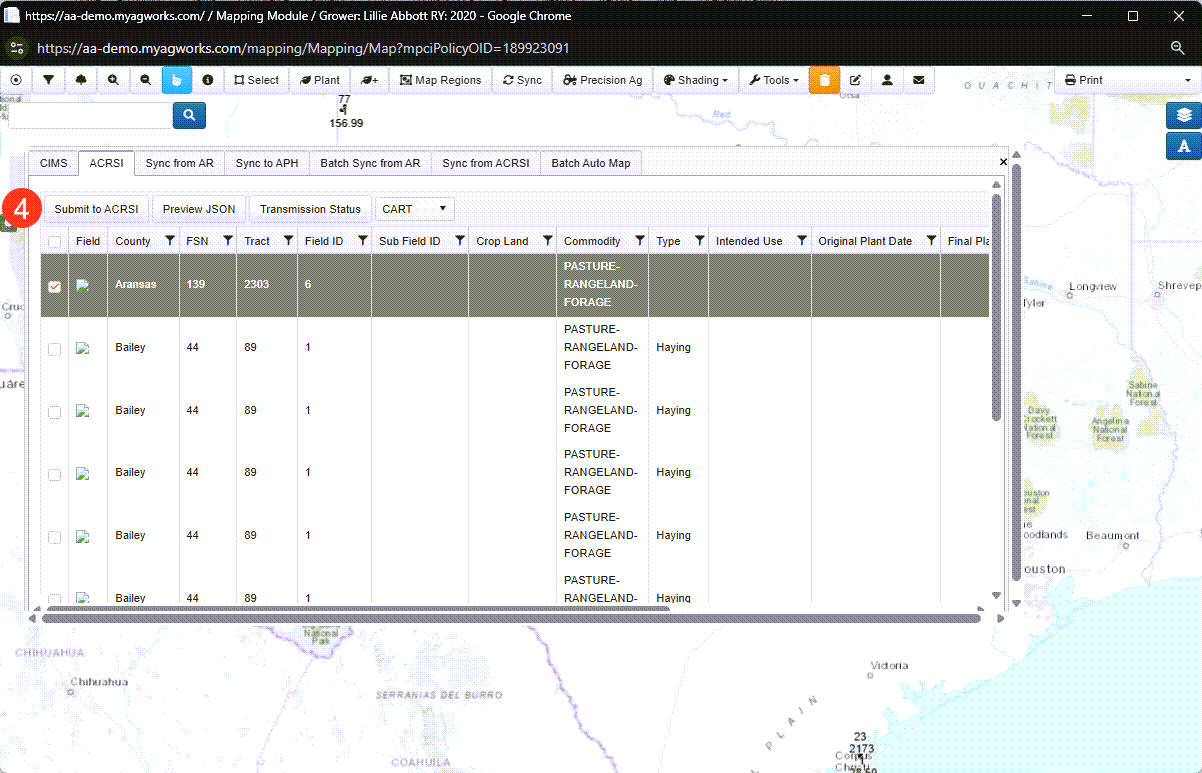
This tab displays all fields and the applicable FSA ACRSI data options.
The ACRSI tab allows users to select fields and submit the selected fields to ACRSI.
| 1. | Click Sync. The Sync panel opens and displays available sync options. |
| 2. | Select the ACRSI tab. The tab opens. |
| 3. | Select the checkbox of the desired fields or select the check box in the header of the grid to select all fields. |
| 4. | Then, select Submit to ACRSI to submit the selected fields to ACRSI. |
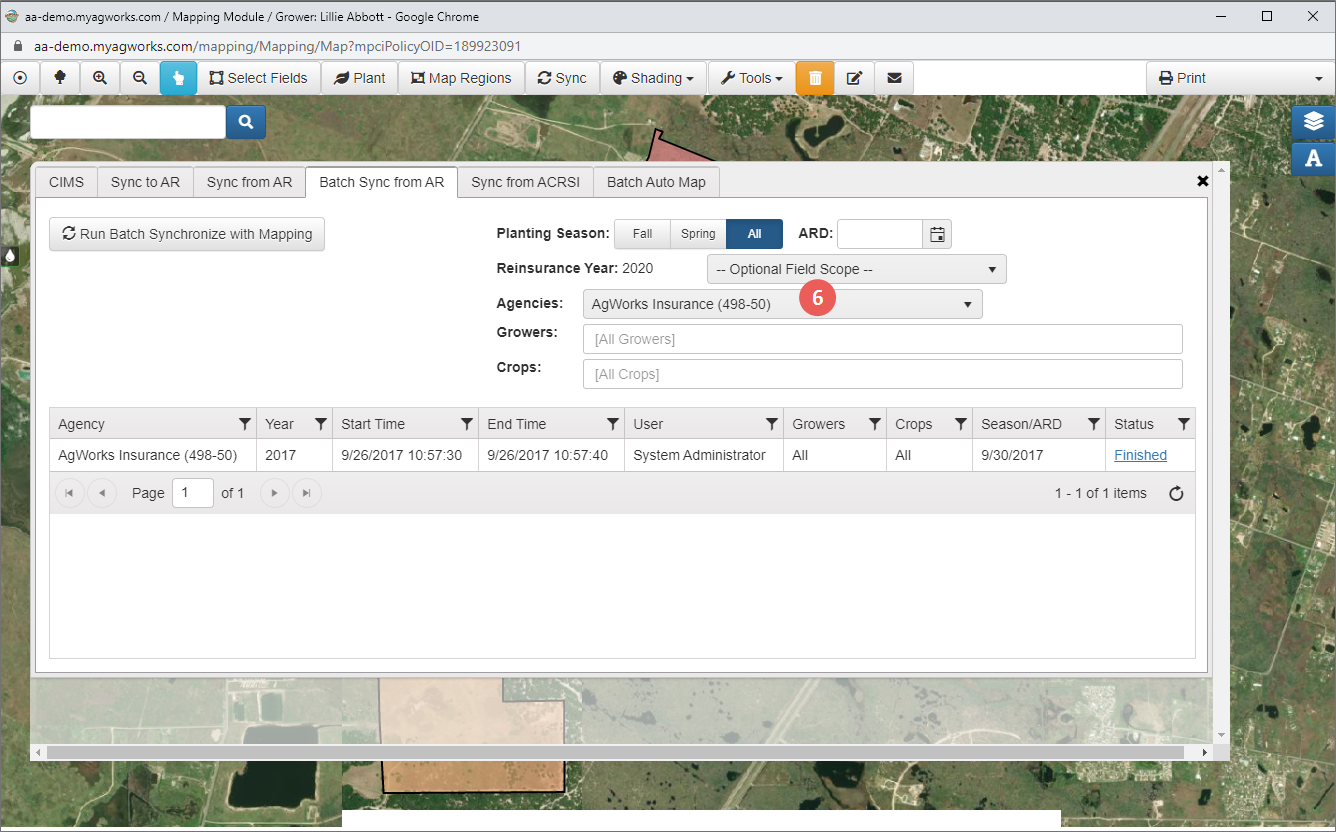
The Batch Sync from AR tab allows users to sync the planted CLUs and AR data to the Mapping Module for the entire agency in a single batch job.
| 1. | Click Sync. The Sync panel opens and displays available sync options. |
| 2. | Select the Batch Sync from AR tab. The tab opens. |
| 3. | To filter the available coverages shown by Planting Season, you can select to view only "Fall", "Spring", or "All" coverages. |
| 4. | Then, within the selected ARD, you can select a specific date from the ARD dropdown using the calendar button. |
| 5. | To change how fields are synced, from the Optional Field Scope dropdown, select one of the following: |
| • | To sync fields based on Farm/Tract instead of planted CLUs, select "Include all Fields for Farm/Tract". |
| • | To sync fields based onland IDs, select " AutoMap by Premium Land IDs". When selected, instead of the System syncing by planted CLUs, it will search through Land IDs on the policy and add fields based on the Farm/Tract information on the land ID. |
| 6. | In the Agencies dropdown, your agency will be selected by default. |
| 7. | From the Growers dropdown, select each grower you want to sync CLU data for. The selected grower names display in the field. To remove a selected grower, click the X that corresponds with the name. By default, "[All Growers]" is shown. |
| 8. | From the Crops dropdown, select each crop you want to sync CLU data for. The selected crops display in the field. To remove a selected crop, click the X that corresponds with the crop. By default, "[All Crops]" is shown. |
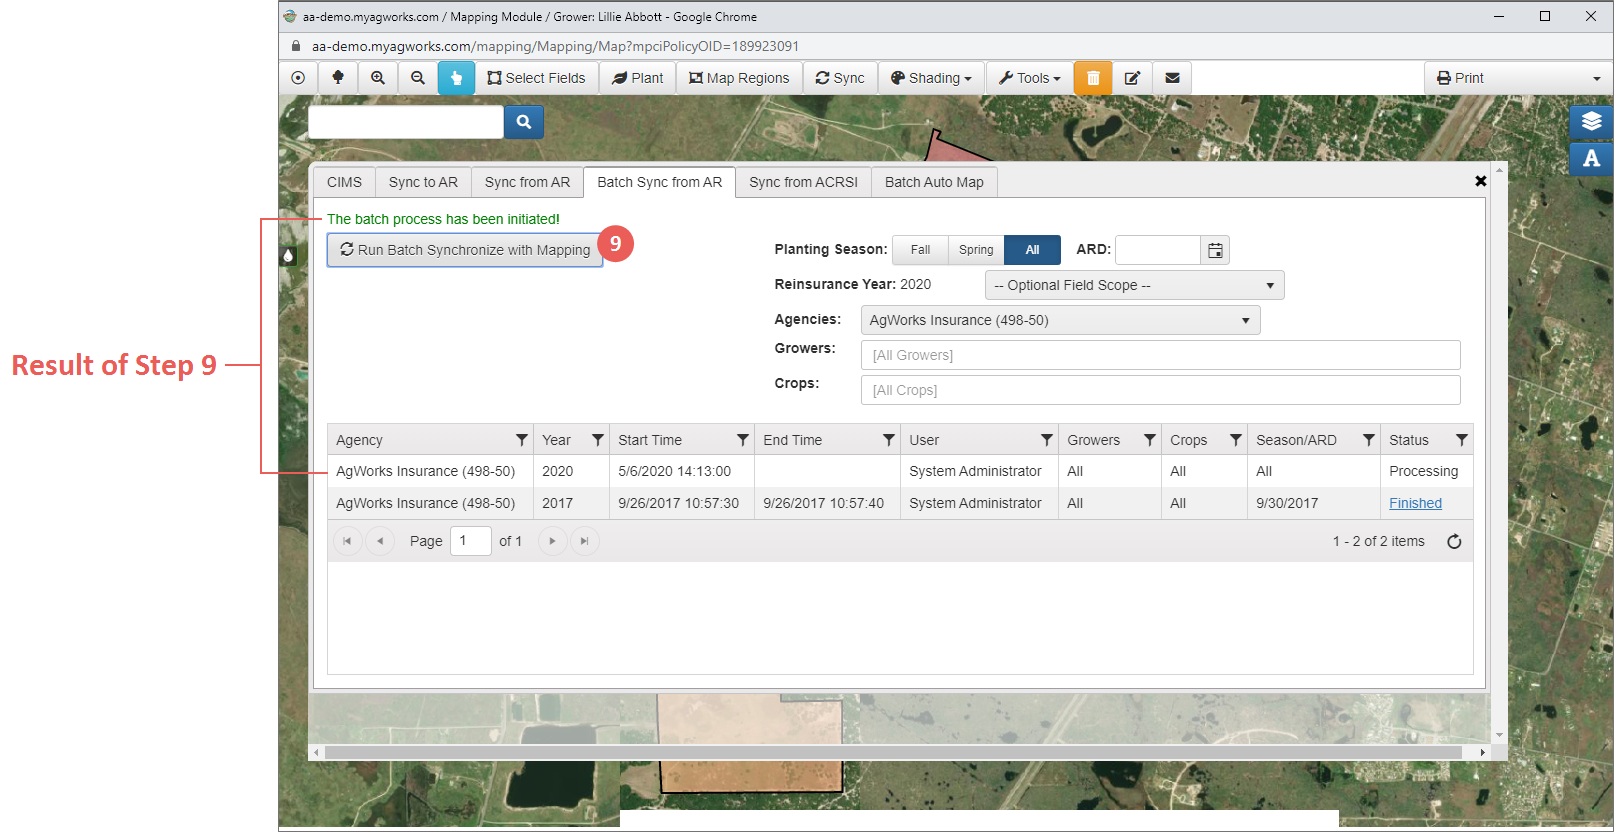
| 9. | Once all batch criteria has been selected, click Run Batch Synchronize with Mapping to initiate the batch. The System will add the job to the job grid. |
| 10. | Click the Refresh button on bottom of grid to update the batch status. When the batch has completed, the status will change to "Finished". |
| 11. | Click on the Finished status link to download a report of the sync results for each grower and policy included in the batch job. |
The Batch Auto Map tab allows users to sync the CIMS data to the Mapping Module for the entire agency or specific growers within in an agency in a single batch job. If the user has permissions to access the Adjuster Layer and the Adjuster Layer is active, the Batch Auto Map will sync CLUs for the Adjuster Layer.
| 1. | Click Sync. The Sync panel opens and displays available sync options. |
| 2. | Select the Batch Auto Map tab. The tab opens. |
| 3. | From the CIMS Year dropdown, select a year to auto map. |
| 4. | In the Agencies dropdown, your agency will be selected by default. |
| 5. | From the Growers dropdown, select each grower you want to sync CIMS data for. The selected grower names display in the field. To remove a selected grower, click the X that corresponds with the name. By default, "[All Growers]" is shown. |
| 6. | Click Run Batch Auto Map. Green text displays above the button to indicate that the batch process has started and the batch is listed in the grid below with the batch status. To refresh the status, click the refresh button for the grid. |

