Related
Import & Export Fields
All Reinsurance Years
To help users work more efficiently, users can import fields as objects (shape and KML files) from another source as well as export fields as objects from within the Integrated Mapping module. This is useful when transferring the same field information from year to year and uploading customized fields from personal GPS devices.
Additionally, when a user has the proper permissions, they'll be able to create a PRF agency extract (via the Export tool) to be imported by third-party systems.
To import field information, you must have every file type that comes with either the shapefile (SHP, DBF, SHX, and PRJ file types), a single KML file (single file) included in the upload. These files can be included in a ZIP file or uploaded separately.
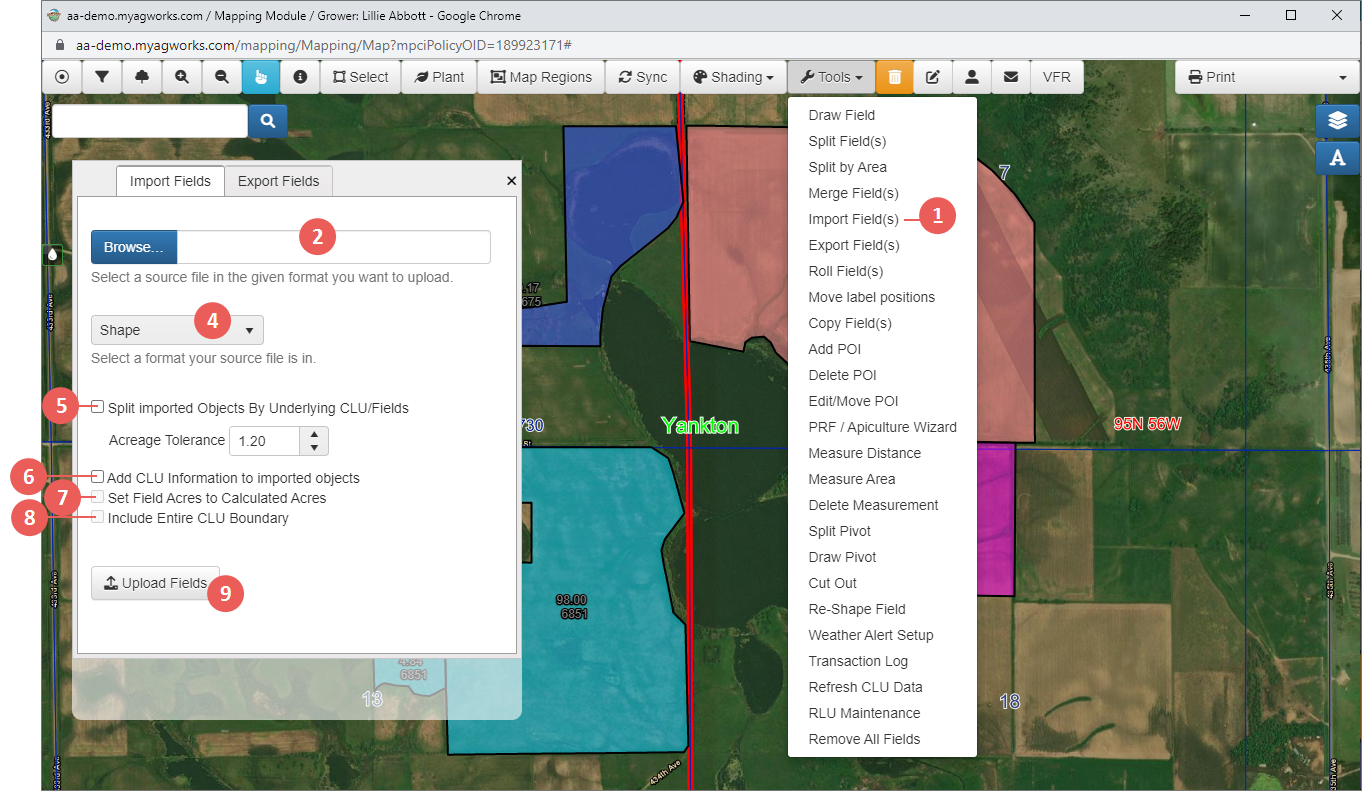
| 1. | In the Mapping window, click Tools and then select “Import Field(s)”. The Import/Export popup displays. |
| 2. | On the Import tab of the Import/Export popup, click Browse to open the Open dialog window. In this new window, locate the files you need to upload. To work correctly, you must have each of the four files that make up a shapefile (DBF, PRJ, SHP, and SHX); however, a KML is a single file. Select each the four file types for the shapefile so that all of them are selected at once or select the single KML file. These files must be uploaded at the same time in order to work correctly. |
Example of Windows File Explorer displaying all 4 file types that make up shapefile "usershapeexport_736"
| 3. | Select Open. The number of files selected displays to the right of the Browse button when they are ready for import. |
| 4. | In the dropdown, “Shape” is selected by default. "KML" is also available if that file type is being imported. |
| 5. | To Split imported Objects By Underlying CLU/Fields only if the acreage is under the amount set in the Acreage Tolerance field. To change the acreage tolerance value, use the up and down spinner to change the numbers. |
| 6. | To Add CLU Information to the imported objects, mark the corresponding checkbox. If selecting this option, the System will use the geometry of the imported objects to determine the relevant CLU information for the imported objects. |
| 7. | When the Add CLU Information to the imported objects checkbox is selected, the Set Field Acres to Calculated Acres field is enabled. Select this checkbox to have the Mapping module use the calculated acres of the object instead of the CLU Acres. This is helpful when a user imports a shape that falls into two or more CLUs or when importing a CLU that has been split. |
| 8. | To import the entire CLU boundary for the shapefile, mark the Include Entire CLU Boundary checkbox. |
| 9. | Click Upload Fields to import the selected files. When the files have imported, the System displays a message: “The fields have been imported successfully.” Using zoom, if necessary, verify the fields are correct. |
Imported objects are automatically saved to that policyholder so that information will be there when Mapping module is reloaded or closed and reopened.
To export field information, fields must be associated with the policyholder whose policy you are in. You can either export all fields for a policyholder or select specific fields to export.
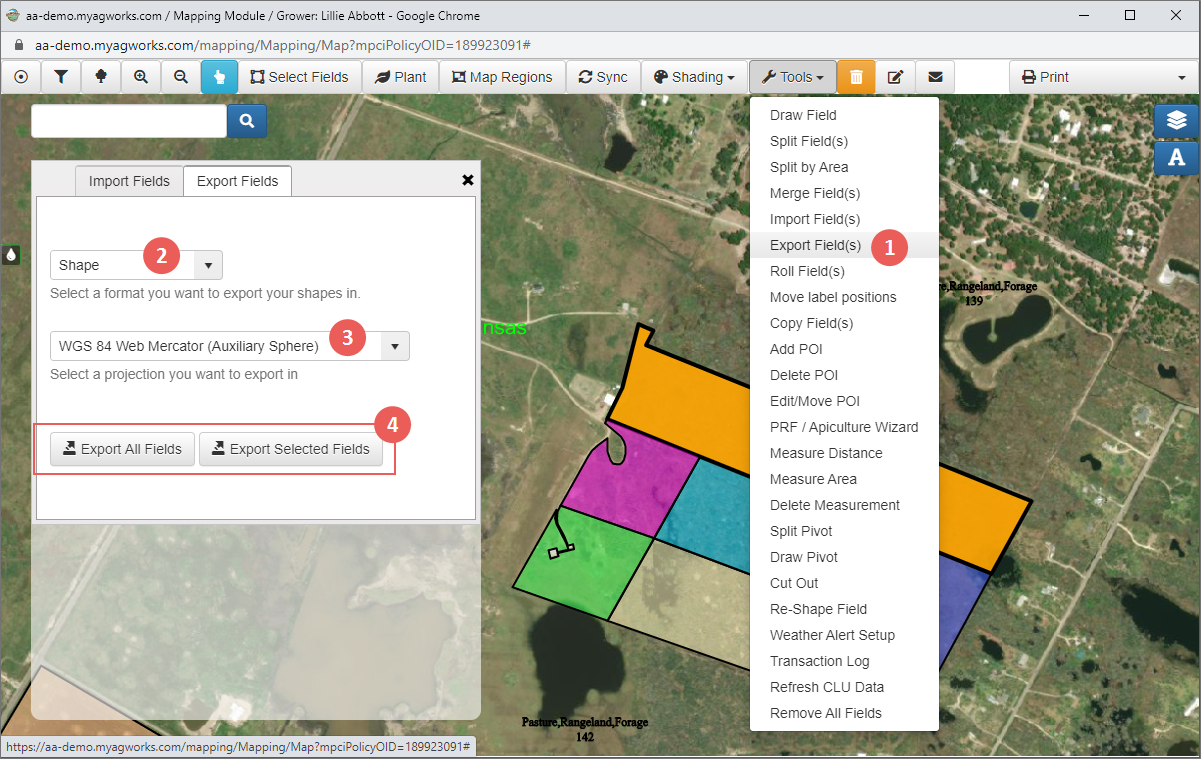
| 1. | In the Mapping window, click Tools and select “Export Field(s)”. The Import/Export popup displays. |
| 2. | On the Export tab of the Import/Export popup, from the first dropdown, select the layer to export from. Your options include: Grower Field, Adjuster Layer, and RLU Layer. |
| 3. | Select the format you want to export the files as: "Shape", "GEOJSON", or "KML". |
| 4. | Select which projection to export that data with: "WGS84" or "WGS84 Web Mercator (Auxiliary Sphere)". The Web Mercator option is the projection of the imagery within the software—however, both will act the same within Integrated Mapping. |
| 5. | Select the level of data you want to export. Your options include: "All Data" or "Exclude Grower Name". |
| 6. | Click either Export All Fields or Export Selected Fields. The files then download as a ZIP file to your browser. |
To import that data back into the application, unzip that file and make sure that it has all 4 file types that are required for shapefiles (SHP, SHX, PRJ, and DBF) and see “Importing” above.
NOTE: A KML export will download as a single KML file.
When a user has the proper permissions, the Export tab of the Import/Export popup allows them to export a PRF Extract that includes all PRF data from the Mapping Module. This extract can then be uploaded for use into third-party systems.
| 1. | In the Mapping window, click Tools and select “Export Field(s)”. The Import/Export popup displays. |
| 2. | On the Export tab of the Import/Export popup, from the first dropdown, select "Grower Field" as the layer to export from. Adjuster Layer and RLU Layer are not compatible with the PRF Extract. |
| 3. | On the Export tab of the Import/Export window, from the first dropdown, |
| 4. | select the "PRF Extract" format. This disables the projection field. |
| 5. | Click either Export All Fields. The files then download as a .json file to your browser. |


