|
1.
|
Go to: Tools > Dashboard > Disclosure Entry tab. The Online Disclosure Entry page opens. |
|
2.
|
From Person Type, select "Individual". |
|
3.
|
From Type, select "Conflict of Interest". |
|
4.
|
In Tax ID, type the full tax ID found on your entity record (e.g., 000110000 or 000-11-0000). |
|
5.
|
In Last Name, type the last name found on your user profile. |
NOTE: To find out what your name is listed as in your user profile, you can click the icon in the System header to open a sub-menu. The first line of this menu is the name on your user profile in read-only text.
|
6.
|
From Year, select the year you want to sign a COI for. Only certain years may display in this dropdown. |
NOTE: The Year field, for users with certain permissions, displays as a dropdown which lists each RY available in the System; this dropdown allows the user to enter a COI for any RY selected from it.
|
7.
|
Click Search. The COI Information page for online COI entry opens. Summary information including your name, TIN (Tax ID), the agency you're associated with, etc. appears in the header of the page. |
|
8.
|
If you need to print the COI form for a specific RY, in the header of the COI Information page, select a RY from the year dropdown; then, click Print COI Form. The form begins downloading as a PDF to your browser for you to save or open to view. |
NOTE: This form will print as pre-filled if a COI has been entered for the RY selected. If no COI information exists for the RY selected, the form will print pre-headed.
|
9.
|
Answer questions 1-10 by selecting either "Yes" or "No". |
|
•
|
If you select "Yes" for a question, the Maintain Policies in Conflict popup opens allowing you to search for and/or add policies in conflict for the selected question. Continue to step 10. |
|
•
|
If you select "No" for a question, one of two things will happen: |
|
•
|
If no policies in conflict are currently showing beneath that question, the "No" option will be selected. Then, you can answer any remaining questions. |
|
•
|
If there are policies in conflict showing beneath that question, the Maintain Policies in Conflict popup opens. You must remove any policies listed in the Policies in Conflict or Policies to Verify grids. Skip to step 12. |
|
10.
|
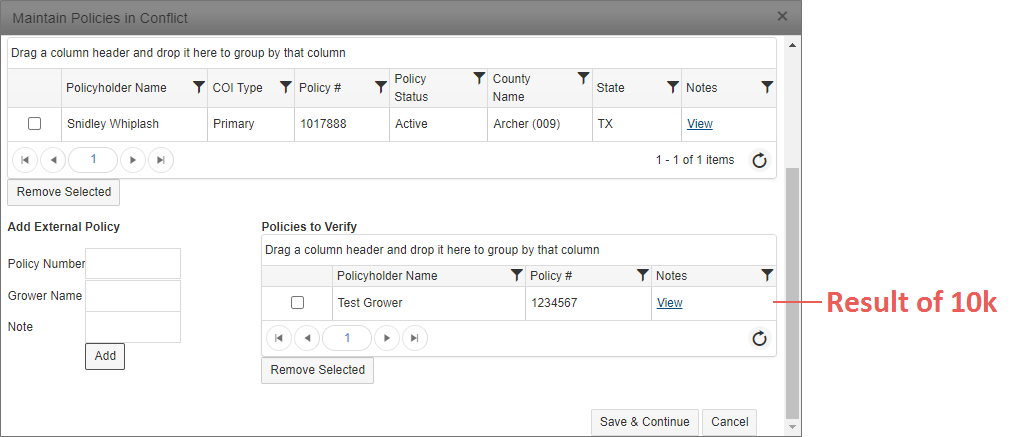
If you need to add policies in conflict on the Maintain Policies in Conflict popup for a question, do so using one of the following two methods: |
 ADDING POLICIES IN CONFLICT USING SEARCH
Use this method to add policies in conflict to the Maintain Policies in Conflict popup if the policies being added exist in the System and you are allowed to view them (e.g., you aren't restricted from viewing the agency the policies are under).
|
a.
|
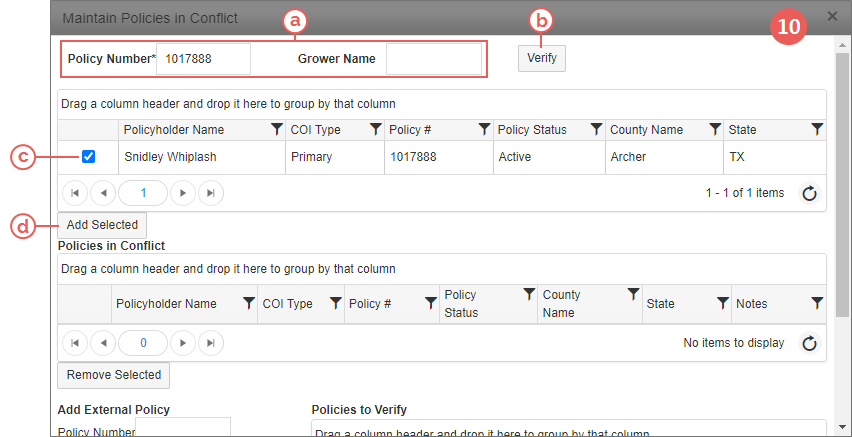
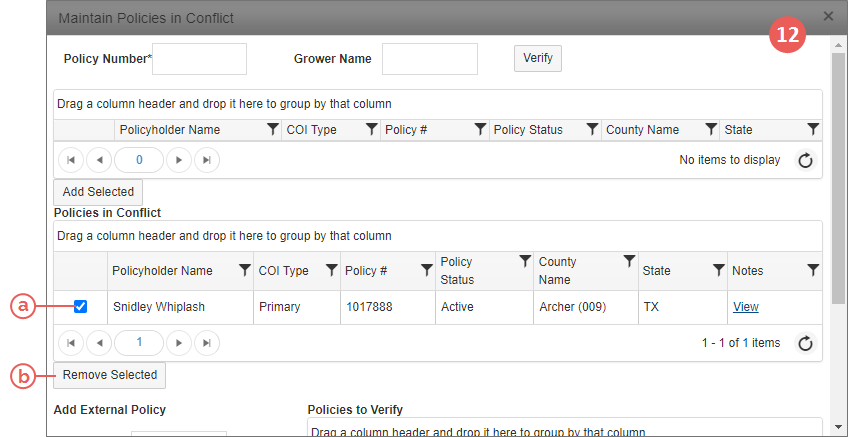
At the top of the Maintain Policies in Conflict popup, search for policies in one of two ways: |
|
•
|
To search for policies by policy number, in Policy Number, type the full, 7-digit policy number you want to search for and continue to step b. |
NOTE: When searching for policies in conflict to attach using the Policy Number search field, the System looks for the entered policy number in the current RY. If the policy is not found, the System will try to find the policy in the prior RY.
|
•
|
To search for policies by grower name, in Grower Name, type the full or partial last name of the grower you want to search for and continue to step b. |
|
b.
|
Click Verify. Search results (if any) appear in the results grid just below the Policy Number and Grower Name fields. |
NOTE: The results returned by the System for the policy number entered in the Policy Number field include that policy number along with any related policies; related policies are where the Grower OID is the same as the Grower OID on the searched-for policy or the Tax ID of the Grower is the same as the Tax ID of any of the SBIs on the searched-for policy.
|
c.
|
To add policies from the results grid to the Policies in Conflict grid, select the checkboxes for the applicable policies in the results grid. |
|
d.
|
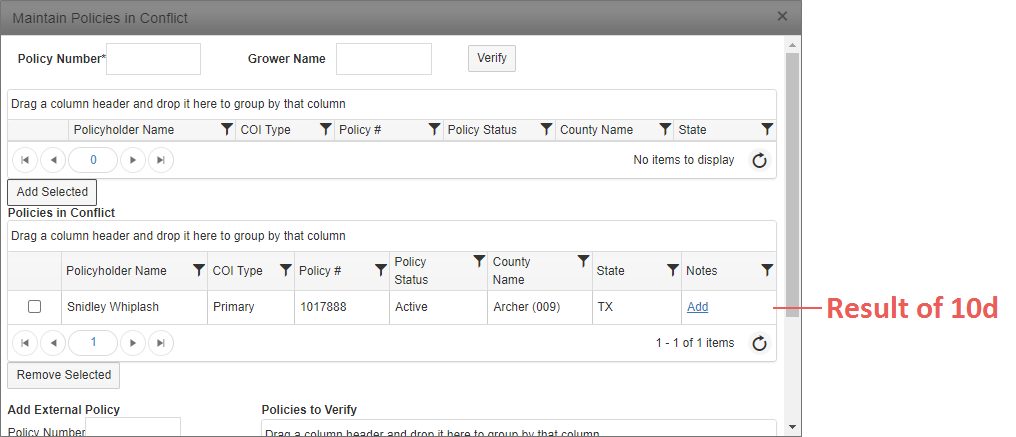
Click Add Selected. A popup opens informing you that the selected policies will be attached to the COI; click OK. The selected policies are moved to the Policies in Conflict grid. |
|
e.
|
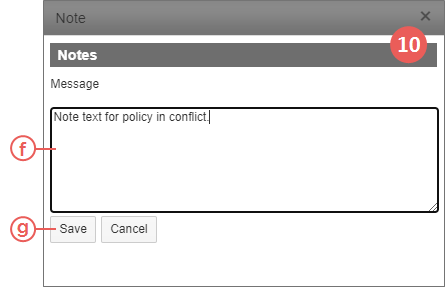
If you need to add notes to a policy in the Policies in Conflict grid, in the Notes column of that grid for the policy, click the Add hyperlink. The Note popup opens. |
|
g.
|
Click Save. You are returned to the Maintain Policies in Conflict popup, and a View hyperlink displays in the Notes column for that policy. Clicking this hyperlink will allow you to view and/or edit the notes for that policy. |
 ADDING EXTERNAL POLICIES IN CONFLICT
Use this method to add policies in conflict to the Maintain Policies in Conflict popup if the policies being added do not exist in the System (i.e., are external policies or have not been added to the System yet) or you are not allowed to view them (i.e., you are restricted from viewing the agency the policies are under). Any policies in conflict added using these steps will be flagged in the System as needing verification from the AIP.
|
h.
|
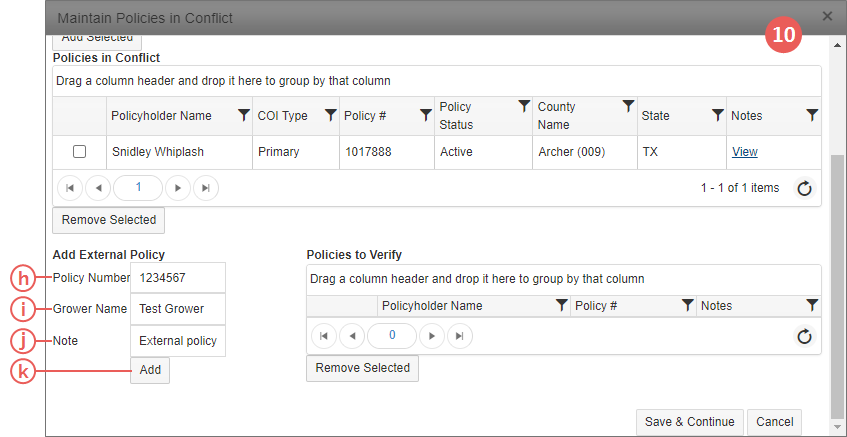
In the Add External Policy area of the Maintain Policies in Conflict popup, if you have a policy number, type it in Policy Number. This field is optional. |
|
i.
|
In Grower Name, type the grower's name. This field is required. |
|
j.
|
If applicable, to add a note with the grower's name and policy, in Note, type the note. |
NOTE: If a note is added to a grower/policy with this field, the note will be viewable by clicking the View hyperlink in the Notes column of the Policies to Verify grid once the grower/policy is added to that grid in the next step.
|
k.
|
Click Add. The grower/policy is added to the Policies to Verify grid. |
|
l.
|
If you need to add notes to a grower/policy in the Policies to Verify grid and did not add them using the Note field in step j above, in the Notes column of that grid for the policy, click the Add hyperlink. The Note popup opens. |
|
n.
|
Click Save. You are returned to the Maintain Policies in Conflict popup, and a View hyperlink displays in the Notes column for that grower/policy. Clicking this hyperlink will allow you to view the notes for that grower/policy. |
|
11.
|
When done adding policies in conflict for a question in the Maintain Policies in Conflict popup, click Save & Continue. You are returned to the COI Information page and the policies in conflict you added display under that particular question. Any external policies in conflict display with an asterisk (*). |
NOTE: If you need to change the policies in conflict for a question after you've clicked Save & Continue, click the green plus sign (+) that displays in front of the policy numbers beneath each question.
|
•
|
If you need to remove previously-added policies in conflict from the Maintain Policies in Conflict popup for a question, continue to step 12. |
|
•
|
If you are done answering questions 1-10 and adding/removing policies in conflict to/from questions 1-10, skip to step 14. |
|
12.
|
If you need to remove policies in conflict on the Maintain Policies in Conflict popup for a question, do one of the following based on which grid the policies are in: |
 REMOVING POLICIES IN CONFLICT FROM THE POLICIES IN CONFLICT GRID
|
a.
|
In the Policies in Conflict grid on the Maintain Policies in Conflict popup, select the checkboxes for the policies you need to remove. |
|
b.
|
Click Remove Selected. A popup opens asking you to verify you want to remove the selected policies from the COI. |
|
c.
|
Click OK. You are returned to the Maintain Policies in Conflict popup, and the selected policies are removed. |
 REMOVING POLICIES IN CONFLICT FROM THE POLICIES TO VERIFY GRID
|
d.
|
In the Policies to Verify grid on the Maintain Policies in Conflict popup, select the checkboxes for the policies you need to remove. |
|
e.
|
Click Remove Selected. A popup opens asking you to verify you want to remove the selected policies from the COI. |
|
f.
|
Click OK. You are returned to the Maintain Policies in Conflict popup, and the selected policies are removed. |
|
13.
|
When done removing policies in conflict for a question, click Save & Continue. You are returned to the COI Information page and the policies you removed no longer display under that particular question. |
|
•
|
If you need to add policies in conflict to the Maintain Policies in Conflict popup for a question, return to step 10. |
|
•
|
If you are done answering questions 1-10 and adding/removing policies in conflict to/from questions 1-10, continue to step 14. |
|
14.
|
For question 11, select either "Yes" or "No". |
|
•
|
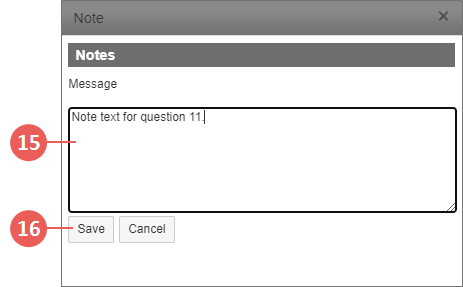
If you select "Yes", the Note popup will open. Continue to step 15. |
|
•
|
If you select "No", skip to step 17. |
|
15.
|
Enter any notes for question 11. |
|
16.
|
Click Save. You are returned to the COI Information page. |
|
17.
|
When you have answered questions 1-11 on the COI Information page and are satisfied with your entries, click Complete Certification. Your answers are submitted, and you are directed to the COI Certification page with the Certification statements. The System embeds the Full Name from your user profile in the Discloser's Name field and in the first statement in the Certification Statements section. The System also pre-fills the electronically-certified date with the current System date. |
|
18.
|
From here, you can save, exit, or return to the COI Information page by clicking one the following buttons: |
|
•
|
Cancel: Click this button to return to the COI Information page without saving your COI. A popup opens informing you that your COI was not submitted to the AIP. Click OK to continue or Cancel to close the popup and return to the COI Certification page. The COI form will not attach to your entity disclosure record, and your answers will not be saved in the Online Disclosure Entry tool. |
|
•
|
Return to COI Screen: Click this button to return to the COI Information page without saving/attaching the COI form to your entity disclosure record. A popup opens informing you that your COI was not submitted to the AIP. Click OK to continue or Cancel to close the popup and return to the COI Certification page. Your answers to questions and policies in conflict entered previously will display on the COI Information page. |
|
•
|
Save & Print: Click this button to save and attach the completed COI form to your entity disclosure record. A popup opens confirming your COI was successfully submitted to the AIP. Click OK to continue. A PDF of the completed COI form will begin downloading to your browser so you can save or open it to view. Additionally, you will be returned to the COI Information page. |
|
•
|
Save & Return to COI Screen: Click this button to save and attach the completed COI form to your entity disclosure record and return to the COI Information page where your previously-entered answers and policies in conflict display. A popup opens confirming your COI was successfully submitted to the AIP. Click OK to close the popup and return to the COI Information page. |
NOTE: If modifications need to be made after submitting, you will need to go through the same process of entry, and upon completion, the System will put the updated electronic signature dates in the "Amended Dates" fields in the header of the Online COI.


