Related
Add Signatures via Signature Maintenance
All Reinsurance Years
In the System, there are several locations where an insured and agent signature is required. To help users quickly apply and maintain signatures to an Application, Acreage Report, or Production Report, the System features a Signature Maintenance tool.
This tool, accessed from the Detail Lines tab of a policy, permits a user to apply insured and agent signature dates to all detail lines on a coverage within a given reporting date and also correct an original sign date or revise a signature date. A user can also change the Agent of Record on a policy from this tool.
| 1. | Locate and open the policy that contains the coverage you need to add a signature to. The policy opens on the Coverages tab. |
| 2. | Select the Detail Lines tab. |
| 3. | On the Detail Lines tab, from the dropdown below the Detail Line Information heading, select "Signature Maintenance". The Maintain Signatures page opens. |
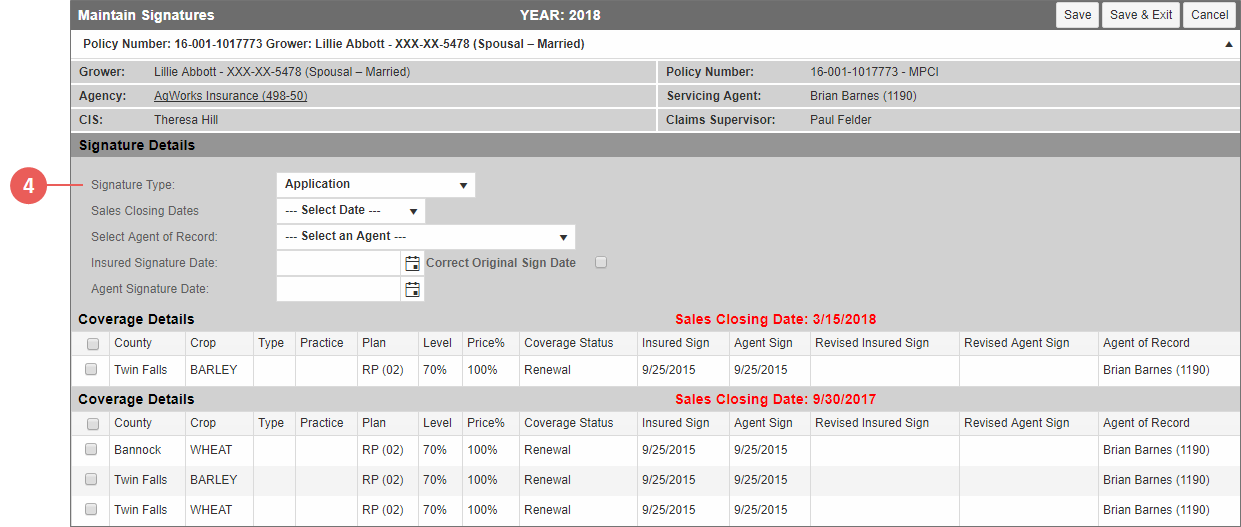
| 4. | From the Signature Type dropdown, select "Application". For easy reference, one or more grids display below the Signature Details section for each Sales Closing Date that a County/Crop on the coverage belongs to. The Sales Closing Date displays in red text in the banner of each grid. |
| 5. | If desired, from the Sales Closing Date dropdown, select the Sales Closing Date for which you want to apply application signatures to. The dates available in this dropdown match the dates shown on the Coverage Details grid(s) below. If you don't select a single Sales Closing Date, all dates will appear below the Signature Details section and a signature date can be applied to all selected as mentioned in step 9. |
| 6. | From the Select Agent of Record dropdown, select the agent who is signing the application. |
NOTE: When applicable, this is also the location in the System where the Agent of Record should be updated for a coverage (the Servicing Agent will not be changed).
| 7. | In the Insured Signature Date and Agent Signature Date fields, type the dates the insured and agent signed the policy in MMDDYYYY format or click the calendar button to open the calendar and select a signature date. |
NOTE: Dates specified here will be the Original Date unless one already exists. If one already exists, the specified dates will be considered the Revised Dates. If a Revised Date needs to be applied to an individual detail line, then it must be entered from the View or Maintain Detail Lines pages.
| 8. | If you are correcting the original sign date for the application, mark the Correct Original Sign Date checkbox. |
| 10. | As your next step, click one of the following buttons: |
| • | To save the signatures and remain on the Maintain Signatures page, click Save. |
| • | To save the signatures and return to the View MPCI Detail Lines page, click Save & Exit. |
| • | To discard the signatures and return to the View MPCI Detail Lines page, click Cancel. |
| 1. | Locate and open the policy that contains the coverage you need to add a signature to. The policy opens on the Coverages tab. |
| 2. | Select the Detail Lines tab. |
| 3. | On the Detail Lines tab, from the dropdown below the Detail Line Information heading, select "Signature Maintenance". The Maintain Signatures page opens. |
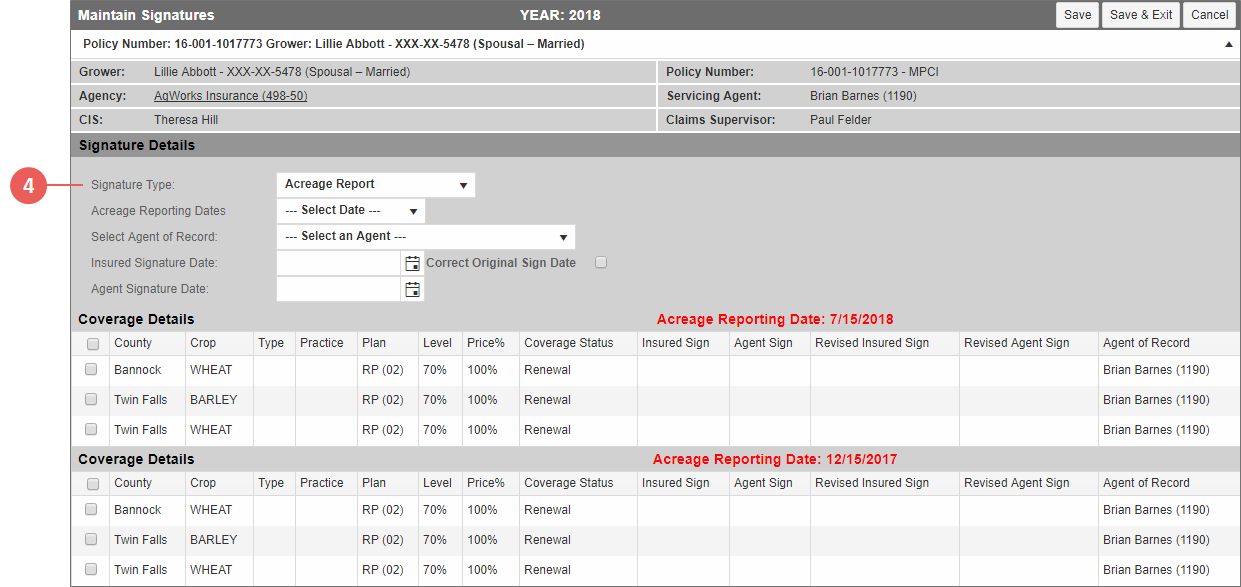
| 4. | From the Signature Type dropdown, select "Acreage Report". For easy reference, one or more grids display below the Signature Details section for each reporting date that a County/Crop on the coverage belongs to. The Acreage Reporting Date displays in red text in the banner of each grid. |
| 5. | If desired, from the Acreage Reporting Dates dropdown, select the Acreage Reporting Date for which you want to apply application signatures to. The dates available in this dropdown match the dates shown on the Coverage Details grid(s) below.If you don't select a single Acreage Reporting Date, all dates will appear below the Signature Details section and a signature date can be applied to all selected as mentioned in step 9. |
| 6. | From the Select Agent of Record dropdown, select the agent who is signing the acreage report. |
NOTE: When applicable, this is also the location in the System where the Agent of Record should be updated for a coverage (the Servicing Agent will not be changed).
| 7. | In the Insured Signature Date and Agent Signature Date fields, type the dates the insured and agent signed the acreage report in MMDDYYYY format or click the calendar button to open the calendar and select a signature date. |
NOTE: Dates specified here will be the Original Date unless one already exists. If one already exists, the specified dates will be considered the Revised Dates. If a Revised Date needs to be applied to an individual detail line, then it must be entered from the View or Maintain Detail Lines pages.
| 8. | If you are correcting the original sign date for the acreage report, mark the Correct Original Sign Date checkbox. |
| 10. | As your next step, click one of the following buttons: |
| • | To save the signatures and remain on the Maintain Signatures page, click Save. |
| • | To save the signatures and return to the View MPCI Detail Lines page, click Save & Exit. |
| • | To discard the signatures and return to the View MPCI Detail Lines page, click Cancel. |
Once an Acreage Reporting Signature Date has been entered and saved, the System will also mark the Request CIMS checkbox for the crop at the policy level. This flag can be seen when editing the coverage.
| 1. | Locate and open the policy that contains the coverage you need to add a signature to. The policy opens on the Coverages tab. |
| 2. | Select the Detail Lines tab. |
| 3. | On the Detail Lines tab, from the dropdown below the Detail Line Information heading, select "Signature Maintenance". The Maintain Signatures page opens. |
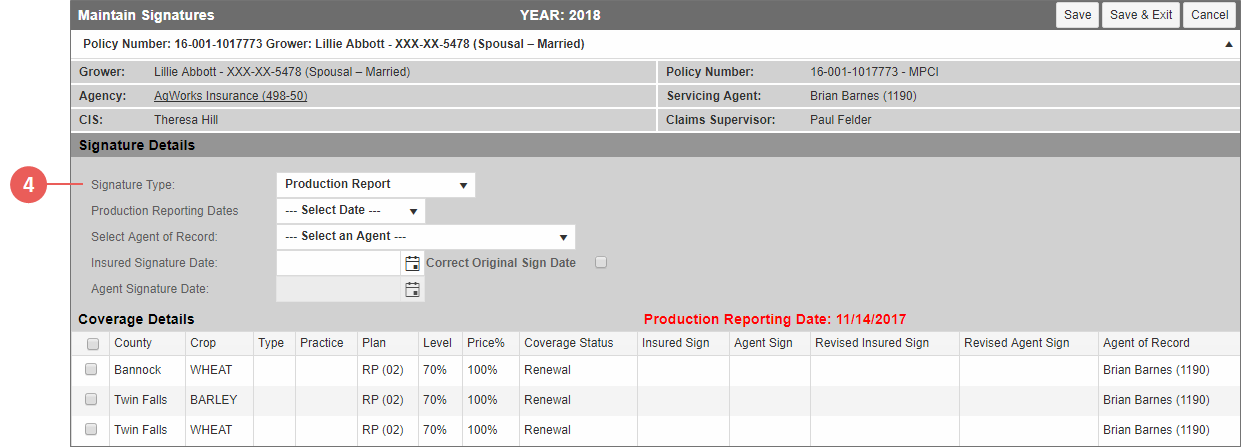
| 4. | From the Signature Type dropdown, select "Production Report". For easy reference, one or more grids display below the Signature Details section for each Production Reporting Date that a County/Crop on the coverage belongs to. The Production Reporting Date displays in red text in the banner of each grid. |
| 5. | If desired, from the Production Reporting Date dropdown, select the Production Reporting Date for which you want to apply signatures to. The dates available in this dropdown match the dates shown on the Coverage Details grid(s) below. If you don't select a single Production Reporting Date, all dates will appear below the Signature Details section and a signature date can be applied to all selected as mentioned in step 9. |
| 6. | From the Select Agent of Record dropdown, select the agent who is signing the production report. |
NOTE: When applicable, this is also the location in the System where the Agent of Record should be updated for a coverage (the Servicing Agent will not be changed).
| 7. | In the Insured Signature Date and Agent Signature Date fields, type the dates the insured and agent signed the production report in MMDDYYYY format or click the calendar button to open the calendar and select a signature date. |
NOTE: Dates specified here will be the Original Date unless one already exists. If one already exists, the specified dates will be considered the Revised Dates. If a Revised Date needs to be applied to an individual detail line, then it must be entered from the View or Maintain Detail Lines pages.
| 8. | If you are correcting the original sign date for the production report, mark the Correct Original Sign Date checkbox. |
| 10. | As your next step, click one of the following buttons: |
| • | To save the signatures and remain on the Maintain Signatures page, click Save. |
| • | To save the signatures and return to the View MPCI Detail Lines page, click Save & Exit. |
| • | To discard the signatures and return to the View MPCI Detail Lines page, click Cancel. |


