|
1.
|
Locate and open the policy that you need to add an Apple Trees coverage to. The View MPCI Policy page opens on the Coverages tab. |
|
2.
|
Click Add MPCI Coverage. The Add New Coverage page opens. |
|
3.
|
The Policy State displays as the state selected for the policy. If this state is incorrect, you must create a new policy in the state needed. If this state is correct, continue to the next step. |
The System validates your selections for County Name, Crop Name, Crop Plan, and Coverage Level and modifies the available fields and the options within each.
|
4.
|
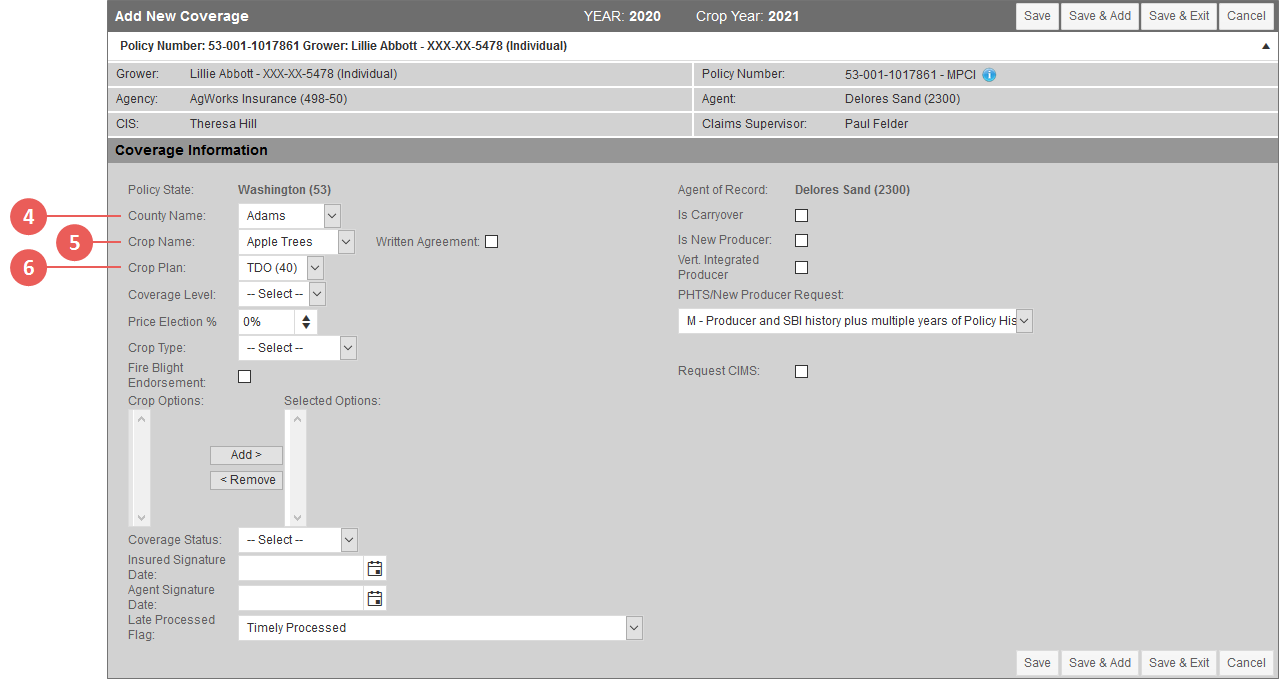
From the County Name dropdown, select the county for the coverage. The Crop Name field may refresh based on the county selected. |
|
5.
|
From the Crop Name dropdown, select "Apple Trees". |
|
6.
|
From the Crop Plan dropdown, select "TDO (40)". The Crop Type dropdown displays on the page below the Price Election % field. |
|
7.
|
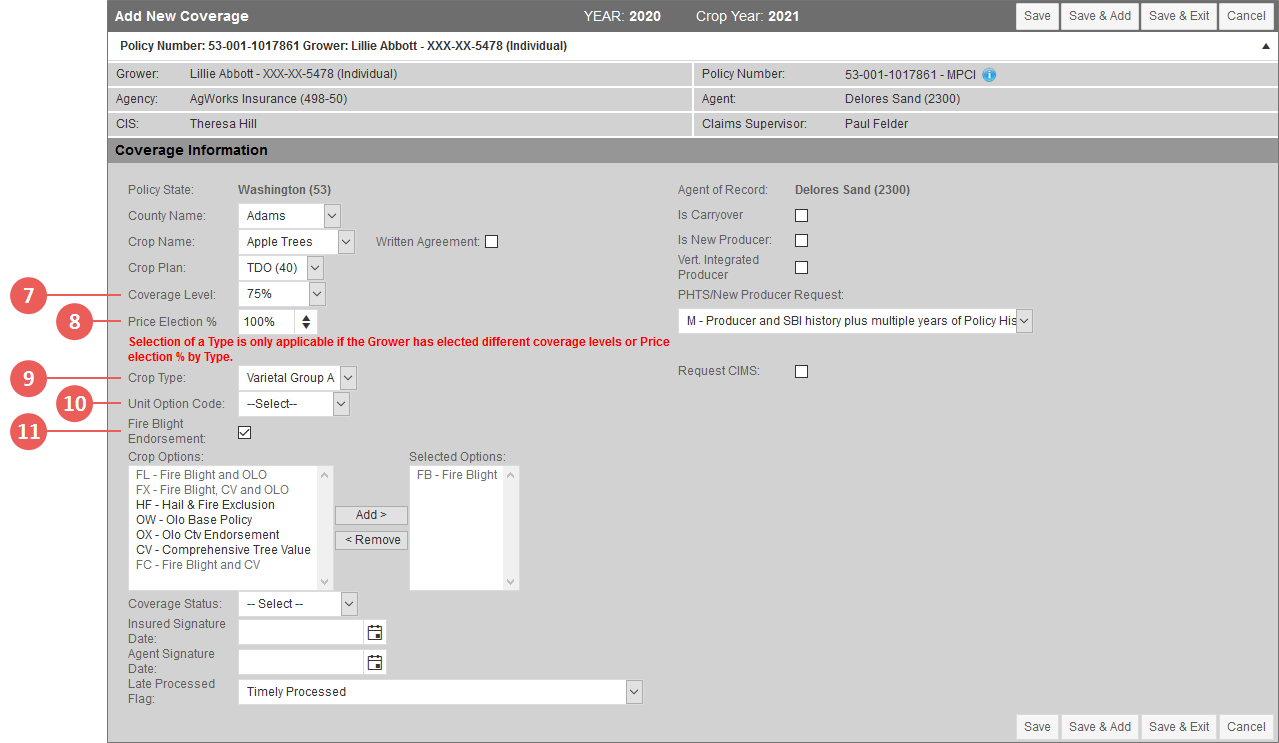
From the Coverage Level dropdown, select the coverage level for the coverage. |
|
•
|
If you selected any coverage level besides "CAT (50%)", the Price Election % field defaults to 100%, and the Unit Option Code dropdown displays on the page below the Price Election % field. Continue to the next step. |
|
•
|
If you selected the "CAT (50%)" coverage level, the Price Election % field defaults to 55% and cannot be edited, and the Crop Type dropdown is removed from the page. Additionally, all options in the Crop Options selection boxes are removed, and the Fire Blight Endorsement checkbox is removed. Skip to step 14. |
|
8.
|
If you selected any coverage level besides "CAT (50%)" in the previous step and you need to update the price election percentage from the default "100%", in the Price Election % field, type the applicable value as a whole number (e.g., type 95 for 95%) or use the arrows to move the value up and down. |
|
9.
|
If you selected any coverage level besides "CAT (50%)" in step 7 and the grower has elected different coverage levels or price election % by type, from the Crop Type dropdown, select the varietal group for the coverage. |
|
|
If the grower has NOT elected different coverage levels or price election % by type, you do NOT have to select a varietal group from this dropdown. |
NOTE: If a varietal group is selected from the Crop Type dropdown, a bold red message will display above the dropdown that reads, "Selection of a Type is only applicable if the Grower has elected different coverage levels or Price election % by Type."
|
10.
|
If you selected any coverage level besides "CAT (50%)" in step 7 and a unit option code applies, from the Unit Option Code dropdown, select the applicable code. This dropdown is optional. |
|
11.
|
If you selected any coverage level besides "CAT (50%)" in step 7, for the Fire Blight Endorsement checkbox, do one of the following: |
|
•
|
If the state your policy is in requires the Fire Blight Endorsement to be selected, the Fire Blight Endorsement checkbox will be selected by default. If the Apple Trees on the coverage are under an organic practice, you'll need to unselect this checkbox. The FB option will be removed from the Selected Options box and added to the Crop Options box. Continue to the next step. |
|
•
|
If the state your policy is in does not require the Fire Blight Endorsement to be selected, the Fire Blight Endorsement checkbox will be unselected by default. If the Apple Trees on the coverage are not under an organic practice and the grower wants to elect the Fire Blight Endorsement, select this checkbox. The FB option is moved from the Crop Options box to the Selected Options box. Continue to the next step. |
|
12.
|
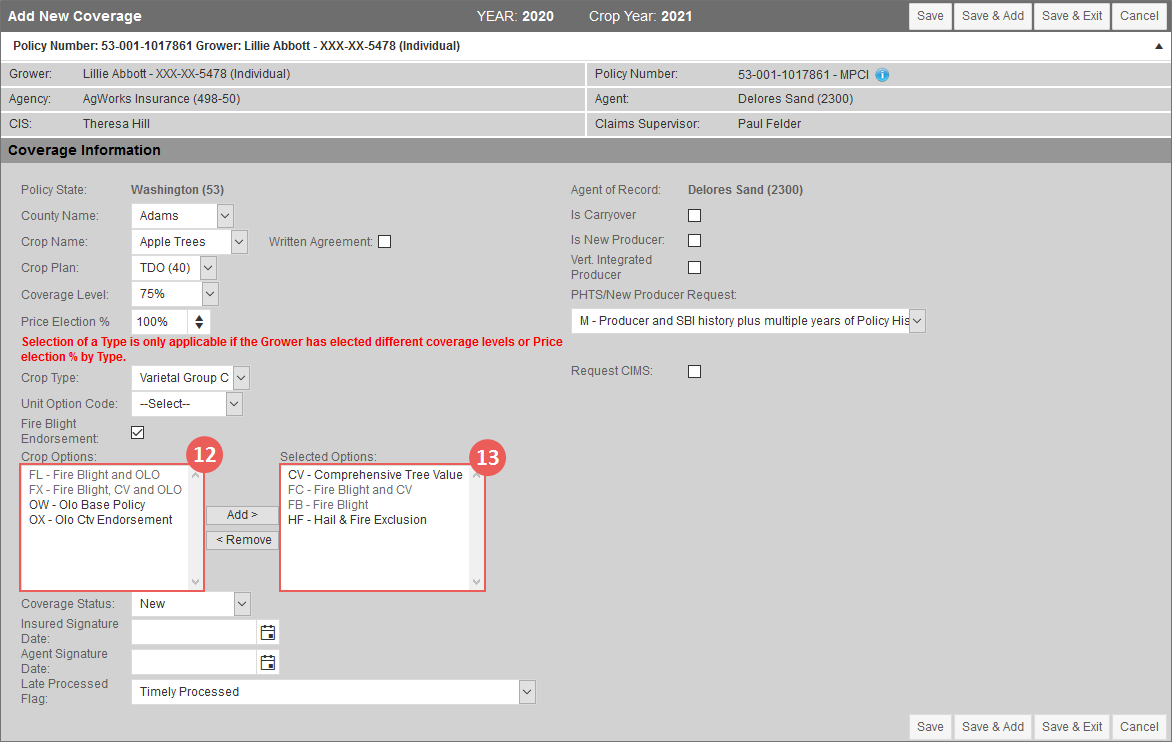
If the grower wants to elect any crop options, in the Crop Options box, select the options the grower wants to elect and click Add >. The selected options are added to the Selected Options box. |
|
|
Fire Blight options display as grayed out and can only be moved to the Selected Options box by the System. Because Fire Blight can be combined with different options, the System will automatically select the applicable Fire Blight options/combinations based on other selections you make. For example, if the Fire Blight checkbox is selected, the FB option will automatically move from the Crop Options box to the Selected Options box. If you also select the CV option, the System will automatically move the FC option to the Selected Options box along with the CV option separately. |
NOTE: Not all crop options can be selected together. If a specific combination is not allowable, the System will alert you when you try to save the coverage.
|
13.
|
To remove a selected crop option, in the Selected Options box, select the options you want to remove and click < Remove. The selected options are moved back to the Crop Options box. |
|
|
Using the example given in the previous step, if you added the CV option to the Selected Options box with the Fire Blight Endorsement checkbox selected and remove the CV option from the Selected Options box in this current step, the FC option will also be removed from the Selected Options box and added back to the Crop Options box. |
NOTE: The FB option can only be removed from the Selected Options box by unselecting the Fire Blight Endorsement checkbox.
|
14.
|
From the Coverage Status dropdown, indicate whether the coverage was an internal transfer, new, or a transfer in. |
|
15.
|
In the Insured Signature Date field, if available, type the date the Insured signed the coverage into effect using DDMMYYYY format or click the calendar button to open the calendar and select the date. |
|
16.
|
In the Agent Signature Date field, if available, type the date the Agent signed the coverage using DDMMYYYY format or click the calendar button to open the calendar and select the date. |
|
17.
|
From the Late Processed Flag dropdown, indicate if this coverage was processed on time or if it needs a late processed flag. |
|
18.
|
The Agent of Record is displayed as indicated on the policy. This field cannot be edited. Continue to the next step. |
|
19.
|
If this policy is a carryover with the same agent from the previous reinsurance year, the Is Carryover is selected. If this policy is not selected but was a transfer from one agent to another within the same AIP, select this checkbox. |
|
20.
|
If the producer qualifies as a new producer, select the Is New Producer checkbox. Then, in the New Producer Verification Date field that displays, type the date that the new producer status was verified using DDMMYYYY format or click the calendar button to open the calendar and select the date. |
|
21.
|
If the producer is vertically integrated, select the Vert. Integrated Producer checkbox. |
|
22.
|
To request PHTS or New Producer information for the grower from RMA, from the PHTS/New Producer Request dropdown, select an appropriate option. |
|
23.
|
To request CIMS data from RMA, select the Request CIMS checkbox. If CIMS data has already been requested, this field displays as "CIMS Data Requested". |
|
24.
|
For your next step, click one of the following buttons: |
|
•
|
To save the coverage and remain on the Add New Coverage page, click Save. |
|
•
|
To save the coverage and open a new Add New Coverage page to add another coverage, click Save & Add. |
|
•
|
To save the coverage and return to the View MPCI Policy page, click Save & Exit. |
|
•
|
To discard the coverage and return to the View MPCI Policy page, click Cancel. |
This functionality does not apply to the selected Reinsurance Year.


