Related
Add Apiculture Coverage
All Reinsurance Years
| 1. | Locate and open the policy that you need to add Apiculture coverage to. The View MPCI Policy page opens on the Coverages tab. |
| 2. | Click Add MPCI Coverage. The Add New Coverage page opens. |
| 3. | The Policy State displays as the state selected for the policy. If this state is incorrect, you must create a new policy in the state needed. If this state is correct, continue to the next step. |
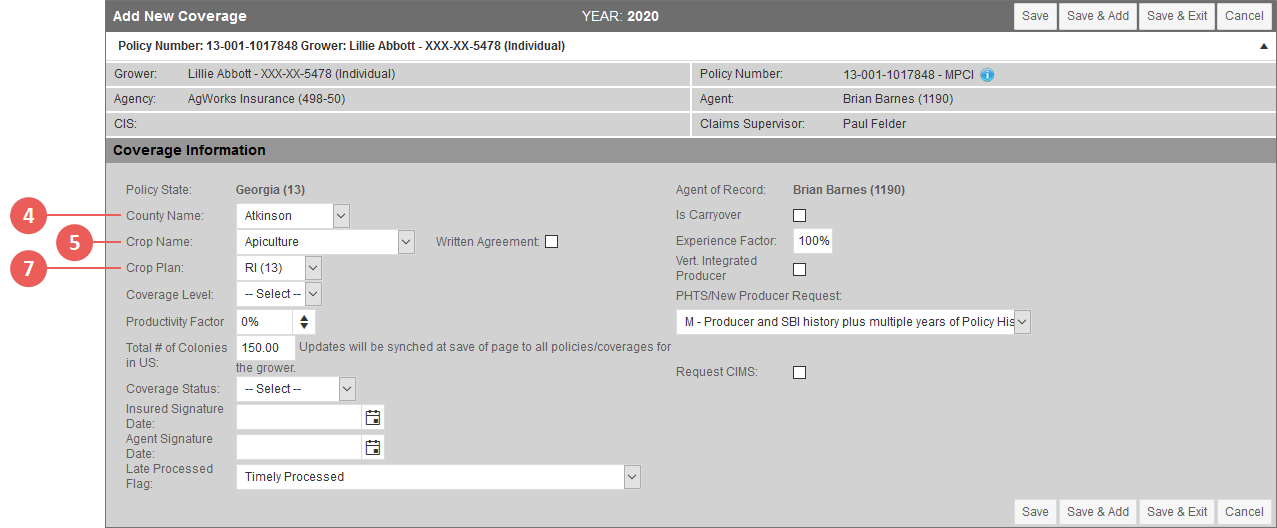
The System validates your selections for County Name, Crop Name, Crop Plan, and Coverage Level and modifies the available fields and the options within each.
| 4. | From the County Name dropdown, select the county for the coverage. The Crop Name field may refresh based on the county selected. |
| 5. | From the Crop Name dropdown, select "Apiculture". |
| 6. | If the Is Primary County checkbox is displayed below the Crop Name field after selecting the crop, select this box if the grower signed an all-county application and requested that the county shown in the County Name field be the primary county for the application. |
| 7. | From the Crop Plan dropdown, select the available crop plan. The System validates your selection and changes the remaining fields to those that are specific to Apiculture for the State/County/Crop. |
| 8. | From the Coverage Level dropdown, select the level of coverage for the selected Crop Name/Plan/Intended Use. |
| 9. | In the Productivity Factor box, use the arrows to indicate the percentage of the county value the grower expects for the coverage. Choosing 100% indicates that the grower will produce the same as the county yield. You can select a value between 60 and 150 (e.g., 61, 100, 104). |
| 10. | In the Total # of Colonies in US field, type the total numbers of colonies the insured has in the US. This value will be synced at save of page to all Apiculture policies/coverages for the grower. |
| 11. | From the Coverage Status dropdown, indicate whether the coverage was an internal transfer, new, or a transfer in. |
| 12. | In the Insured Signature Date field, if available, type the date the Insured signed the coverage into effect using DDMMYYYY format or click the calendar button to open the calendar and select the date. |
| 13. | In the Agent Signature Date field, if available, type the date the Agent signed the coverage using DDMMYYYY format or click the calendar button to open the calendar and select the date. |
| 14. | From the Late Processed Flag field, indicate if this coverage was processed on time or if it needs a late processed flag. |
| 15. | The Agent of Record is displayed as indicated on the policy. This field cannot be edited. Continue to the next step. |
| 16. | If this policy is a carryover with the same agent from the previous RY, the Is Carryover checkbox is selected. If this policy is not selected but was a transfer from one agent to another within the same AIP, select this checkbox. |
| 17. | Indicate the Experience Factor for the coverage by typing the percentage in the text box. |
| 18. | If the insured is vertically integrated, select the Vert. Integrated Producer checkbox. |
| 19. | To request PHTS or New Producer information for the grower from RMA, from the PHTS/New Producer Request dropdown, select an appropriate option. |
| 20. | To request CIMS data from RMA, select the Request CIMS checkbox. If CIMS data has already been requested, this field displays as "CIMS Data Requested". |
| 21. | For your next step, click one of the following buttons: |
| • | To save the coverage and remain on the Add New Coverage page, click Save. |
| • | To save the coverage and open a new Add New Coverage page to add another coverage, click Save & Add. |
| • | To save the coverage and return to the View MPCI Policy page, click Save & Exit. |
| • | To discard the coverage and return to the View MPCI Policy page, click Cancel. |
